If you’ve been reading this blog in cronological order, you’ll know about the FTDI adapter I made for the Z88. If you don’t read this in order, you’ll know about the Minimus programming I’ve been doing and what the Minimus is (note that I’ve not blogged about that yet… be patient!)
Now to turn it in to something genuinely useful…
I will blog more about the Minimus at a later date, but for now I will just mention that it is virtually Arduino compatible, has a USB interface that can emulate a USB keyboard, has a hardware serial port, as well as a programmable switch and 2 LEDs on board. Oh, and it’s very small.
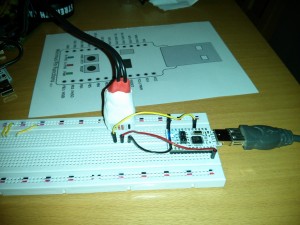
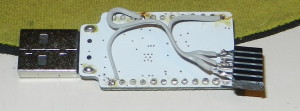
Connecting the Minimus to the Z88 FTDI lead (or, for that matter, any FTDI lead) is very straight forward, needing only Ground, VCC and Tx connecting up. After getting it prototyped on a breadboard, it was time to bring out the soldering iron and make up a little 6 pin socket
Of course, this doesn’t look too neat, and won’t stand the rigorous of time, so out comes a couple of packs of Sugru too;
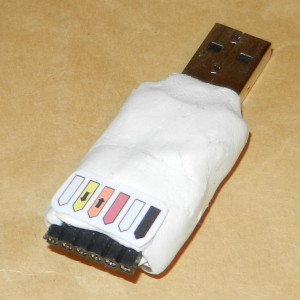
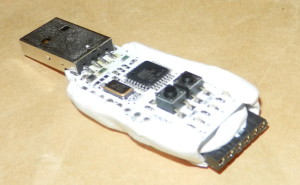
I left the top side pretty much un-Sugru’d so the buttons and LEDs can be accessed easilly.
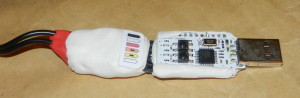
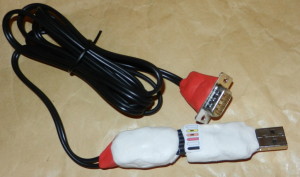
Complete Z88 FTDI lead and Minimus USB adapter
I have programmed 4 modes in to this, which are indicated in binary by the 2 LEDs, using the built in button to change mode.
- Mode 0 – No LEDs – Whatever appears on the serial port is echoed as a character write
- Mode 1 – Blue LED – Add a LF to enter command and converts escape to characters
- Mode 2 – Red LED – Some applications on my Android tablet ignored the second of any double characters (eg type “Hello” and it appears as “Helo”). So this bodge up fixes that
- Mode 3 – Both LEDs – The cursor keys on the Z88 are sent as escape characters. This converts them to arrow keys
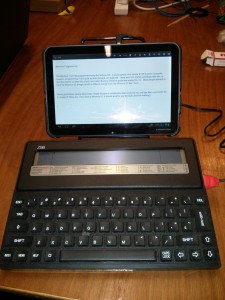
So far, this has been tested with a Motorola Xoom tablet, and it works great as a USB keyboard using the terminal program built in to the Z88. It works great as a USB keyboard on a PC or laptop too! One other really neat trick is to write up your document on the Z88 using Pipedream, and the just printing it directly in to Word or any other application.
HardwareSerial Uart = HardwareSerial();
int Mode = 2;
int RedLed = 5;
int BlueLed = 6;
int Button = 7;
char LastChar = 0;
char escChar = 0;

void setup() {
  // open the serial port:
Uart.begin(38400);
Serial.begin(38400);
  // initialize control over the keyboard:
  Keyboard.begin();
pinMode (RedLed, OUTPUT);
pinMode (BlueLed, OUTPUT);
pinMode (Button, INPUT);
}

void loop() {
  CheckButton();
  if (Mode == 0) {
    Mode0();
  }
  if (Mode == 1) {
    Mode1();
  }
  if (Mode == 2) {
    Mode2();
  }
  if (Mode == 3) {
    Mode3();
  }
}

void CheckButton() {
   if (digitalRead(Button) == LOW) {
    delay(250);
    Mode = Mode+1;
      if (Mode >= 4) {
        Mode = 0;
        }
  Serial.println(Mode);
   }
}

void Mode0() {
  // No LEDs.  Simple passthrough
  digitalWrite (RedLed, HIGH);
  digitalWrite (BlueLed, HIGH);

    if (Uart.available() > 0) {
      char inChar = Uart.read();
      Keyboard.write(inChar);
    }
}

void Mode1() {
  // Blue LED. Adds LF to enter command and converts esc characters
  digitalWrite (RedLed, LOW);
  digitalWrite (BlueLed, HIGH);
  if (Uart.available() > 0) {
    char inChar = Uart.read();
    if (inChar==27) {      //Escape
    delay(5);              //wait for buffer to fill with next char
    if (Uart.available() > 0) {  //read character after escape
    inChar = Uart.read();        //
    }
    inChar = Escape(inChar);     //send char after escape to be converted
    }
    if (inChar==13)              //Carriage Return
      { Keyboard.write(10);      //Writes a Line Feed
      }
      else
        {
        Keyboard.write(inChar);
        }
    }
}

void Mode2() {
  // Red LED. Double letters possible Android
    digitalWrite (RedLed, HIGH);
  digitalWrite (BlueLed, LOW);
    if (Uart.available() > 0) {
    char inChar = Uart.read();
    if (inChar==27) {      //Escape
    delay(5);              //wait for buffer to fill with next char
    if (Uart.available() > 0) {  //read character after escape
    inChar = Uart.read();        //
    }
    inChar = Escape(inChar);     //send char after escape to be converted
    }
    if (inChar==13)              //Carriage Return
      { Keyboard.write(10);      //Writes a Line Feed
      }
      else
        {
        Keyboard.write(inChar);
        }
   // Keyboard.write(inChar);
    if (inChar == LastChar)
    {
      Keyboard.write(inChar);
    }
    LastChar = inChar;
    }
}

void Mode3() {
  // Both LEDs. Debug mode. Writes ascii code to serial port
    digitalWrite (RedLed, LOW);
  digitalWrite (BlueLed, LOW);
    if (Uart.available() > 0) {
    // read incoming serial data:
    char inChar = Uart.read();

    if (inChar==13)
      { Keyboard.write(10);
      }
      else
        {
    Keyboard.write(inChar);
  }
    int ch = inChar;
    Serial.print(ch);
  }
}

char Escape(char escChar){
  Serial.println ("Escape");
    if  (escChar == 65) {   //Up arrow A
      Keyboard.press (KEY_UP_ARROW);
      delay(100);
      Keyboard.releaseAll();
    }
    if  (escChar == 66) {   //Down arrow B
       Keyboard.press (KEY_DOWN_ARROW);
      delay(100);
      Keyboard.releaseAll();
    }
     if  (escChar == 67) {   //Down arrow C
       Keyboard.press (KEY_RIGHT_ARROW);
      delay(100);
      Keyboard.releaseAll();
    }
     if  (escChar == 68) {   //Down arrow D
       Keyboard.press (KEY_LEFT_ARROW);
      delay(100);
      Keyboard.releaseAll();
    }
    return (0);
}