<?xml version="1.0" encoding="utf-8"?>
<feed xmlns="http://www.w3.org/2005/Atom" xmlns:media="http://search.yahoo.com/mrss/">
    <title>sowen.com</title>
    <link href="https://sowen.com/feed.xml" rel="self" />
    <link href="https://sowen.com" />
    <updated>2026-10-23T17:13:36+01:00</updated>
    <author>
        <name>Spencer</name>
    </author>
    <id>https://sowen.com</id>

    <entry>
        <title>Leatherwork Adventures</title>
        <author>
            <name>Spencer</name>
        </author>
        <link href="https://sowen.com/leatherwork-adventures.html"/>
        <id>https://sowen.com/leatherwork-adventures.html</id>

        <updated>2026-04-09T18:57:26+01:00</updated>
            <summary type="html">
                <![CDATA[
                    <!-- wp:paragraph -->
<p>A while ago, YouTube started recommending some ASMR videos of leatherwork being done. Handbags, laptop cases, wallets etc. It was fascinating to watch a leather hide being turned in to wonderful objects through the skills, craftsmanship and obscure processes. Over time I began to recognise the individual steps involved and wondered how hard can this craft be? Luckily, YouTube also has a lot of tutorial videos too, and before I knew it, I ordered a starter kit of tools &amp; fittings and some sample leather.</p>
<!-- /wp:paragraph -->
<p> </p>
<!-- wp:gallery {"linkTo":"file"} -->
<figure class="wp-block-gallery has-nested-images columns-default is-cropped"><!-- wp:image {"id":1457,"sizeSlug":"large","linkDestination":"media"} -->
<figure class="wp-block-image size-large"><a href="https://sowen.com/media/posts/88/wallet02.jpg"><figure class="wp-image-1457"><img loading="lazy"  src="https://sowen.com/media/posts/88/wallet02.jpg" alt="" sizes="(max-width: 768px) 100vw, 768px" srcset="https://sowen.com/media/posts/88/responsive/wallet02-xs.jpg 300w ,https://sowen.com/media/posts/88/responsive/wallet02-sm.jpg 480w ,https://sowen.com/media/posts/88/responsive/wallet02-md.jpg 768w"></figure></a>
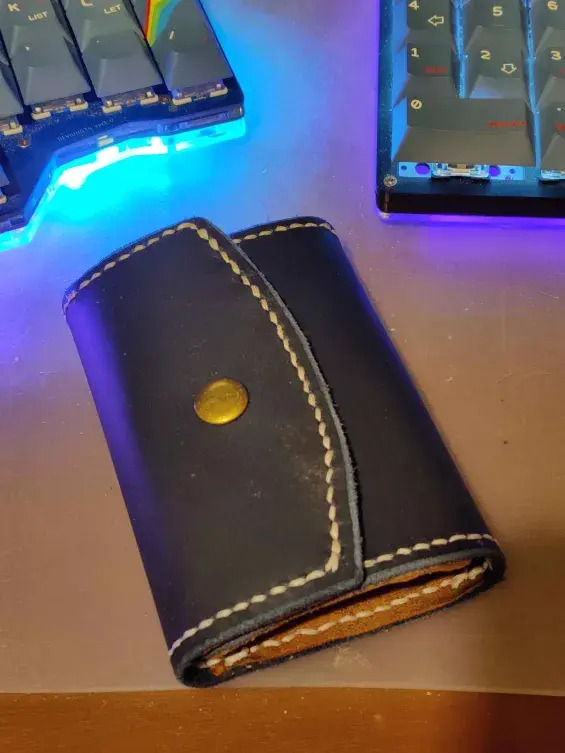
<figcaption class="wp-element-caption">Closed keywallet</figcaption>
</figure>

                ]]>
            </summary>
        <content type="html">
            <![CDATA[
                <!-- wp:paragraph -->
<p>A while ago, YouTube started recommending some ASMR videos of leatherwork being done. Handbags, laptop cases, wallets etc. It was fascinating to watch a leather hide being turned in to wonderful objects through the skills, craftsmanship and obscure processes. Over time I began to recognise the individual steps involved and wondered how hard can this craft be? Luckily, YouTube also has a lot of tutorial videos too, and before I knew it, I ordered a starter kit of tools &amp; fittings and some sample leather.</p>
<!-- /wp:paragraph -->
<p> </p>
<!-- wp:gallery {"linkTo":"file"} -->
<figure class="wp-block-gallery has-nested-images columns-default is-cropped"><!-- wp:image {"id":1457,"sizeSlug":"large","linkDestination":"media"} -->
<figure class="wp-block-image size-large"><a href="https://sowen.com/media/posts/88/wallet02.jpg"><figure class="wp-image-1457"><img loading="lazy"  src="https://sowen.com/media/posts/88/wallet02.jpg" alt="" sizes="(max-width: 768px) 100vw, 768px" srcset="https://sowen.com/media/posts/88/responsive/wallet02-xs.jpg 300w ,https://sowen.com/media/posts/88/responsive/wallet02-sm.jpg 480w ,https://sowen.com/media/posts/88/responsive/wallet02-md.jpg 768w"></figure></a>
<figcaption class="wp-element-caption">Closed keywallet</figcaption>
</figure>
<!-- /wp:image --> <!-- wp:image {"id":1445,"sizeSlug":"large","linkDestination":"media"} -->
<figure class="wp-block-image size-large"><a href="https://sowen.com/media/posts/88/notebook12.jpg"><figure class="wp-image-1445"><img loading="lazy"  src="https://sowen.com/media/posts/88/notebook12.jpg" alt="" sizes="(max-width: 768px) 100vw, 768px" srcset="https://sowen.com/media/posts/88/responsive/notebook12-xs.jpg 300w ,https://sowen.com/media/posts/88/responsive/notebook12-sm.jpg 480w ,https://sowen.com/media/posts/88/responsive/notebook12-md.jpg 768w"></figure></a>
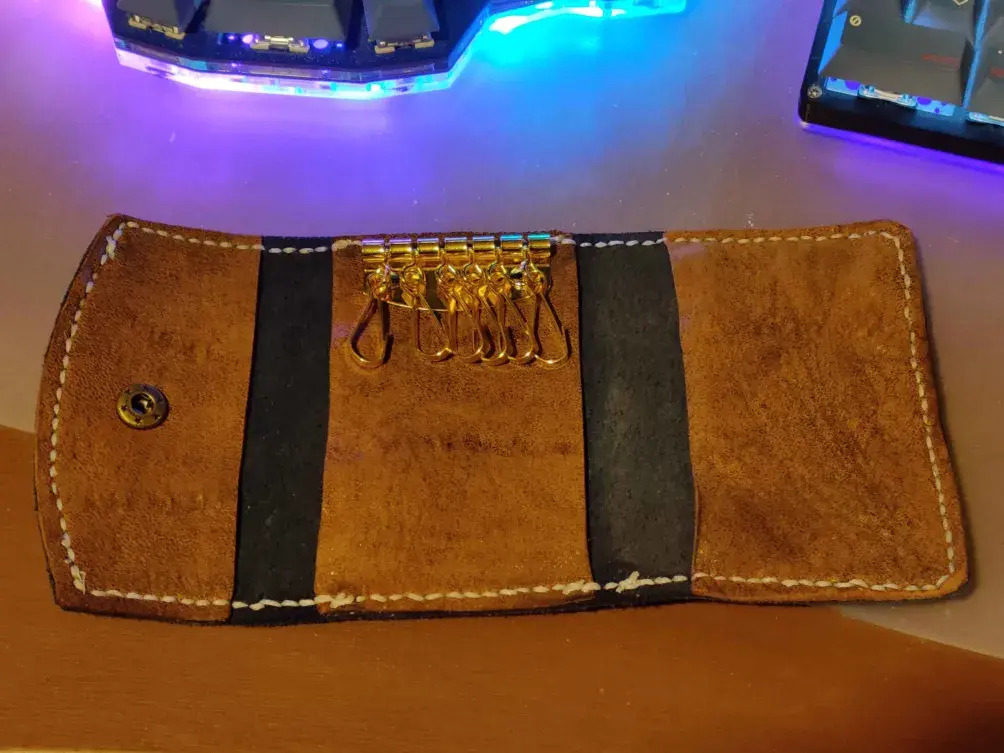
<figcaption class="wp-element-caption">Inside open keywallet</figcaption>
</figure>
<!-- /wp:image --> <!-- wp:image {"id":1455,"sizeSlug":"large","linkDestination":"media"} -->
<figure class="wp-block-image size-large"><a href="https://sowen.com/media/posts/88/wallet01.jpg"><figure class="wp-image-1455"><img loading="lazy"  src="https://sowen.com/media/posts/88/wallet01.jpg" alt="" sizes="(max-width: 768px) 100vw, 768px" srcset="https://sowen.com/media/posts/88/responsive/wallet01-xs.jpg 300w ,https://sowen.com/media/posts/88/responsive/wallet01-sm.jpg 480w ,https://sowen.com/media/posts/88/responsive/wallet01-md.jpg 768w"></figure></a>
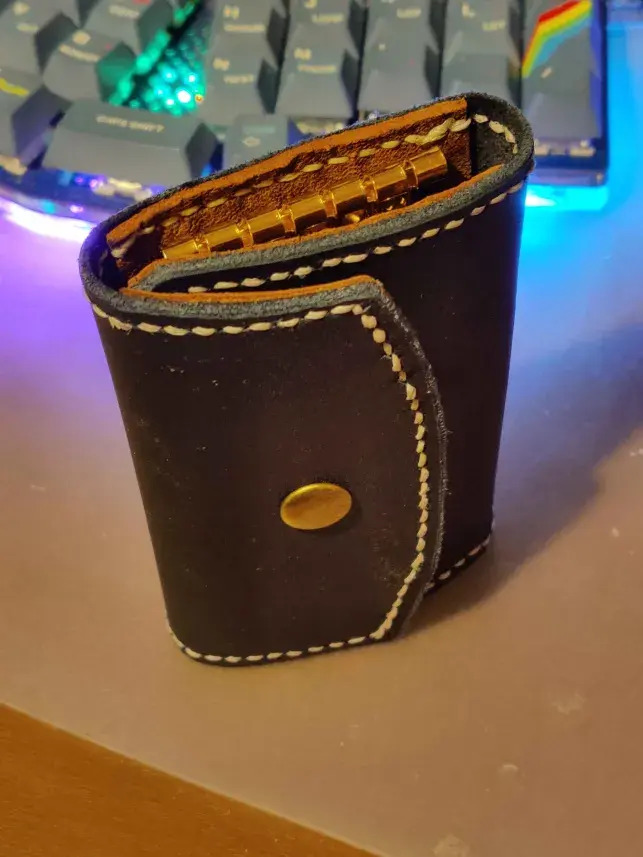
<figcaption class="wp-element-caption">keywallet standing up</figcaption>
</figure>
<!-- /wp:image --> <!-- wp:image {"id":1461,"sizeSlug":"large","linkDestination":"media"} -->
<figure class="wp-block-image size-large"><a href="https://sowen.com/media/posts/88/wallet04.jpg"><figure class="wp-image-1461"><img loading="lazy"  src="https://sowen.com/media/posts/88/wallet04.jpg" alt="" sizes="(max-width: 768px) 100vw, 768px" srcset="https://sowen.com/media/posts/88/responsive/wallet04-xs.jpg 300w ,https://sowen.com/media/posts/88/responsive/wallet04-sm.jpg 480w ,https://sowen.com/media/posts/88/responsive/wallet04-md.jpg 768w"></figure></a>
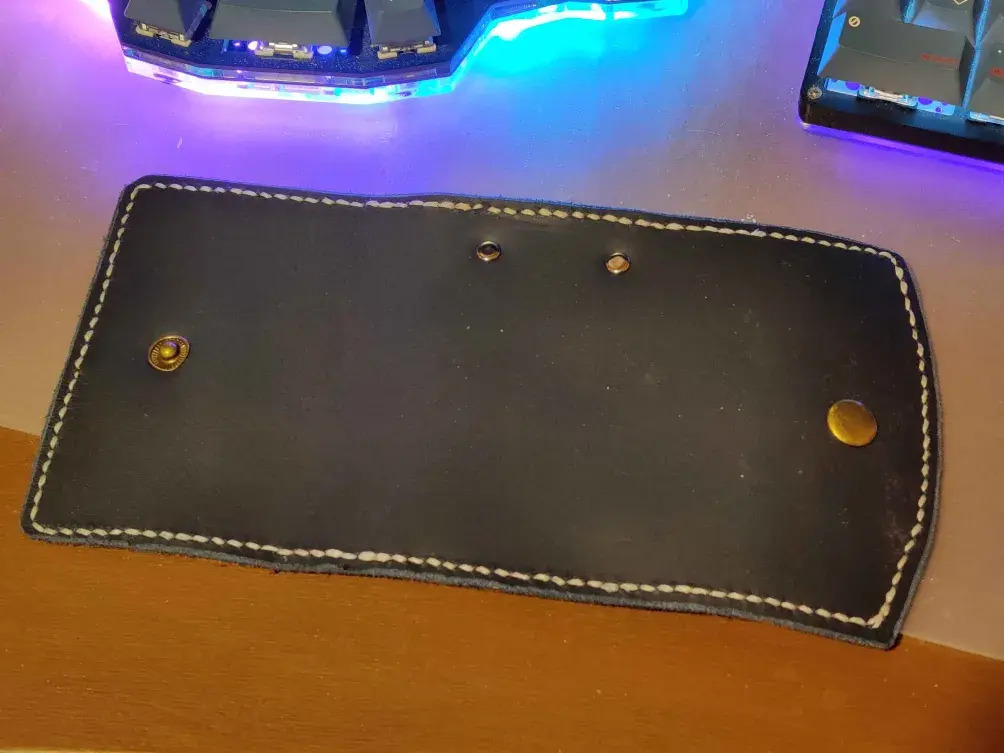
<figcaption class="wp-element-caption">outside of open keywallet</figcaption>
</figure>
<!-- /wp:image --></figure>
<!-- /wp:gallery -->
<p> </p>
<!-- wp:paragraph -->
<p>I was given a bag of leather offcuts by a friend which was great to get to grips with the various tools. The starter kit included a key wallet thingy. Whilst I'm not a fan of these kind of key rings, it was a good starter project. Templates are easy to find online, and over a few evenings, I put the key wallet above together. It is far from perfect. Mistakes were made. Things could and should be done better. But a lot was learned. And I was very happy for the results from my first leather project.</p>
<!-- /wp:paragraph -->
<p> </p>
<!-- wp:more -->
<p>Next up was creating a leather sheath for the skiving knife. It was a pretty simple design and works much better than the flimsy cardboard it came packaged with.</p>
<!-- /wp:paragraph -->
<p> </p>
<!-- wp:paragraph -->
<p>Recently I have had need for a small pocket notebook. The Travellers Notebooks are great and the Passport size refill is perfect. However, a notebook is no use without a pen, so some kind of leather cover with integrated pen loop was in order.</p>
<!-- /wp:paragraph -->
<p> </p>
<!-- wp:gallery {"linkTo":"file"} -->
<figure class="wp-block-gallery has-nested-images columns-default is-cropped"><!-- wp:image {"id":1441,"sizeSlug":"large","linkDestination":"media"} -->
<figure class="wp-block-image size-large"><a href="https://sowen.com/media/posts/88/notebook10.jpg"><figure class="wp-image-1441"><img loading="lazy"  src="https://sowen.com/media/posts/88/notebook10.jpg" alt="" sizes="(max-width: 768px) 100vw, 768px" srcset="https://sowen.com/media/posts/88/responsive/notebook10-xs.jpg 300w ,https://sowen.com/media/posts/88/responsive/notebook10-sm.jpg 480w ,https://sowen.com/media/posts/88/responsive/notebook10-md.jpg 768w"></figure></a>
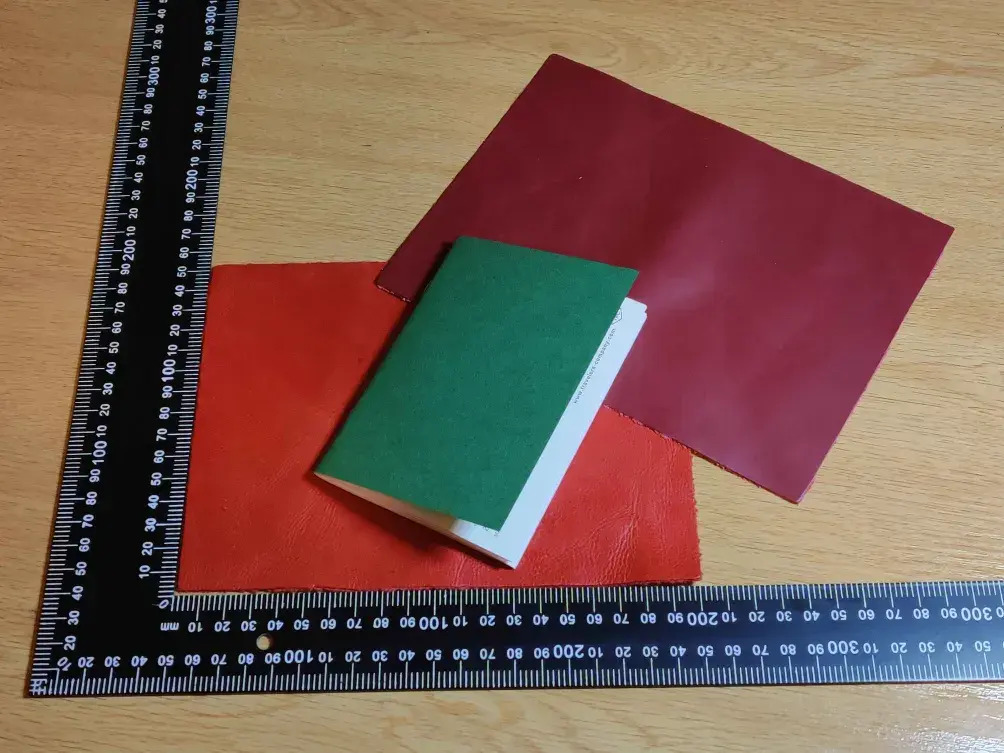
<figcaption class="wp-element-caption">Leather pieces and notebook</figcaption>
</figure>
<!-- /wp:image --> <!-- wp:image {"id":1425,"sizeSlug":"large","linkDestination":"media"} -->
<figure class="wp-block-image size-large"><a href="https://sowen.com/media/posts/88/notebook02.jpg"><figure class="wp-image-1425"><img loading="lazy"  src="https://sowen.com/media/posts/88/notebook02.jpg" alt="" sizes="(max-width: 768px) 100vw, 768px" srcset="https://sowen.com/media/posts/88/responsive/notebook02-xs.jpg 300w ,https://sowen.com/media/posts/88/responsive/notebook02-sm.jpg 480w ,https://sowen.com/media/posts/88/responsive/notebook02-md.jpg 768w"></figure></a>
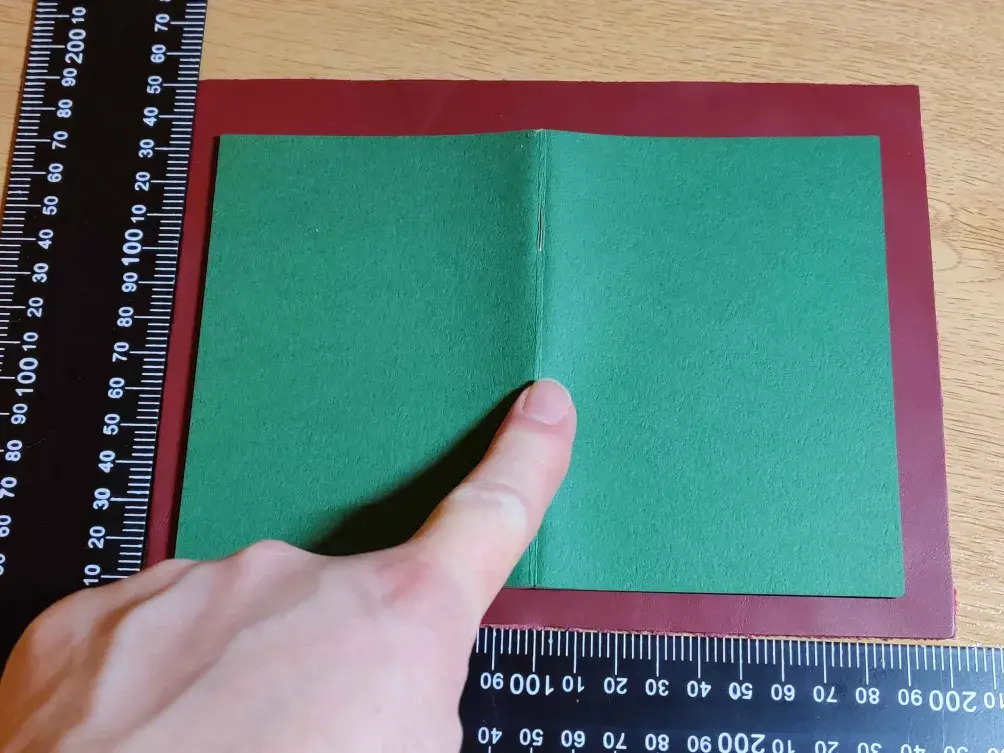
<figcaption class="wp-element-caption">notebook open over leather</figcaption>
</figure>
<!-- /wp:image --> <!-- wp:image {"id":1459,"sizeSlug":"large","linkDestination":"media"} -->
<figure class="wp-block-image size-large"><a href="https://sowen.com/media/posts/88/wallet03.jpg"><figure class="wp-image-1459"><img loading="lazy"  src="https://sowen.com/media/posts/88/wallet03.jpg" alt="" sizes="(max-width: 768px) 100vw, 768px" srcset="https://sowen.com/media/posts/88/responsive/wallet03-xs.jpg 300w ,https://sowen.com/media/posts/88/responsive/wallet03-sm.jpg 480w ,https://sowen.com/media/posts/88/responsive/wallet03-md.jpg 768w"></figure></a>
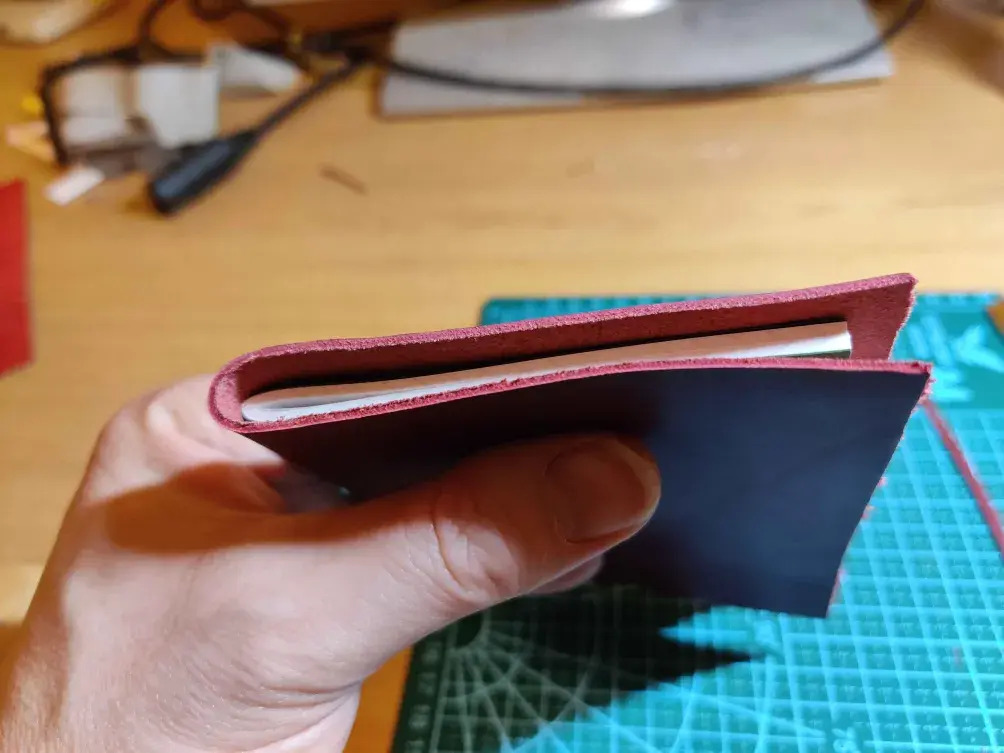
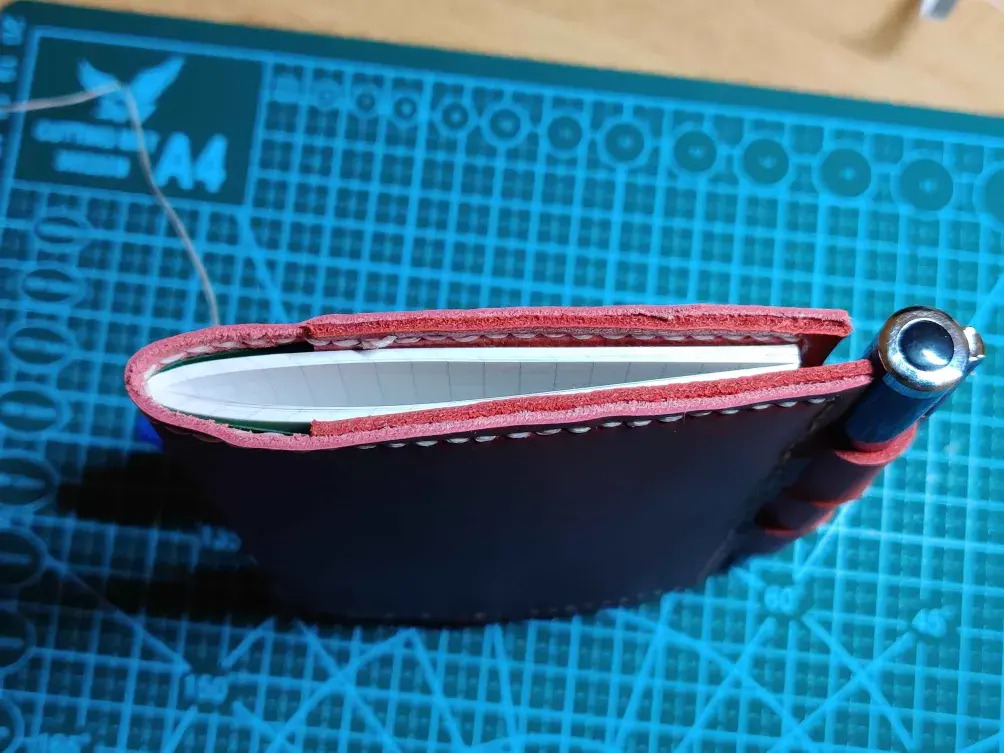
<figcaption class="wp-element-caption">top view to see how well the cover fits</figcaption>
</figure>
<!-- /wp:image --></figure>
<!-- /wp:gallery -->
<p> </p>
<!-- wp:paragraph -->
<p>The sample leather pieces were 200 x 150mm and all different colours. At that size, they are plenty tall enough, but only just wide enough to fit around the passport size Travellers Notebook refill. Certainly there was no room to trim the edges, but the top and bottom could be a few mm shorter. The burgundy piece felt nice and looked great. There wasn't another piece to match for the inside, but going for the red made for a stylish fashion choice.</p>
<!-- /wp:paragraph -->
<p> </p>
<!-- wp:gallery {"linkTo":"file"} -->
<figure class="wp-block-gallery has-nested-images columns-default is-cropped"><!-- wp:image {"id":1443,"sizeSlug":"large","linkDestination":"media"} -->
<figure class="wp-block-image size-large"><a href="https://sowen.com/media/posts/88/notebook11.jpg"><figure class="wp-image-1443"><img loading="lazy"  src="https://sowen.com/media/posts/88/notebook11.jpg" alt="" sizes="(max-width: 768px) 100vw, 768px" srcset="https://sowen.com/media/posts/88/responsive/notebook11-xs.jpg 300w ,https://sowen.com/media/posts/88/responsive/notebook11-sm.jpg 480w ,https://sowen.com/media/posts/88/responsive/notebook11-md.jpg 768w"></figure></a>
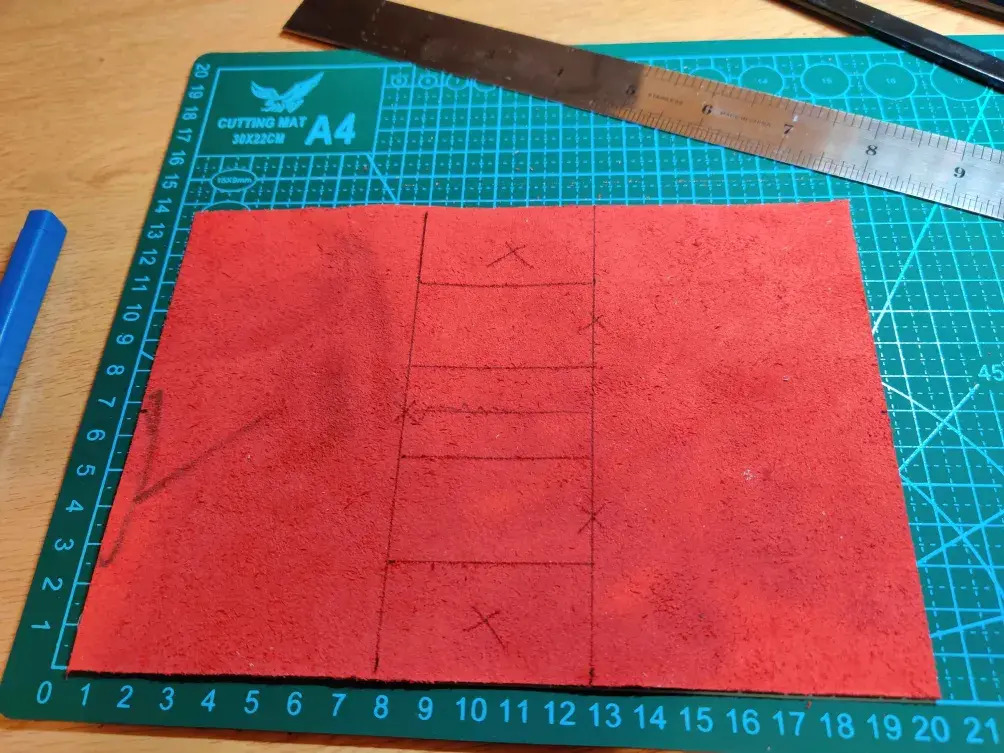
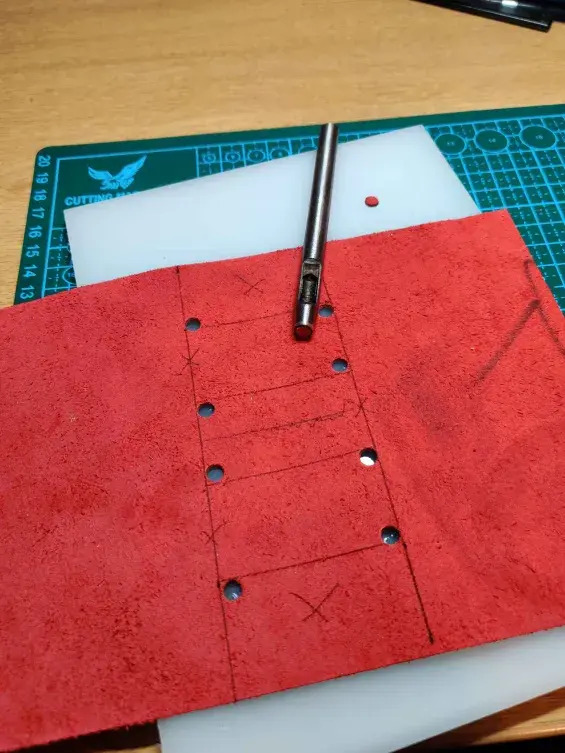
<figcaption class="wp-element-caption">marking the cut lines</figcaption>
</figure>
<!-- /wp:image --> <!-- wp:image {"id":1435,"sizeSlug":"large","linkDestination":"media"} -->
<figure class="wp-block-image size-large"><a href="https://sowen.com/media/posts/88/notebook07.jpg"><figure class="wp-image-1435"><img loading="lazy"  src="https://sowen.com/media/posts/88/notebook07.jpg" alt="" sizes="(max-width: 768px) 100vw, 768px" srcset="https://sowen.com/media/posts/88/responsive/notebook07-xs.jpg 300w ,https://sowen.com/media/posts/88/responsive/notebook07-sm.jpg 480w ,https://sowen.com/media/posts/88/responsive/notebook07-md.jpg 768w"></figure></a>
<figcaption class="wp-element-caption">holes punched</figcaption>
</figure>
<!-- /wp:image --> <!-- wp:image {"id":1451,"sizeSlug":"large","linkDestination":"media"} -->
<figure class="wp-block-image size-large"><a href="https://sowen.com/media/posts/88/notebook15.jpg"><figure class="wp-image-1451"><img loading="lazy"  src="https://sowen.com/media/posts/88/notebook15.jpg" alt="" sizes="(max-width: 768px) 100vw, 768px" srcset="https://sowen.com/media/posts/88/responsive/notebook15-xs.jpg 300w ,https://sowen.com/media/posts/88/responsive/notebook15-sm.jpg 480w ,https://sowen.com/media/posts/88/responsive/notebook15-md.jpg 768w"></figure></a>
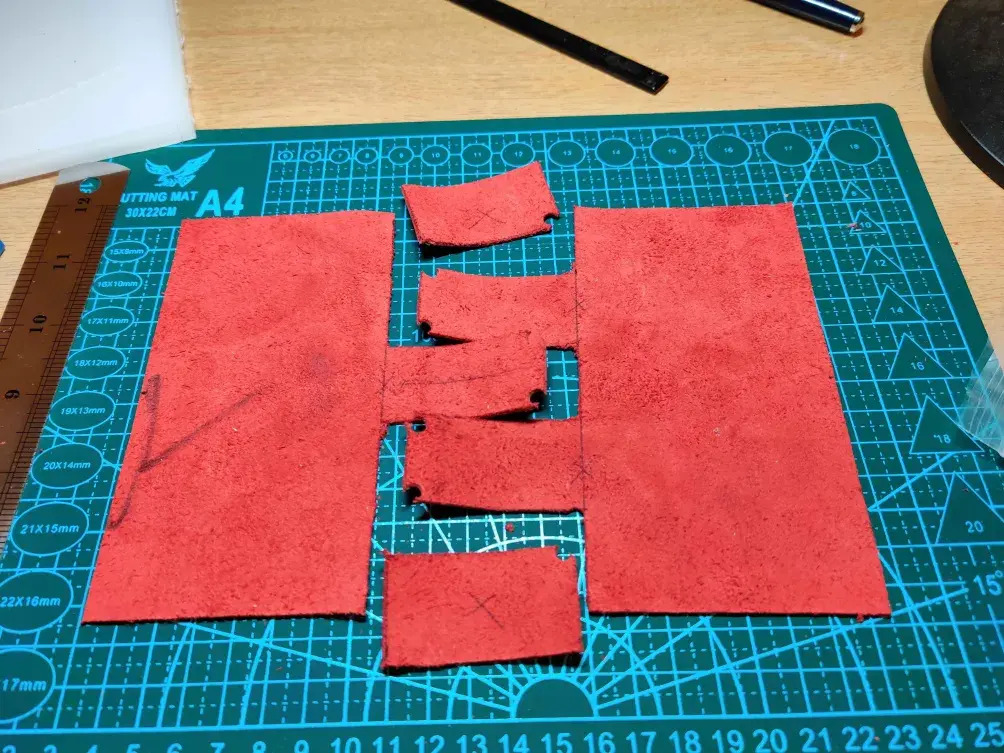
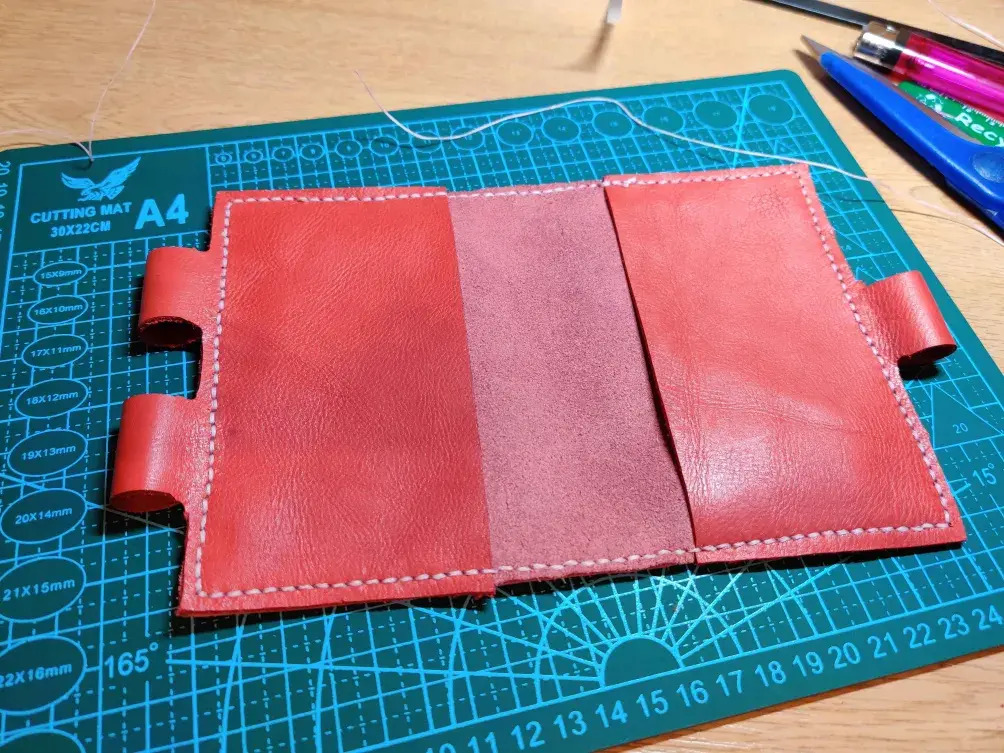
<figcaption class="wp-element-caption">two inside panels</figcaption>
</figure>
<!-- /wp:image --> <!-- wp:image {"id":1423,"sizeSlug":"large","linkDestination":"media"} -->
<figure class="wp-block-image size-large"><a href="https://sowen.com/media/posts/88/notebook01.jpg"><figure class="wp-image-1423"><img loading="lazy"  src="https://sowen.com/media/posts/88/notebook01.jpg" alt="" sizes="(max-width: 768px) 100vw, 768px" srcset="https://sowen.com/media/posts/88/responsive/notebook01-xs.jpg 300w ,https://sowen.com/media/posts/88/responsive/notebook01-sm.jpg 480w ,https://sowen.com/media/posts/88/responsive/notebook01-md.jpg 768w"></figure></a>
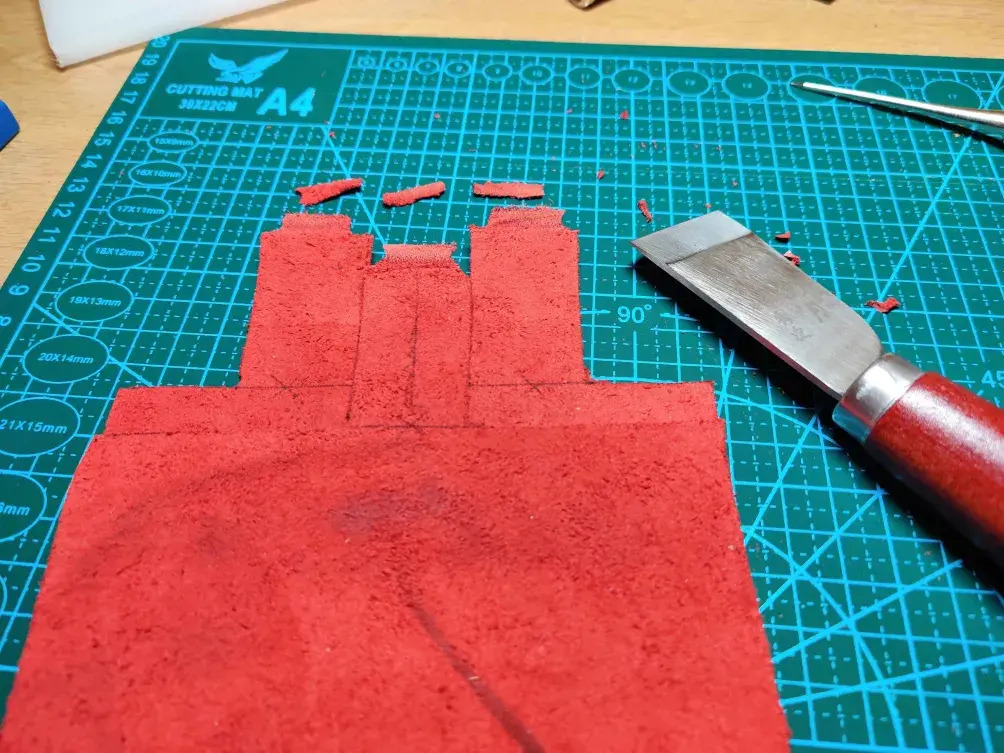
<figcaption class="wp-element-caption">skived edges</figcaption>
</figure>
<!-- /wp:image --> <!-- wp:image {"id":1447,"sizeSlug":"large","linkDestination":"media"} -->
<figure class="wp-block-image size-large"><a href="https://sowen.com/media/posts/88/notebook13.jpg"><figure class="wp-image-1447"><img loading="lazy"  src="https://sowen.com/media/posts/88/notebook13.jpg" alt="" sizes="(max-width: 768px) 100vw, 768px" srcset="https://sowen.com/media/posts/88/responsive/notebook13-xs.jpg 300w ,https://sowen.com/media/posts/88/responsive/notebook13-sm.jpg 480w ,https://sowen.com/media/posts/88/responsive/notebook13-md.jpg 768w"></figure></a>
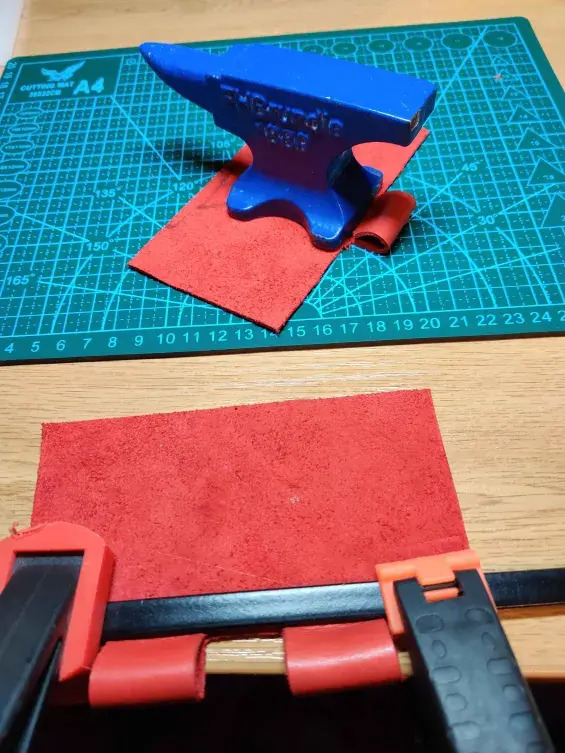
<figcaption class="wp-element-caption">pen loops glued</figcaption>
</figure>
<!-- /wp:image --></figure>
<!-- /wp:gallery -->
<p> </p>
<!-- wp:paragraph -->
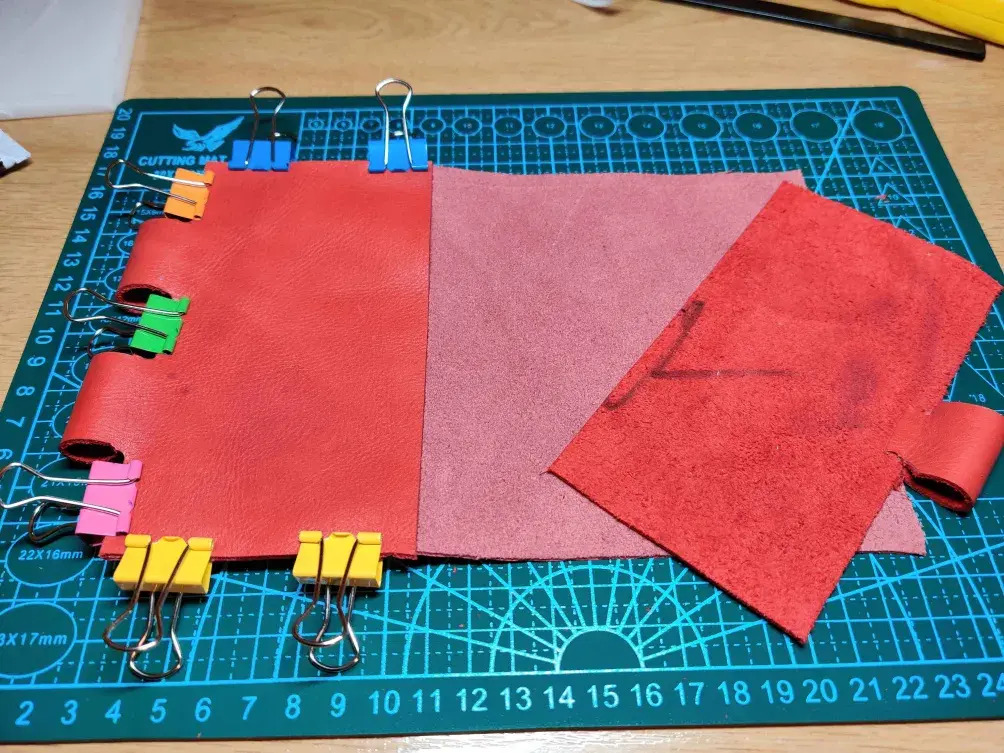
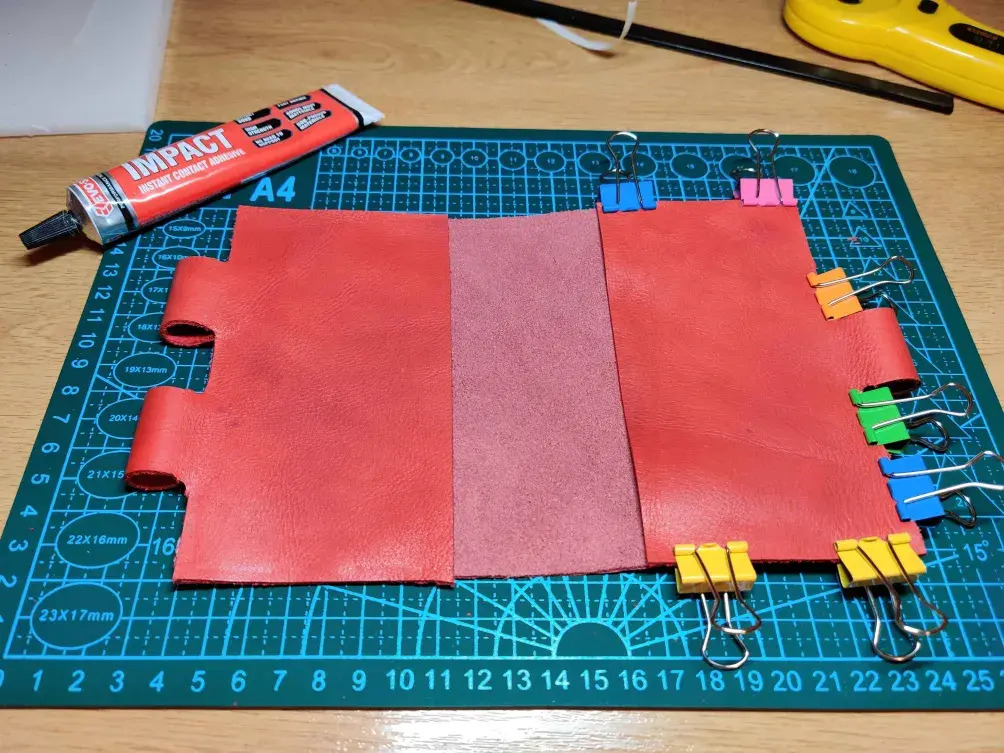
<p>I had an idea of having two pen loops on one side of the cover that went over a pen loop on the other side, so that when a pen was inside it kept the notebook cover closed. Due to the tight sizing on the width I realised that I would need to use the middle section of the red piece for the loops and cut an alternating pattern between them. A 50mm wide strip was marked down the middle, and lines drawn. A circular die was used to cut the corners before the main lines were cut. To reduce the thickness where the pen loops joined back in to the panels the ends were skived down. Contact adhesive was allowed to set before using weights or clamps to create the loops.</p>
<!-- /wp:paragraph -->
<p> </p>
<!-- wp:gallery {"linkTo":"file"} -->
<figure class="wp-block-gallery has-nested-images columns-default is-cropped"><!-- wp:image {"id":1429,"sizeSlug":"large","linkDestination":"media"} -->
<figure class="wp-block-image size-large"><a href="https://sowen.com/media/posts/88/notebook04.jpg"><figure class="wp-image-1429"><img loading="lazy"  src="https://sowen.com/media/posts/88/notebook04.jpg" alt="" sizes="(max-width: 768px) 100vw, 768px" srcset="https://sowen.com/media/posts/88/responsive/notebook04-xs.jpg 300w ,https://sowen.com/media/posts/88/responsive/notebook04-sm.jpg 480w ,https://sowen.com/media/posts/88/responsive/notebook04-md.jpg 768w"></figure></a>
<figcaption class="wp-element-caption">left inner panel glued in place</figcaption>
</figure>
<!-- /wp:image --> <!-- wp:image {"id":1449,"sizeSlug":"large","linkDestination":"media"} -->
<figure class="wp-block-image size-large"><a href="https://sowen.com/media/posts/88/notebook14.jpg"><figure class="wp-image-1449"><img loading="lazy"  src="https://sowen.com/media/posts/88/notebook14.jpg" alt="" sizes="(max-width: 768px) 100vw, 768px" srcset="https://sowen.com/media/posts/88/responsive/notebook14-xs.jpg 300w ,https://sowen.com/media/posts/88/responsive/notebook14-sm.jpg 480w ,https://sowen.com/media/posts/88/responsive/notebook14-md.jpg 768w"></figure></a>
<figcaption class="wp-element-caption">both panels glued</figcaption>
</figure>
<!-- /wp:image --> <!-- wp:image {"id":1431,"sizeSlug":"large","linkDestination":"media"} -->
<figure class="wp-block-image size-large"><a href="https://sowen.com/media/posts/88/notebook05.jpg"><figure class="wp-image-1431"><img loading="lazy"  src="https://sowen.com/media/posts/88/notebook05.jpg" alt="" sizes="(max-width: 768px) 100vw, 768px" srcset="https://sowen.com/media/posts/88/responsive/notebook05-xs.jpg 300w ,https://sowen.com/media/posts/88/responsive/notebook05-sm.jpg 480w ,https://sowen.com/media/posts/88/responsive/notebook05-md.jpg 768w"></figure></a>
<figcaption class="wp-element-caption">stitching holes punched</figcaption>
</figure>
<!-- /wp:image --> <!-- wp:image {"id":1437,"sizeSlug":"large","linkDestination":"media"} -->
<figure class="wp-block-image size-large"><a href="https://sowen.com/media/posts/88/notebook08.jpg"><figure class="wp-image-1437"><img loading="lazy"  src="https://sowen.com/media/posts/88/notebook08.jpg" alt="" sizes="(max-width: 768px) 100vw, 768px" srcset="https://sowen.com/media/posts/88/responsive/notebook08-xs.jpg 300w ,https://sowen.com/media/posts/88/responsive/notebook08-sm.jpg 480w ,https://sowen.com/media/posts/88/responsive/notebook08-md.jpg 768w"></figure></a>
<figcaption class="wp-element-caption">saddle stich</figcaption>
</figure>
<!-- /wp:image --> <!-- wp:image {"id":1433,"sizeSlug":"large","linkDestination":"media"} -->
<figure class="wp-block-image size-large"><a href="https://sowen.com/media/posts/88/notebook06.jpg"><figure class="wp-image-1433"><img loading="lazy"  src="https://sowen.com/media/posts/88/notebook06.jpg" alt="" sizes="(max-width: 768px) 100vw, 768px" srcset="https://sowen.com/media/posts/88/responsive/notebook06-xs.jpg 300w ,https://sowen.com/media/posts/88/responsive/notebook06-sm.jpg 480w ,https://sowen.com/media/posts/88/responsive/notebook06-md.jpg 768w"></figure></a>
<figcaption class="wp-element-caption">all stitched up</figcaption>
</figure>
<!-- /wp:image --></figure>
<!-- /wp:gallery -->
<p> </p>
<!-- wp:paragraph -->
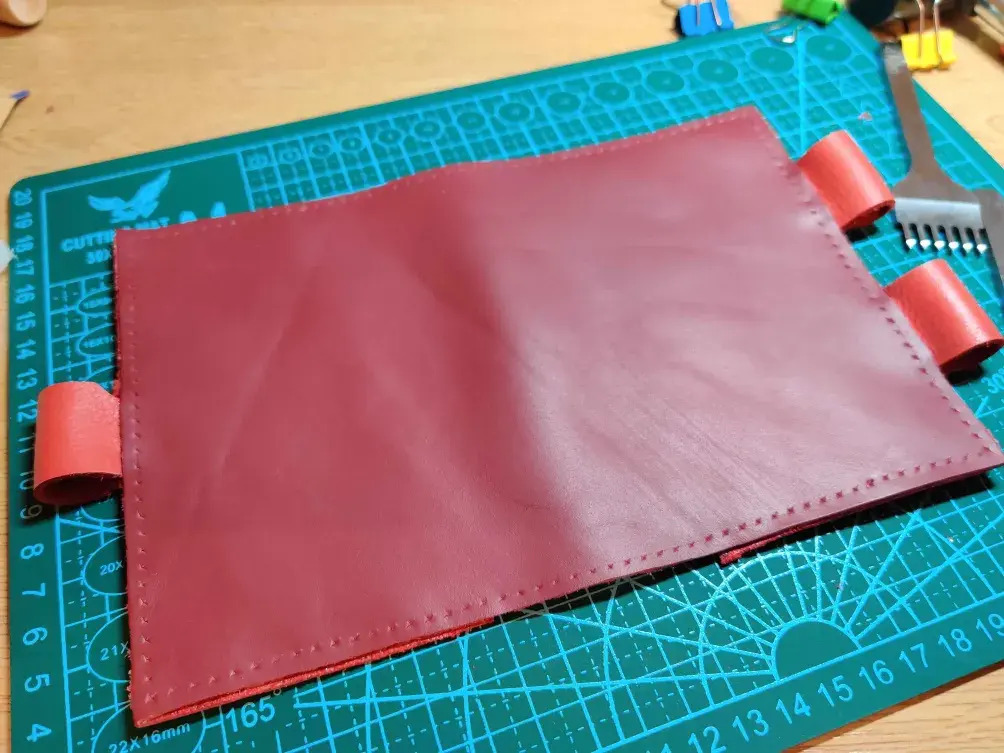
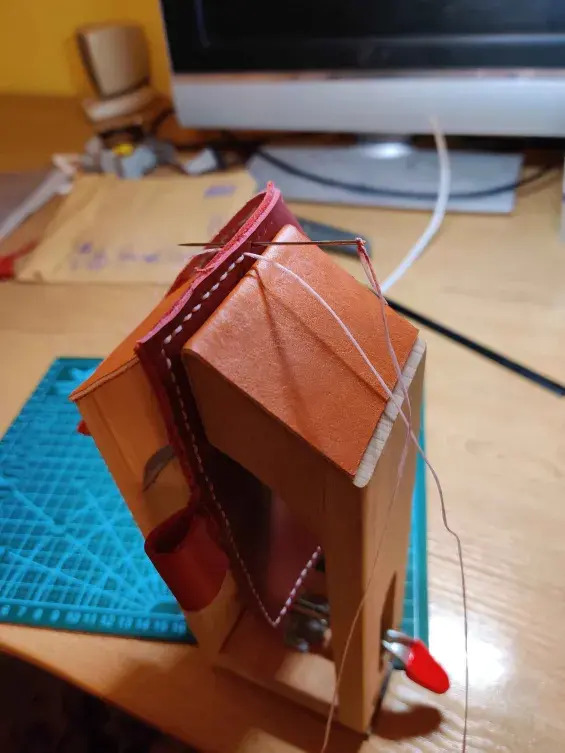
<p>The inner panels were glued around the edge to the outer cover. Because of the limited width there was only room for a thin bead of contact adhesive, but this was enough to hold it well. A line was marked on the outer cover about 4mm from the edge, and holes punched using a set of pricking irons. A cheap stitching pony made the saddle stitch so much easier than with the key wallet, but it still took almost 2 hours to sew together.</p>
<!-- /wp:paragraph -->
<p> </p>
<!-- wp:gallery {"linkTo":"file"} -->
<figure class="wp-block-gallery has-nested-images columns-default is-cropped"><!-- wp:image {"id":1427,"sizeSlug":"large","linkDestination":"media"} -->
<figure class="wp-block-image size-large"><a href="https://sowen.com/media/posts/88/notebook03.jpg"><figure class="wp-image-1427"><img loading="lazy"  src="https://sowen.com/media/posts/88/notebook03.jpg" alt="" sizes="(max-width: 768px) 100vw, 768px" srcset="https://sowen.com/media/posts/88/responsive/notebook03-xs.jpg 300w ,https://sowen.com/media/posts/88/responsive/notebook03-sm.jpg 480w ,https://sowen.com/media/posts/88/responsive/notebook03-md.jpg 768w"></figure></a>
<figcaption class="wp-element-caption">notebook is snug but fits</figcaption>
</figure>
<!-- /wp:image --> <!-- wp:image {"id":1439,"sizeSlug":"large","linkDestination":"media"} -->
<figure class="wp-block-image size-large"><a href="https://sowen.com/media/posts/88/notebook09.jpg"><figure class="wp-image-1439"><img loading="lazy"  src="https://sowen.com/media/posts/88/notebook09.jpg" alt="" sizes="(max-width: 768px) 100vw, 768px" srcset="https://sowen.com/media/posts/88/responsive/notebook09-xs.jpg 300w ,https://sowen.com/media/posts/88/responsive/notebook09-sm.jpg 480w ,https://sowen.com/media/posts/88/responsive/notebook09-md.jpg 768w"></figure></a>
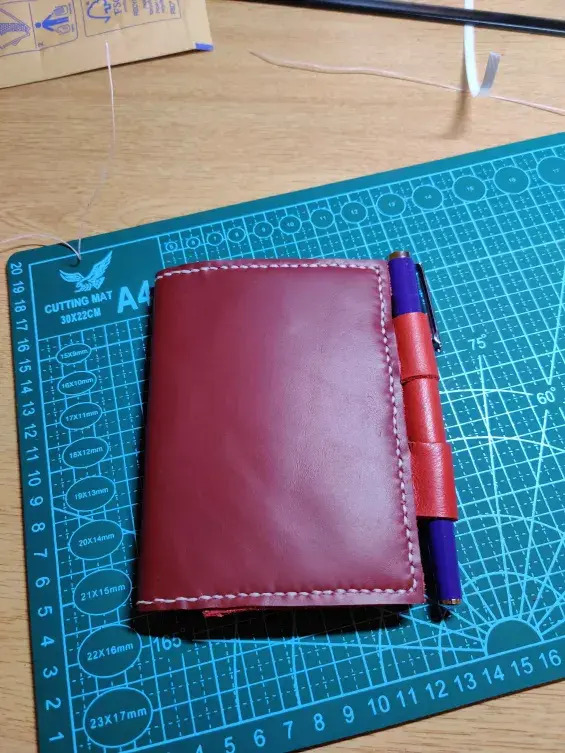
<figcaption class="wp-element-caption">pen loops work great as a closure</figcaption>
</figure>
<!-- /wp:image --> <!-- wp:image {"id":1453,"sizeSlug":"large","linkDestination":"media"} -->
<figure class="wp-block-image size-large"><a href="https://sowen.com/media/posts/88/notebook16.jpg"><figure class="wp-image-1453"><img loading="lazy"  src="https://sowen.com/media/posts/88/notebook16.jpg" alt="" sizes="(max-width: 768px) 100vw, 768px" srcset="https://sowen.com/media/posts/88/responsive/notebook16-xs.jpg 300w ,https://sowen.com/media/posts/88/responsive/notebook16-sm.jpg 480w ,https://sowen.com/media/posts/88/responsive/notebook16-md.jpg 768w"></figure></a>
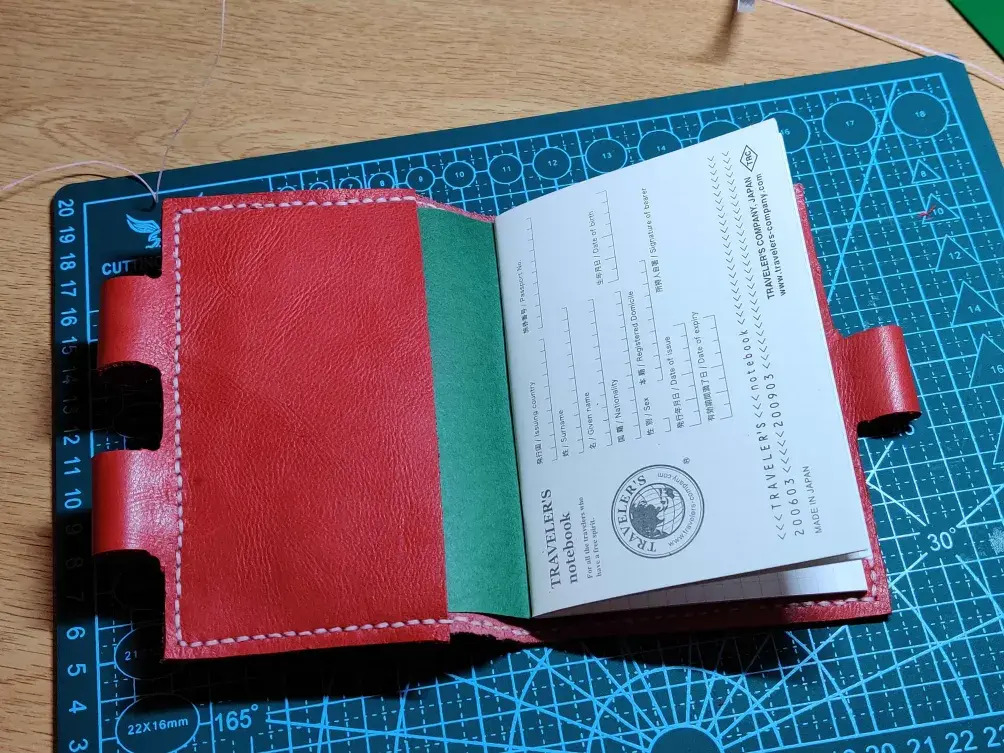
<figcaption class="wp-element-caption">notebook inside the cover</figcaption>
</figure>
<!-- /wp:image --></figure>
<!-- /wp:gallery -->
<p> </p>
<!-- wp:paragraph -->
<p>Until the sewing was finished I didn't know for sure if I had left enough space for the notebook covers. It was tight! just a millimetre or two less would have made it impossible to fit, but it did fit, and that's what counts. Also the pen loops as a closure worked well too. One of them needed a slight shave, but otherwise they are great. The biggest issue is that the pens I like are taller than the cover... but that can be fixed with some pen shopping!</p>
<!-- /wp:paragraph -->
<p> </p>
<!-- wp:paragraph -->
<p> </p>
<!-- /wp:paragraph -->
            ]]>
        </content>
    </entry>
    <entry>
        <title>Custom Keyboard Rabbit Hole</title>
        <author>
            <name>Spencer</name>
        </author>
        <link href="https://sowen.com/custom-keyboard-rabbit-hole.html"/>
        <id>https://sowen.com/custom-keyboard-rabbit-hole.html</id>

        <updated>2023-10-15T21:46:33+01:00</updated>
            <summary type="html">
                <![CDATA[
                    <!-- wp:paragraph -->
<p>Like many people, I had seen wild crazy looking mechanical keyboards, and had been both fascinated and confused by them. How could you get by with so few keys?  What does each key actually do? They looked like some kind of wild alien input device, but, at the  same time, must work well otherwise the fad would have died out years ago.  The high cost and fear of failure, thought, was enough to put me off of trying them out.</p>
<!-- /wp:paragraph -->

<!-- wp:image {"id":1395,"width":"836px","height":"auto","aspectRatio":"16/9","scale":"cover","sizeSlug":"full","linkDestination":"media"} -->
<figure class="wp-block-image size-full is-resized"><a href="https://sowen.com/wp-content/uploads/2023/10/Reviung-8.jpg"><figure class="wp-image-1395"><img loading="lazy" src="https://sowen.com/media/posts/87/Reviung-8-edited-1.jpg" alt=""  style="aspect-ratio:16/9;object-fit:cover;width:836px;height:auto" sizes="(max-width: 768px) 100vw, 768px" srcset="https://sowen.com/media/posts/87/responsive/Reviung-8-edited-1-xs.jpg 300w ,https://sowen.com/media/posts/87/responsive/Reviung-8-edited-1-sm.jpg 480w ,https://sowen.com/media/posts/87/responsive/Reviung-8-edited-1-md.jpg 768w"></figure></a></figure>
<!-- /wp:image -->

<!-- wp:paragraph -->
<p>While attending <a href="https://oshug.org/event/oshcamp2023" data-type="link" data-id="https://oshug.org/event/oshcamp2023">OSHCamp</a> earlier this year, a talk by <a href="https://twitter.com/folknology" data-type="link" data-id="https://twitter.com/folknology">Alan Wood</a> explained a lot of the ideas behind these keyboards, and answered a lot of my questions - except for one; Would I be able to cope adjusting to one?</p>
<!-- /wp:paragraph -->

<!-- wp:more -->

                ]]>
            </summary>
        <content type="html">
            <![CDATA[
                <!-- wp:paragraph -->
<p>Like many people, I had seen wild crazy looking mechanical keyboards, and had been both fascinated and confused by them. How could you get by with so few keys?  What does each key actually do? They looked like some kind of wild alien input device, but, at the  same time, must work well otherwise the fad would have died out years ago.  The high cost and fear of failure, thought, was enough to put me off of trying them out.</p>
<!-- /wp:paragraph -->

<!-- wp:image {"id":1395,"width":"836px","height":"auto","aspectRatio":"16/9","scale":"cover","sizeSlug":"full","linkDestination":"media"} -->
<figure class="wp-block-image size-full is-resized"><a href="https://sowen.com/wp-content/uploads/2023/10/Reviung-8.jpg"><figure class="wp-image-1395"><img loading="lazy" src="https://sowen.com/media/posts/87/Reviung-8-edited-1.jpg" alt=""  style="aspect-ratio:16/9;object-fit:cover;width:836px;height:auto" sizes="(max-width: 768px) 100vw, 768px" srcset="https://sowen.com/media/posts/87/responsive/Reviung-8-edited-1-xs.jpg 300w ,https://sowen.com/media/posts/87/responsive/Reviung-8-edited-1-sm.jpg 480w ,https://sowen.com/media/posts/87/responsive/Reviung-8-edited-1-md.jpg 768w"></figure></a></figure>
<!-- /wp:image -->

<!-- wp:paragraph -->
<p>While attending <a href="https://oshug.org/event/oshcamp2023" data-type="link" data-id="https://oshug.org/event/oshcamp2023" class="extlink extlink-icon-1"  >OSHCamp</a> earlier this year, a talk by <a href="https://twitter.com/folknology" data-type="link" data-id="https://twitter.com/folknology" class="extlink extlink-icon-1"  >Alan Wood</a> explained a lot of the ideas behind these keyboards, and answered a lot of my questions - except for one; Would I be able to cope adjusting to one?</p>
<!-- /wp:paragraph -->

<!-- wp:more -->

<!-- /wp:more -->

<!-- wp:paragraph -->
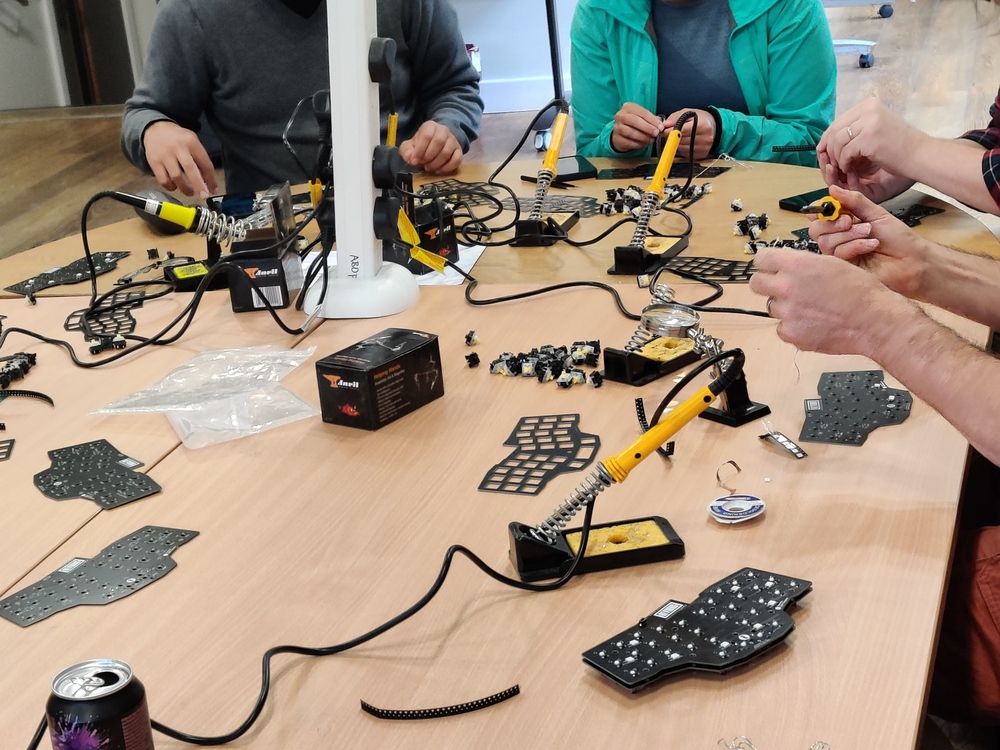
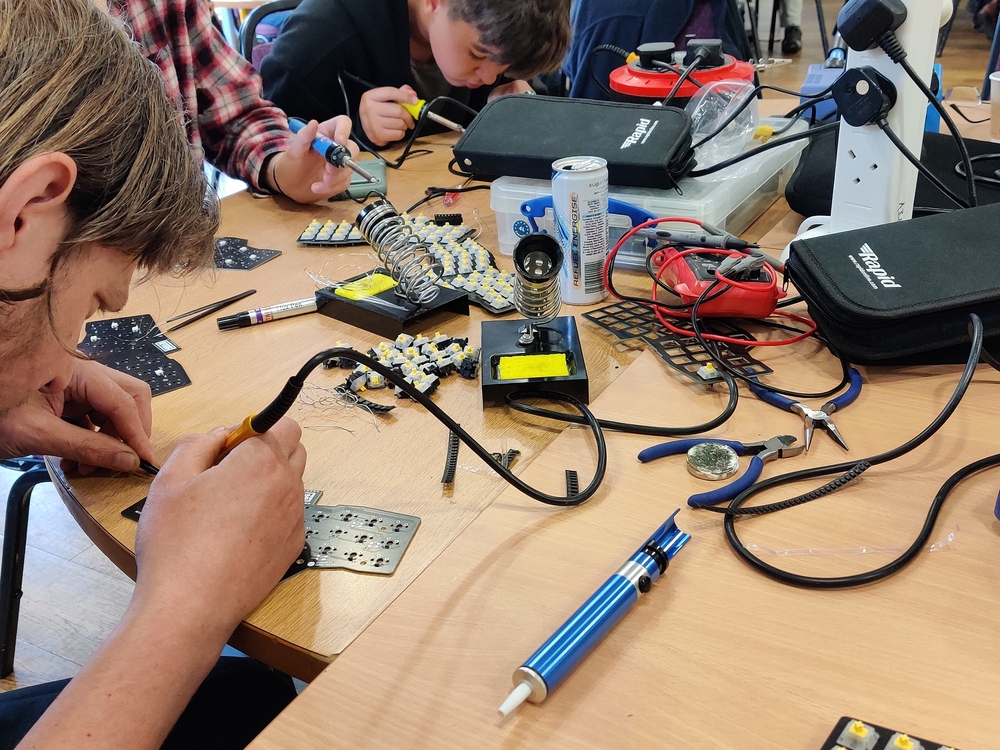
<p>There was a <strong><a href="https://github.com/folknology/Keyboard-Workshop" data-type="link" data-id="https://github.com/folknology/Keyboard-Workshop" class="extlink extlink-icon-1"  >workshop</a></strong> the following day where all the parts were supplied to build a Reviung 34 keyboard, except for the keycaps, micro controller, and optional laser cut acrylic. This was the perfect low barrier to entry I needed to find out if these low key count options were right for me.</p>
<!-- /wp:paragraph -->

<!-- wp:gallery {"linkTo":"file"} -->
<figure class="wp-block-gallery has-nested-images columns-default is-cropped"><!-- wp:image {"id":1331,"sizeSlug":"large","linkDestination":"media"} -->
<figure class="wp-block-image size-large"><a href="https://sowen.com/media/posts/87/Reviung-3.jpg"><figure class="wp-image-1331"><img loading="lazy" src="https://sowen.com/media/posts/87/Reviung-3.jpg" alt=""  sizes="(max-width: 768px) 100vw, 768px" srcset="https://sowen.com/media/posts/87/responsive/Reviung-3-xs.jpg 300w ,https://sowen.com/media/posts/87/responsive/Reviung-3-sm.jpg 480w ,https://sowen.com/media/posts/87/responsive/Reviung-3-md.jpg 768w"></figure></a></figure>
<!-- /wp:image -->

<!-- wp:image {"id":1329,"sizeSlug":"large","linkDestination":"media"} -->
<figure class="wp-block-image size-large"><a href="https://sowen.com/media/posts/87/Reviung-2.jpg"><figure class="wp-image-1329"><img loading="lazy" src="https://sowen.com/media/posts/87/Reviung-2.jpg" alt=""  sizes="(max-width: 768px) 100vw, 768px" srcset="https://sowen.com/media/posts/87/responsive/Reviung-2-xs.jpg 300w ,https://sowen.com/media/posts/87/responsive/Reviung-2-sm.jpg 480w ,https://sowen.com/media/posts/87/responsive/Reviung-2-md.jpg 768w"></figure></a></figure>
<!-- /wp:image -->

<!-- wp:image {"id":1327,"sizeSlug":"large","linkDestination":"media"} -->
<figure class="wp-block-image size-large"><a href="https://sowen.com/media/posts/87/Reviung-1.jpg"><figure class="wp-image-1327"><img loading="lazy" src="https://sowen.com/media/posts/87/Reviung-1.jpg" alt=""  sizes="(max-width: 768px) 100vw, 768px" srcset="https://sowen.com/media/posts/87/responsive/Reviung-1-xs.jpg 300w ,https://sowen.com/media/posts/87/responsive/Reviung-1-sm.jpg 480w ,https://sowen.com/media/posts/87/responsive/Reviung-1-md.jpg 768w"></figure></a></figure>
<!-- /wp:image --></figure>
<!-- /wp:gallery -->

<!-- wp:heading {"level":1} -->
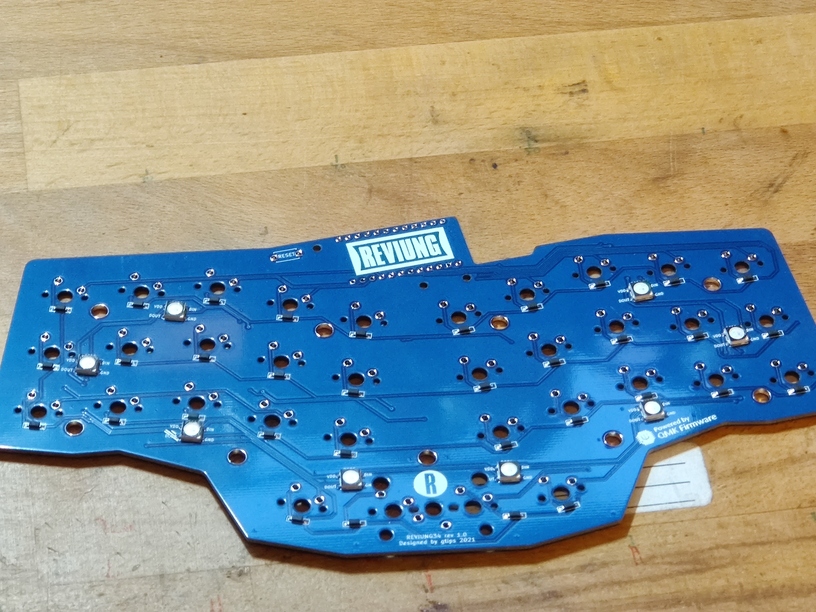
<h1 class="wp-block-heading">Reviung 34</h1>
<!-- /wp:heading -->

<!-- wp:paragraph -->
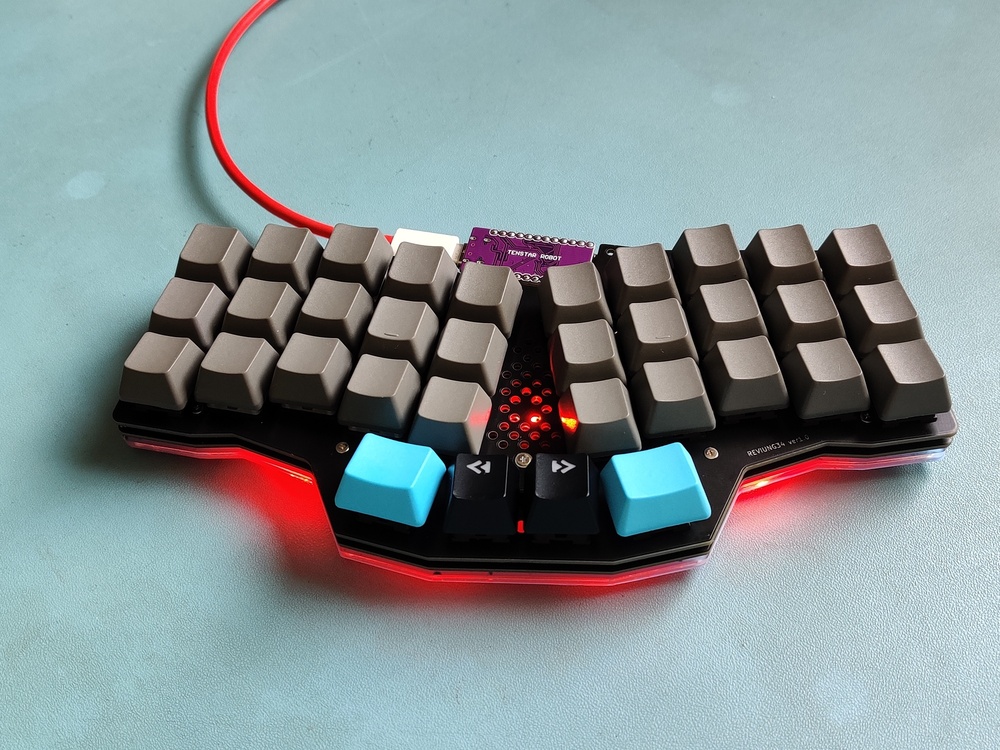
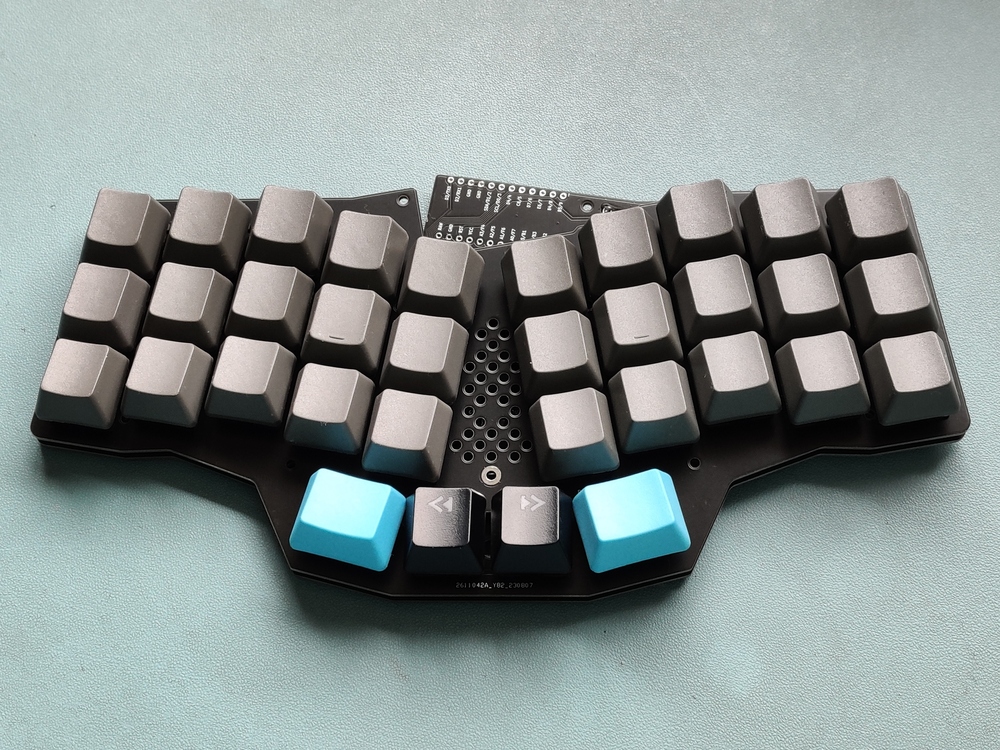
<p>The <a href="https://github.com/gtips/reviung/tree/master/reviung34" data-type="link" data-id="https://github.com/gtips/reviung/tree/master/reviung34" class="extlink extlink-icon-1"  >Reiung 34 </a>is an Open Source keyboard design by gtips.  As the name implies, it uses 34 keys - although it can be built with 33 keys.  It is split column staggered, that is to say that the keys are lined up in columns, centrally split. Nominally there are 26 letters (A - Z) keys, plus 3 punctuation, return, space, delete and 2 modifiers.</p>
<!-- /wp:paragraph -->

<!-- wp:paragraph -->
<p>The keyboard is designed to run a standard Arduino Pro Micro that runs the QMK firmware, although there are lots of compatible micro controllers and firmware that can be used instead.  The QMK firmware runs on hundreds of different keyboards and can be  easily customised to for any layout you want. It handles modifiers through the use of layers, and can control things like RGB LED lighting and other controls too.</p>
<!-- /wp:paragraph -->

<!-- wp:paragraph -->
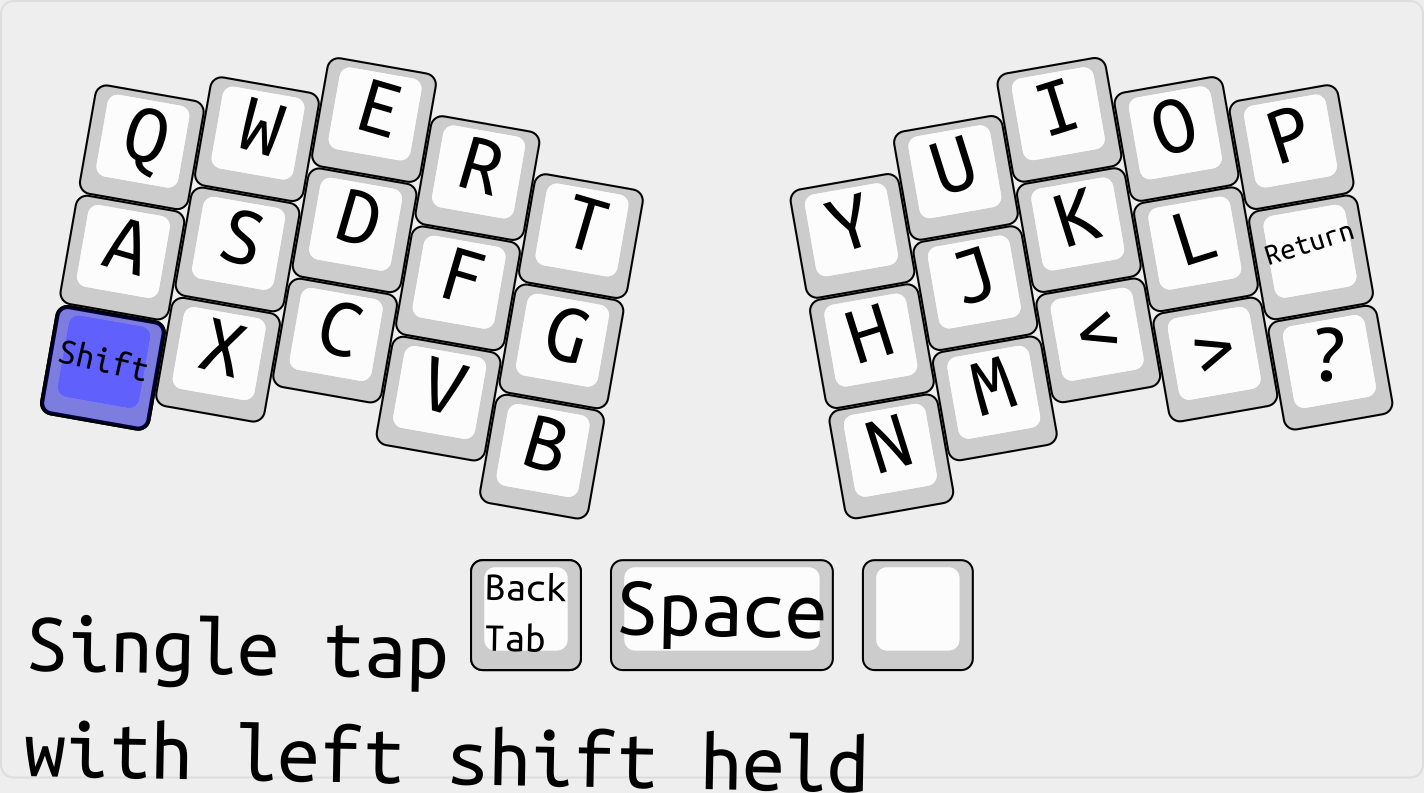
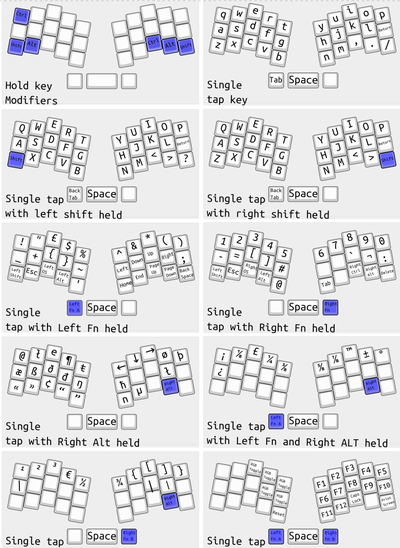
<p>All of the keys (except space) have multiple uses, and some of the regular keys double up as modifiers too.  For example, the "Z" key, bottom left corner, which is near to where shift would be on a normal keyboard, will give a z if tapped, but if held down and another key is pressed, will give the shifted output of that other key.  So that means you can get any of your upper case keys - except for Z. Luckily, the "/" key on the opposite side also doubles up as a shift when held, so this can also get your upper case keys, including Z.</p>
<!-- /wp:paragraph -->

<!-- wp:image {"id":1363,"sizeSlug":"medium","linkDestination":"media"} -->
<figure class="wp-block-image size-medium"><a href="https://sowen.com/wp-content/uploads/2023/10/Reviung34-annoted-layers_Left-shift.png"><figure class="wp-image-1363"><img loading="lazy" src="https://sowen.com/media/posts/87/Reviung34-annoted-layers_Left-shift-300x167.png" alt=""  sizes="(max-width: 768px) 100vw, 768px" srcset="https://sowen.com/media/posts/87/responsive/Reviung34-annoted-layers_Left-shift-300x167-xs.png 300w ,https://sowen.com/media/posts/87/responsive/Reviung34-annoted-layers_Left-shift-300x167-sm.png 480w ,https://sowen.com/media/posts/87/responsive/Reviung34-annoted-layers_Left-shift-300x167-md.png 768w"></figure></a></figure>
<!-- /wp:image -->

<!-- wp:paragraph -->
<p>Other keys work in a similar way for control, alt and the OS (Windows / Mac) key.</p>
<!-- /wp:paragraph -->

<!-- wp:paragraph -->
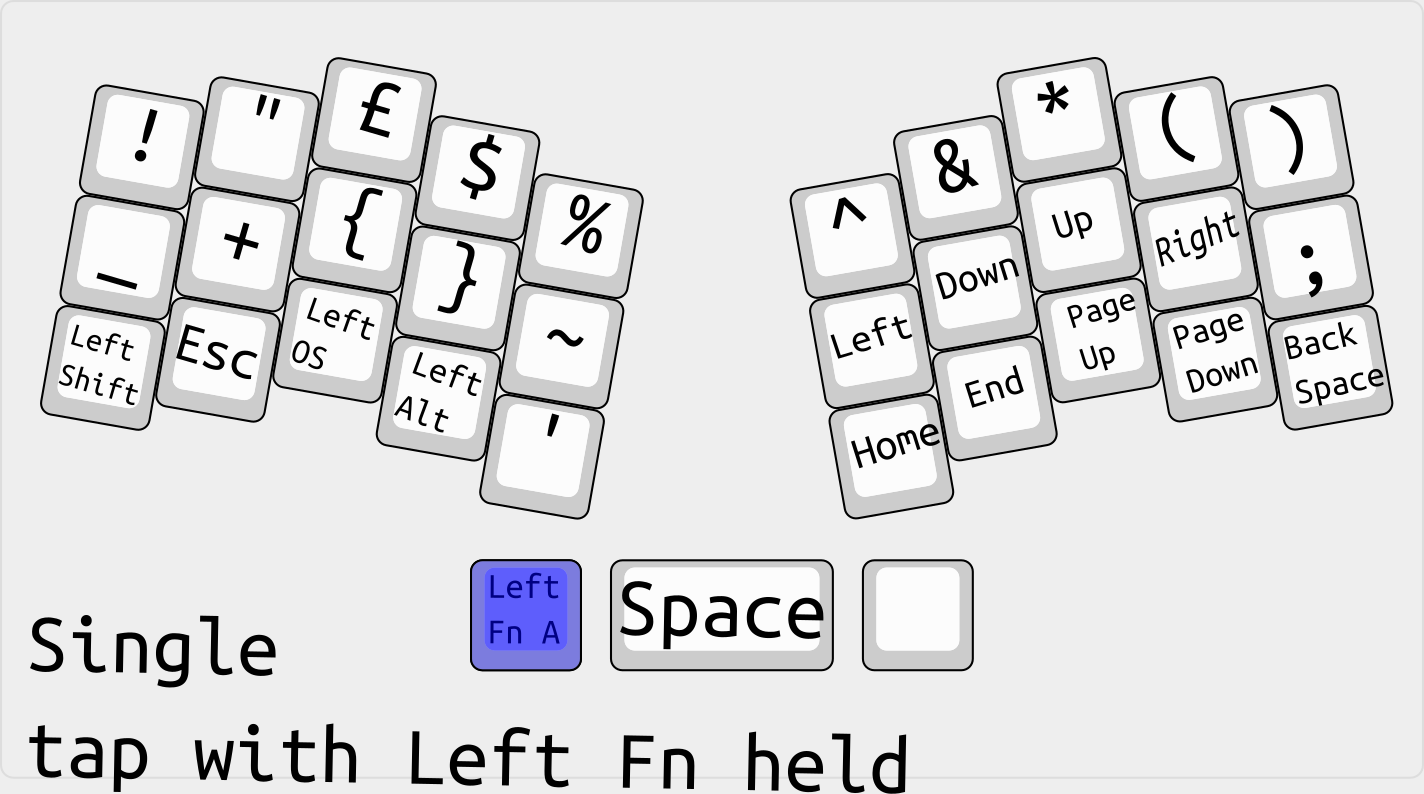
<p>The two modifiers either side of the space allow access to other keys such as the number row by holding down the right one, or the shifted number row by holding down the left one, as well as other combinations.</p>
<!-- /wp:paragraph -->

<!-- wp:image {"id":1369,"sizeSlug":"medium","linkDestination":"media"} -->
<figure class="wp-block-image size-medium"><a href="https://sowen.com/wp-content/uploads/2023/10/Reviung34-annoted-layers_Left-Fn.png"><figure class="wp-image-1369"><img loading="lazy" src="https://sowen.com/media/posts/87/Reviung34-annoted-layers_Left-Fn-300x167.png" alt=""  sizes="(max-width: 768px) 100vw, 768px" srcset="https://sowen.com/media/posts/87/responsive/Reviung34-annoted-layers_Left-Fn-300x167-xs.png 300w ,https://sowen.com/media/posts/87/responsive/Reviung34-annoted-layers_Left-Fn-300x167-sm.png 480w ,https://sowen.com/media/posts/87/responsive/Reviung34-annoted-layers_Left-Fn-300x167-md.png 768w"></figure></a></figure>
<!-- /wp:image -->

<!-- wp:heading {"level":1} -->
<h1 class="wp-block-heading">Why would you want to use a keyboard like this?</h1>
<!-- /wp:heading -->

<!-- wp:paragraph -->
<p>The biggest advantage of a reduced key keyboard is that your fingers never need to move far from the home keys (ASDF JKLreturn) to type what you want.  This reduces fatigue due to less stretching.  It also allows for much faster typing too. </p>
<!-- /wp:paragraph -->

<!-- wp:paragraph -->
<p>A smaller keyboard also takes up much less desk space than a full size keyboard.  And, if you travel around, carrying your favourite 102 key mechanical keyboard adds a lot of bulk and weight to your kit.</p>
<!-- /wp:paragraph -->

<!-- wp:paragraph -->
<p>Of course, it isn't the perfect solution for everybody.  There is quite a steep learning curve, although if you're already a reasonable touch typist, it isn't as big as you'd expect.  Some key strokes feel like a Dance Dance Revolution challenge for your fingers.  Luckily, most of the characters you're likely to type most often are quite intuitive.  There are times too when that particular symbol seems like it keeps moving around the keyboard to avoid every being typed!</p>
<!-- /wp:paragraph -->

<!-- wp:paragraph -->
<p>Although I could already type pretty well, I recommend doing at least the intermediate typing course on <a href="https://www.typing.com/" data-type="link" data-id="https://www.typing.com/" class="extlink extlink-icon-1"  >typing.com</a>. Whilst typing.com is not aimed at custom keyboards like this, the lessons get you quickly acquainted with your keyboard with regular typing, and familiarity makes things much easier.</p>
<!-- /wp:paragraph -->

<!-- wp:heading {"level":1} -->
<h1 class="wp-block-heading">How did it work out for me?</h1>
<!-- /wp:heading -->

<!-- wp:paragraph -->
<p>Mistakes were made! </p>
<!-- /wp:paragraph -->

<!-- wp:paragraph -->
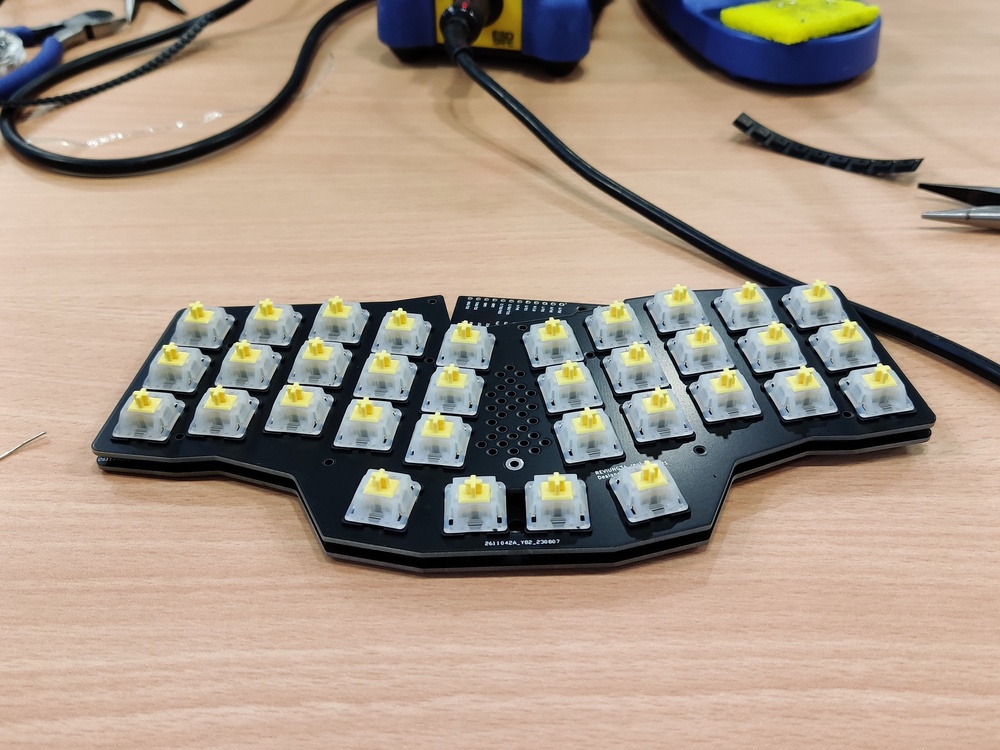
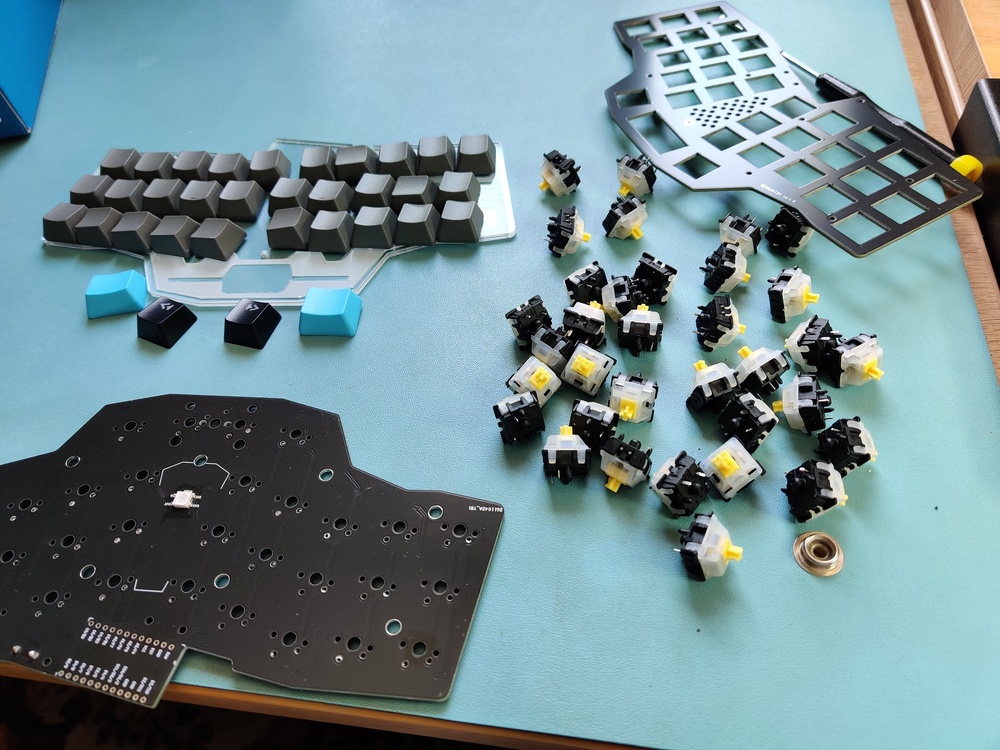
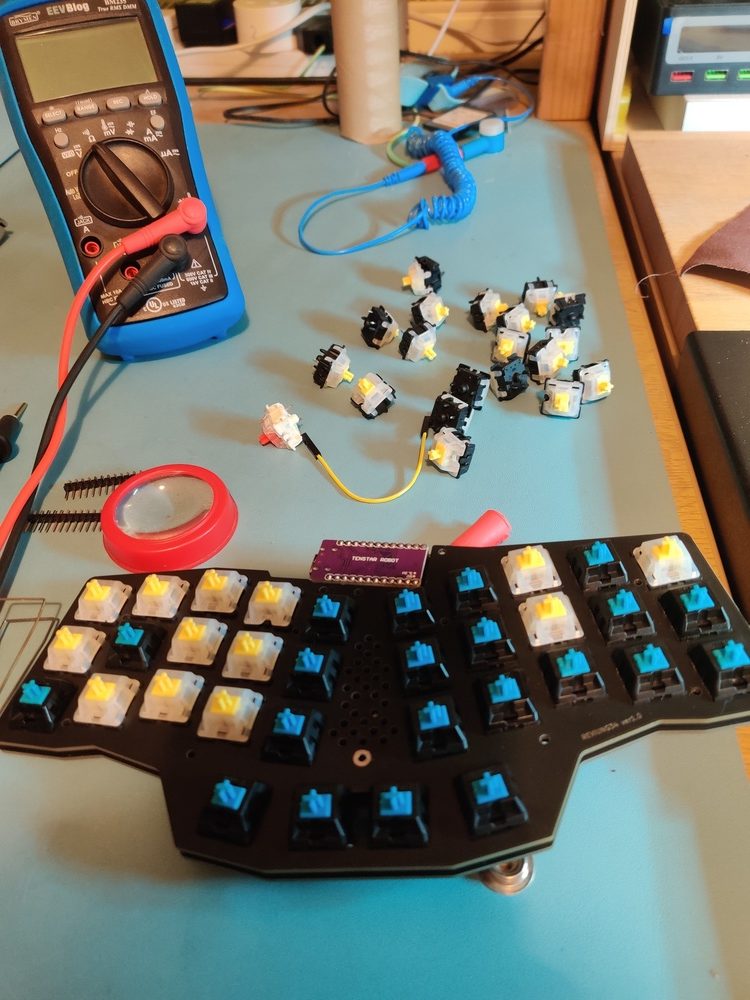
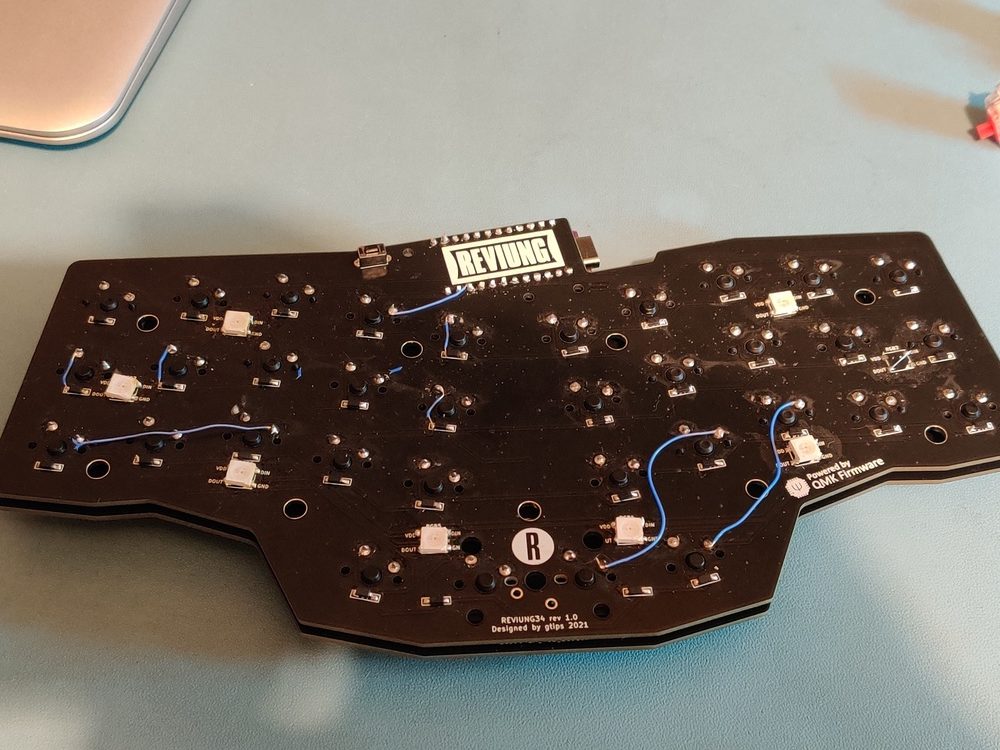
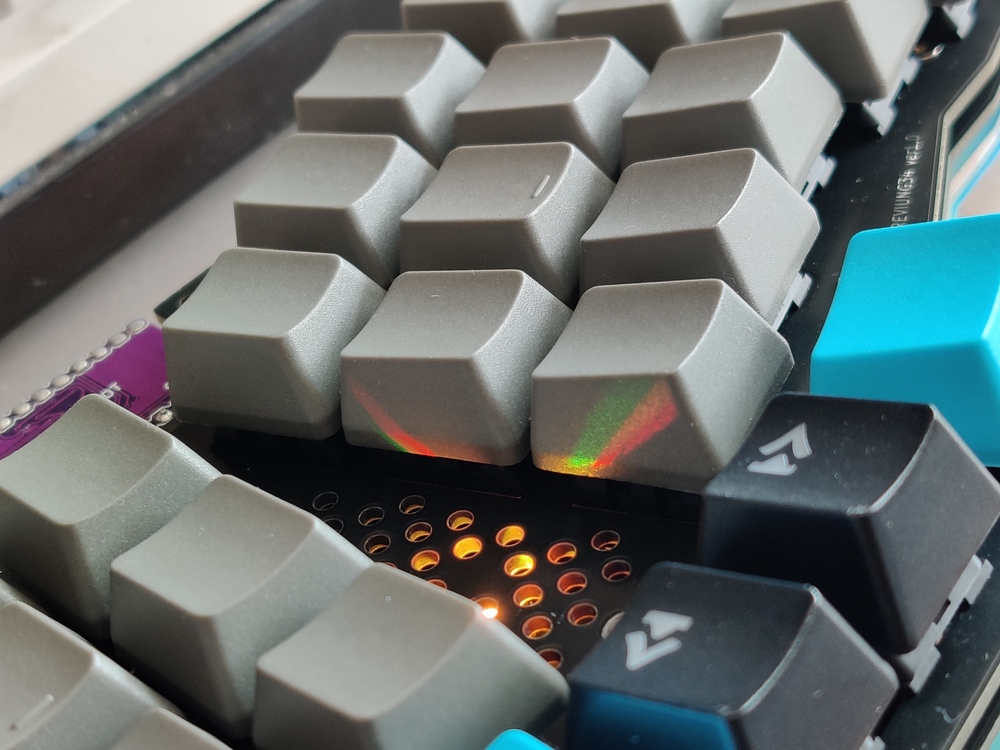
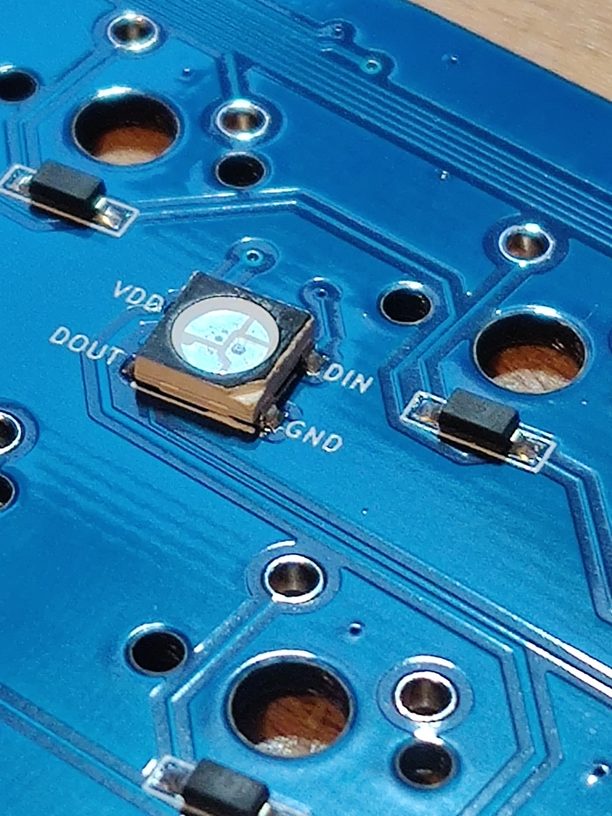
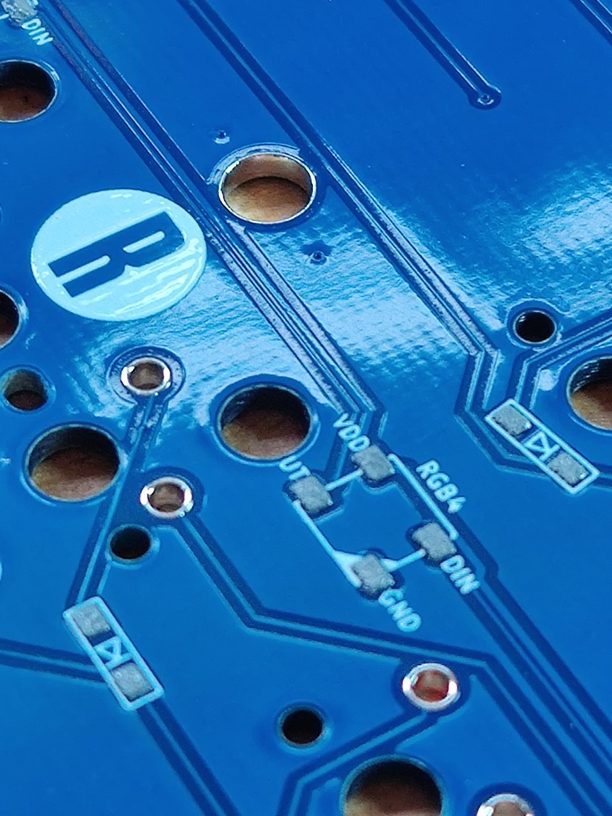
<p>I was very excited to build my Reviung 34 at Alans workshop.  However, it quickly became apparent that without my own soldering station that I'm used to, and the extra magnification that I am reluctantly realising that I need, that things weren't going well with the assembly.  There is a small surface mount diode for each key and 9 surface mount LED packages.  Frankly, I disappointed myself with how well this came out on the day.  On top of that, the top plate which holds the key switches may look like it is mirrored - but it is not.  fitting this on upside-down means that the micro controller cannot be fitted.</p>
<!-- /wp:paragraph -->

<!-- wp:gallery {"linkTo":"file"} -->
<figure class="wp-block-gallery has-nested-images columns-default is-cropped"><!-- wp:image {"id":1333,"sizeSlug":"large","linkDestination":"media"} -->
<figure class="wp-block-image size-large"><a href="https://sowen.com/media/posts/87/Reviung-4.jpg"><figure class="wp-image-1333"><img loading="lazy" src="https://sowen.com/media/posts/87/Reviung-4.jpg" alt=""  sizes="(max-width: 768px) 100vw, 768px" srcset="https://sowen.com/media/posts/87/responsive/Reviung-4-xs.jpg 300w ,https://sowen.com/media/posts/87/responsive/Reviung-4-sm.jpg 480w ,https://sowen.com/media/posts/87/responsive/Reviung-4-md.jpg 768w"></figure></a></figure>
<!-- /wp:image -->

<!-- wp:image {"id":1335,"sizeSlug":"large","linkDestination":"media"} -->
<figure class="wp-block-image size-large"><a href="https://sowen.com/media/posts/87/Reviung-5.jpg"><figure class="wp-image-1335"><img loading="lazy" src="https://sowen.com/media/posts/87/Reviung-5.jpg" alt=""  sizes="(max-width: 768px) 100vw, 768px" srcset="https://sowen.com/media/posts/87/responsive/Reviung-5-xs.jpg 300w ,https://sowen.com/media/posts/87/responsive/Reviung-5-sm.jpg 480w ,https://sowen.com/media/posts/87/responsive/Reviung-5-md.jpg 768w"></figure></a></figure>
<!-- /wp:image -->

<!-- wp:image {"id":1337,"sizeSlug":"large","linkDestination":"media"} -->
<figure class="wp-block-image size-large"><a href="https://sowen.com/media/posts/87/Reviung-6-rotated.jpg"><figure class="wp-image-1337"><img loading="lazy" src="https://sowen.com/media/posts/87/Reviung-6-rotated.jpg" alt=""  sizes="(max-width: 768px) 100vw, 768px" srcset="https://sowen.com/media/posts/87/responsive/Reviung-6-rotated-xs.jpg 300w ,https://sowen.com/media/posts/87/responsive/Reviung-6-rotated-sm.jpg 480w ,https://sowen.com/media/posts/87/responsive/Reviung-6-rotated-md.jpg 768w"></figure></a></figure>
<!-- /wp:image -->

<!-- wp:image {"id":1339,"sizeSlug":"large","linkDestination":"media"} -->
<figure class="wp-block-image size-large"><a href="https://sowen.com/media/posts/87/Reviung-7-rotated.jpg"><figure class="wp-image-1339"><img loading="lazy" src="https://sowen.com/media/posts/87/Reviung-7-rotated.jpg" alt=""  sizes="(max-width: 768px) 100vw, 768px" srcset="https://sowen.com/media/posts/87/responsive/Reviung-7-rotated-xs.jpg 300w ,https://sowen.com/media/posts/87/responsive/Reviung-7-rotated-sm.jpg 480w ,https://sowen.com/media/posts/87/responsive/Reviung-7-rotated-md.jpg 768w"></figure></a></figure>
<!-- /wp:image --></figure>
<!-- /wp:gallery -->

<!-- wp:paragraph -->
<p>The only solution was to unsolder every single key switch to remove the top plate.  This is an epic job in itself, but after getting them all out, I could flip the top plate over, re-fit the switches and connect the micro controller.  This was where I discovered that there is a good way and a bad way to remove the switches - and I had used the bad way (gripping them vertically with pliers on the top), which damaged most of the switches! Luckily, I had some spare switches, but it still meant removing most switches again.  And the replacement switches I had were MX Blue (clicky) vs Yellow (silent).  Eventually, though, after fixing many errors and broken pads, I had a working keyboard.</p>
<!-- /wp:paragraph -->

<!-- wp:paragraph -->
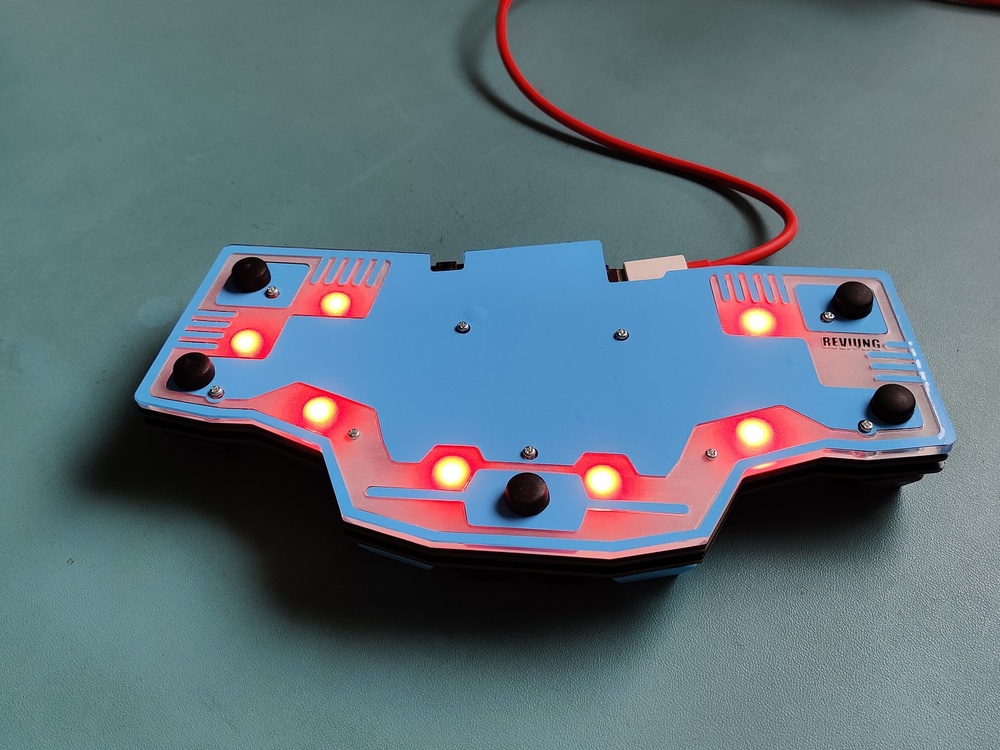
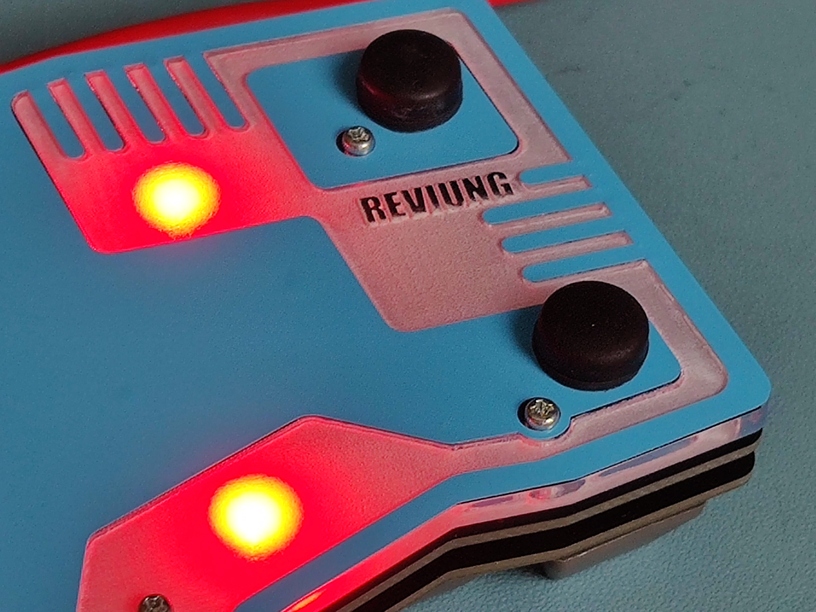
<p>I laser cut the acrylic base plate, and chose to add a vinyl layer to hide the mess hidden below.  Time to learn how to type!</p>
<!-- /wp:paragraph -->

<!-- wp:gallery {"linkTo":"file"} -->
<figure class="wp-block-gallery has-nested-images columns-default is-cropped"><!-- wp:image {"id":1343,"sizeSlug":"large","linkDestination":"media"} -->
<figure class="wp-block-image size-large"><a href="https://sowen.com/media/posts/87/Reviung-9.jpg"><figure class="wp-image-1343"><img loading="lazy" src="https://sowen.com/media/posts/87/Reviung-9.jpg" alt=""  sizes="(max-width: 768px) 100vw, 768px" srcset="https://sowen.com/media/posts/87/responsive/Reviung-9-xs.jpg 300w ,https://sowen.com/media/posts/87/responsive/Reviung-9-sm.jpg 480w ,https://sowen.com/media/posts/87/responsive/Reviung-9-md.jpg 768w"></figure></a></figure>
<!-- /wp:image -->

<!-- wp:image {"id":1345,"sizeSlug":"large","linkDestination":"media"} -->
<figure class="wp-block-image size-large"><a href="https://sowen.com/media/posts/87/Reviung-10.jpg"><figure class="wp-image-1345"><img loading="lazy" src="https://sowen.com/media/posts/87/Reviung-10.jpg" alt=""  sizes="(max-width: 768px) 100vw, 768px" srcset="https://sowen.com/media/posts/87/responsive/Reviung-10-xs.jpg 300w ,https://sowen.com/media/posts/87/responsive/Reviung-10-sm.jpg 480w ,https://sowen.com/media/posts/87/responsive/Reviung-10-md.jpg 768w"></figure></a></figure>
<!-- /wp:image -->

<!-- wp:image {"id":1347,"sizeSlug":"large","linkDestination":"media"} -->
<figure class="wp-block-image size-large"><a href="https://sowen.com/media/posts/87/Reviung-11.jpg"><figure class="wp-image-1347"><img loading="lazy" src="https://sowen.com/media/posts/87/Reviung-11.jpg" alt=""  sizes="(max-width: 768px) 100vw, 768px" srcset="https://sowen.com/media/posts/87/responsive/Reviung-11-xs.jpg 300w ,https://sowen.com/media/posts/87/responsive/Reviung-11-sm.jpg 480w ,https://sowen.com/media/posts/87/responsive/Reviung-11-md.jpg 768w"></figure></a></figure>
<!-- /wp:image --></figure>
<!-- /wp:gallery -->

<!-- wp:paragraph -->
<p>Typing on it felt surprisingly good.  Much more natural than I expected. Regular typing that doesn't involve too much punctuation seemed to flow really easily.  As mentioned earlier, the lessons on typing.com really helped.  I initially had issues with mixing up the B and V keys, often trying to type B with the wrong hand.  But, like to many things, practice really helps.</p>
<!-- /wp:paragraph -->

<!-- wp:paragraph -->
<p>One of the first decisions that had to be made was to make this as a 33 or 34 key keyboard.  The difference is the space bar can either be a central 2U wide key, or 2 individual keys where the left one is delete and the right is space.  Having more keys sounds like a good idea, and a dedicated delete key must be good, right? Well, for me, I found the smaller space key annoying and I kept hitting the delete key with my left thumb when I wanted space.  A minor issue, really, but if I had the chance again, I would choose a 33 key layout.</p>
<!-- /wp:paragraph -->

<!-- wp:image {"id":1357,"sizeSlug":"full","linkDestination":"media"} -->
<figure class="wp-block-image size-full"><a href="https://sowen.com/media/posts/87/Reviung-16.jpg"><figure class="wp-image-1357"><img loading="lazy" src="https://sowen.com/media/posts/87/Reviung-16.jpg" alt=""  sizes="(max-width: 768px) 100vw, 768px" srcset="https://sowen.com/media/posts/87/responsive/Reviung-16-xs.jpg 300w ,https://sowen.com/media/posts/87/responsive/Reviung-16-sm.jpg 480w ,https://sowen.com/media/posts/87/responsive/Reviung-16-md.jpg 768w"></figure></a></figure>
<!-- /wp:image -->

<!-- wp:paragraph -->
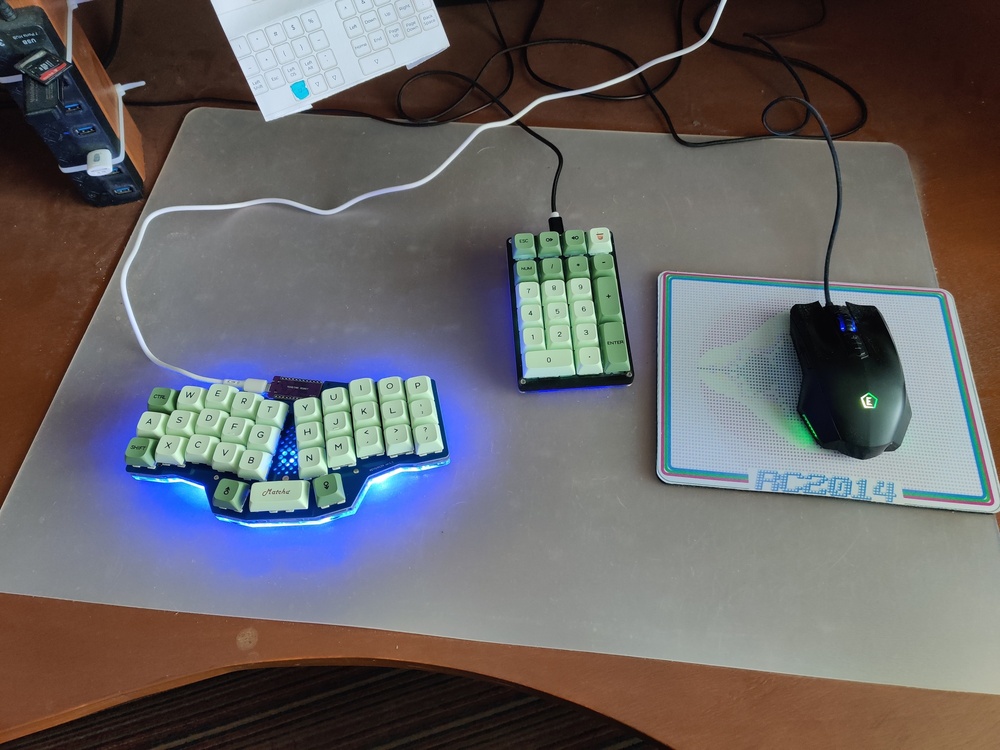
<p>For over 6 weeks now, the Reviung has been my daily driver.  Honest opinion is that it's great.  For anything number intensive it isn't ideal, however, I do have a separate number pad that makes life much easier.  For regular typing, I can easily hit over 60wpm on most typing tests.  The common punctuation and symbols that I use, ' @ # !  :-) have all become second nature.  A handy <a href="https://sowen.com/wp-content/uploads/2023/10/Wheres-that-Fn-key.pdf" data-type="attachment" data-id="1377">cheat-sheet</a> isn't too far away though in case I need ² or ½ or ±</p>
<!-- /wp:paragraph -->

<!-- wp:paragraph -->
<p>One of the advantages of the QMK firmware is that it is totally customisable.  I decided to go with the default layout to start with before making any changes, and ultimately decided that it does everything I want.  Some of the layout was a little questionable at first, but clearly it has been developed by people that know a lot more about good keyboard layout than I do.  So, I haven't made any modifications, and probably won't either.</p>
<!-- /wp:paragraph -->

<!-- wp:heading {"level":1} -->
<h1 class="wp-block-heading">Redemption and further down the rabbit hole</h1>
<!-- /wp:heading -->

<!-- wp:paragraph -->
<p>Spurred on by adapting to the Reviung better than expected, ashamed by the mistakes I had made at the start, and a desire to do things properly, I decided to try again.  As mentioned earlier, the Reviung keyboards are open source, so the PCB design files are available and free to use.  Whilst placing an order for some RC2014 circuit boards it was easy enough to add in an order for 5 (minimum order quantity) top and base plates.</p>
<!-- /wp:paragraph -->

<!-- wp:paragraph -->
<p>This time I did things properly.  I laser cut a stencil so that I could use solder paste and hot air reflow for all the surface mount parts.  </p>
<!-- /wp:paragraph -->

<!-- wp:gallery {"linkTo":"file"} -->
<figure class="wp-block-gallery has-nested-images columns-default is-cropped"><!-- wp:image {"id":1351,"sizeSlug":"large","linkDestination":"media"} -->
<figure class="wp-block-image size-large"><a href="https://sowen.com/media/posts/87/Reviung-13-rotated.jpg"><figure class="wp-image-1351"><img loading="lazy" src="https://sowen.com/media/posts/87/Reviung-13-rotated.jpg" alt=""  sizes="(max-width: 768px) 100vw, 768px" srcset="https://sowen.com/media/posts/87/responsive/Reviung-13-rotated-xs.jpg 300w ,https://sowen.com/media/posts/87/responsive/Reviung-13-rotated-sm.jpg 480w ,https://sowen.com/media/posts/87/responsive/Reviung-13-rotated-md.jpg 768w"></figure></a></figure>
<!-- /wp:image -->

<!-- wp:image {"id":1349,"sizeSlug":"large","linkDestination":"media"} -->
<figure class="wp-block-image size-large"><a href="https://sowen.com/media/posts/87/Reviung-12-rotated.jpg"><figure class="wp-image-1349"><img loading="lazy" src="https://sowen.com/media/posts/87/Reviung-12-rotated.jpg" alt=""  sizes="(max-width: 768px) 100vw, 768px" srcset="https://sowen.com/media/posts/87/responsive/Reviung-12-rotated-xs.jpg 300w ,https://sowen.com/media/posts/87/responsive/Reviung-12-rotated-sm.jpg 480w ,https://sowen.com/media/posts/87/responsive/Reviung-12-rotated-md.jpg 768w"></figure></a></figure>
<!-- /wp:image -->

<!-- wp:image {"id":1353,"sizeSlug":"large","linkDestination":"media"} -->
<figure class="wp-block-image size-large"><a href="https://sowen.com/media/posts/87/Reviung-14.jpg"><figure class="wp-image-1353"><img loading="lazy" src="https://sowen.com/media/posts/87/Reviung-14.jpg" alt=""  sizes="(max-width: 768px) 100vw, 768px" srcset="https://sowen.com/media/posts/87/responsive/Reviung-14-xs.jpg 300w ,https://sowen.com/media/posts/87/responsive/Reviung-14-sm.jpg 480w ,https://sowen.com/media/posts/87/responsive/Reviung-14-md.jpg 768w"></figure></a></figure>
<!-- /wp:image --></figure>
<!-- /wp:gallery -->

<!-- wp:paragraph -->
<p>I have now built 3 of these since the original workshop one.  One is my daily driver, and has clicky MX Blue switches and full 3 layers of acrylic.  This is a really solid keyboard and perfect for desktop use.</p>
<!-- /wp:paragraph -->

<!-- wp:paragraph -->
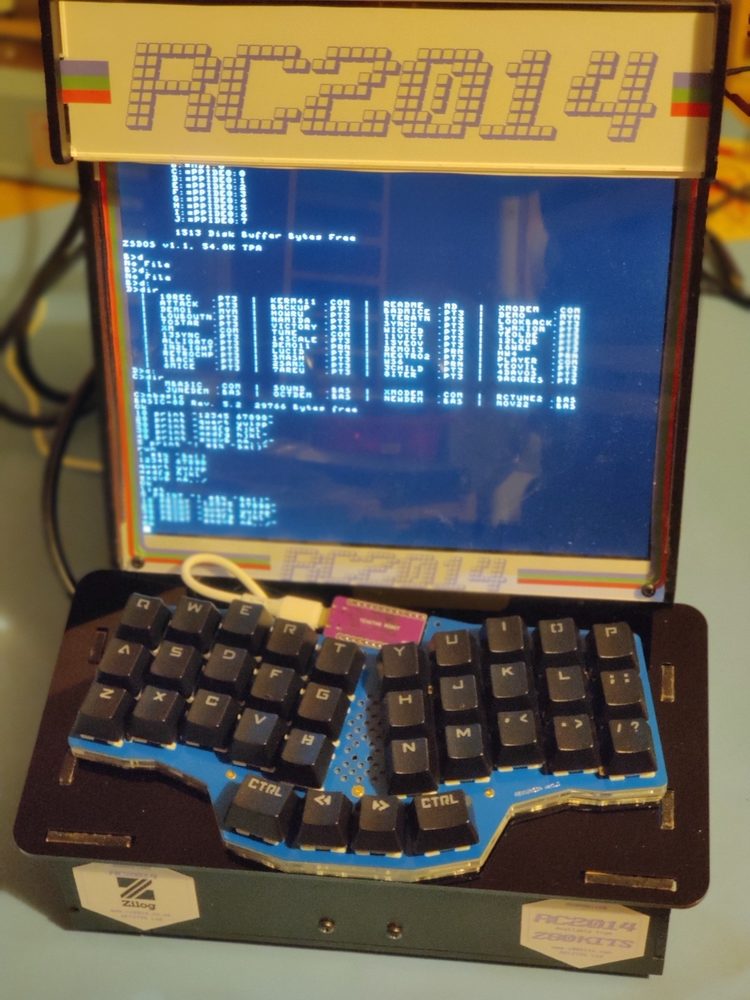
<p>Another was used to upgrade the keyboard from tactile switches on my <a href="https://rc2014.co.uk/1727/rcade-an-arcade-cabinet-for-rc2014/" data-type="link" data-id="https://rc2014.co.uk/1727/rcade-an-arcade-cabinet-for-rc2014/" class="extlink extlink-icon-1"  >RCade</a> cabinet with the lower acrylic plate being incorporated in to the chassis.  This will undoubtable make me quicker at arcade games like Zork, Hitchhikers Guide To The Galaxy and WordStar!</p>
<!-- /wp:paragraph -->

<!-- wp:image {"id":1359,"sizeSlug":"full","linkDestination":"media"} -->
<figure class="wp-block-image size-full"><a href="https://sowen.com/media/posts/87/Reviung-17-rotated.jpg"><figure class="wp-image-1359"><img loading="lazy" src="https://sowen.com/media/posts/87/Reviung-17-rotated.jpg" alt=""  sizes="(max-width: 768px) 100vw, 768px" srcset="https://sowen.com/media/posts/87/responsive/Reviung-17-rotated-xs.jpg 300w ,https://sowen.com/media/posts/87/responsive/Reviung-17-rotated-sm.jpg 480w ,https://sowen.com/media/posts/87/responsive/Reviung-17-rotated-md.jpg 768w"></figure></a></figure>
<!-- /wp:image -->

<!-- wp:paragraph -->
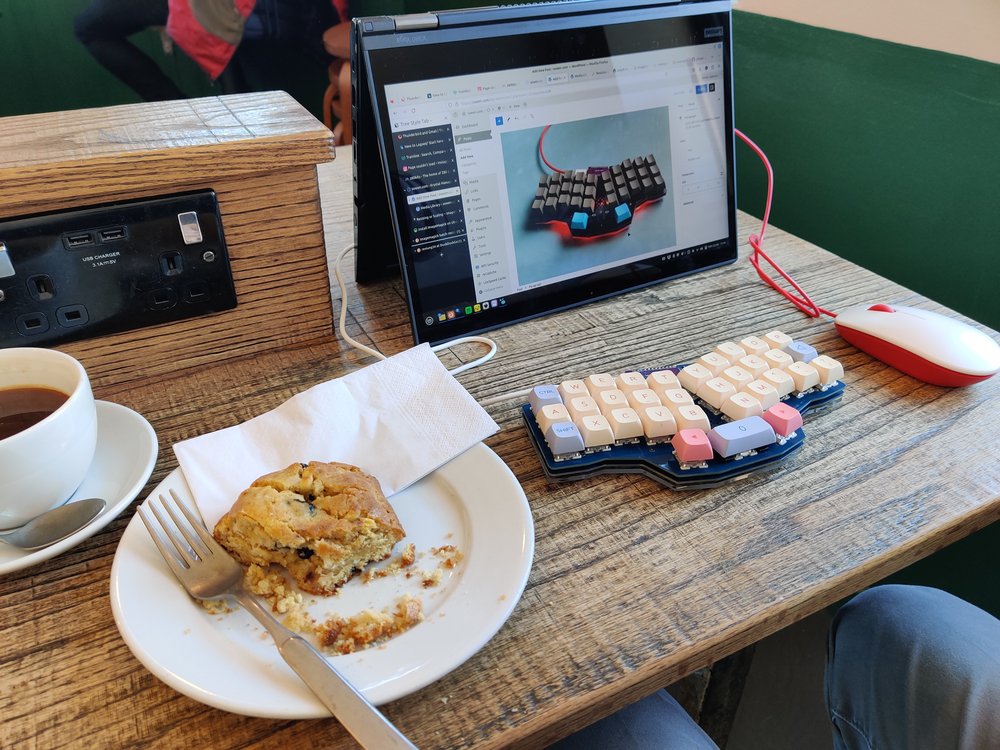
<p>A third one has been fitted with quiet MX Red switches, and only the lower base plate.  This gives a lighter keyboard to carry around, and is quiet enough to use out in coffee shops.</p>
<!-- /wp:paragraph -->

<!-- wp:image {"id":1387,"sizeSlug":"full","linkDestination":"media"} -->
<figure class="wp-block-image size-full"><a href="https://sowen.com/media/posts/87/Reviung-Coffee-Shop.jpg"><figure class="wp-image-1387"><img loading="lazy" src="https://sowen.com/media/posts/87/Reviung-Coffee-Shop.jpg" alt=""  sizes="(max-width: 768px) 100vw, 768px" srcset="https://sowen.com/media/posts/87/responsive/Reviung-Coffee-Shop-xs.jpg 300w ,https://sowen.com/media/posts/87/responsive/Reviung-Coffee-Shop-sm.jpg 480w ,https://sowen.com/media/posts/87/responsive/Reviung-Coffee-Shop-md.jpg 768w"></figure></a></figure>
<!-- /wp:image -->

<!-- wp:heading {"level":1} -->
<h1 class="wp-block-heading">Downloads</h1>
<!-- /wp:heading -->

<!-- wp:paragraph -->
<p>I have made a cheat-sheet with all of they key combinations on them for whatever character you want to type.  I think I have found them all, although it wouldn't surprise me if there are still some combinations that I haven't discovered yet.  Download the pdf here</p>
<!-- /wp:paragraph -->

<!-- wp:image {"id":1389,"sizeSlug":"full","linkDestination":"custom"} -->
<figure class="wp-block-image size-full"><a href="https://sowen.com/wp-content/uploads/2023/10/Wheres-that-Fn-key.pdf" target="_blank" rel="noreferrer noopener"><figure class="wp-image-1389"><img loading="lazy" src="https://sowen.com/media/posts/87/Wheres-that-Fn-key.png" alt=""  sizes="(max-width: 768px) 100vw, 768px" srcset="https://sowen.com/media/posts/87/responsive/Wheres-that-Fn-key-xs.png 300w ,https://sowen.com/media/posts/87/responsive/Wheres-that-Fn-key-sm.png 480w ,https://sowen.com/media/posts/87/responsive/Wheres-that-Fn-key-md.png 768w"></figure></a></figure>
<!-- /wp:image -->

<!-- wp:paragraph -->
<p><a href="https://sowen.com/wp-content/uploads/2023/10/Wheres-that-Fn-key.pdf" data-type="attachment" data-id="1377" target="_blank" rel="noreferrer noopener">Where's That Fn Key</a></p>
<!-- /wp:paragraph -->
            ]]>
        </content>
    </entry>
    <entry>
        <title>Slow Badger Movie Player</title>
        <author>
            <name>Spencer</name>
        </author>
        <link href="https://sowen.com/slow-badger-movie-player.html"/>
        <id>https://sowen.com/slow-badger-movie-player.html</id>

        <updated>2022-12-02T10:33:02+00:00</updated>
            <summary type="html">
                <![CDATA[
                    <!-- wp:paragraph -->
<p>A couple of years ago I saw that somebody on the internet had made a Slow Movie Player, and that piqued my interest.  The basic idea is that your favourite film is  displayed on a screen at a really slow framerate.  Eink displays are ideal for this as they use no power except for when updating the image.  Their refresh rate is pretty poor compared to OLED displays, but if you're only updating once a minute, that's fine. A decent size eink display is pretty expensive though, so this idea went on the back burner.</p>
<!-- /wp:paragraph -->

<!-- wp:image {"id":1269,"sizeSlug":"medium","linkDestination":"media"} -->
<figure class="wp-block-image size-medium"><a href="https://sowen.com/wp-content/uploads/2022/12/Slow-Badger-34-scaled.jpg"><figure class="wp-image-1269"><img loading="lazy" src="https://sowen.com/media/posts/85/Slow-Badger-34-300x225.jpg" alt=""  sizes="(max-width: 768px) 100vw, 768px" srcset="https://sowen.com/media/posts/85/responsive/Slow-Badger-34-300x225-xs.jpg 300w ,https://sowen.com/media/posts/85/responsive/Slow-Badger-34-300x225-sm.jpg 480w ,https://sowen.com/media/posts/85/responsive/Slow-Badger-34-300x225-md.jpg 768w"></figure></a></figure>
<!-- /wp:image -->

<!-- wp:paragraph -->
<p>Earlier this year,<a rel="noreferrer noopener" href="https://shop.pimoroni.com/products/badger-2040" target="_blank"> Pimoroni released the Badger</a>. A small eink display with a built in RP2040 (Raspbrry Pi Pico) which was ideal as a programmable name badge - hence the name. This was really cool, although I didn't have a need for a name badge. This also went on the back burner.</p>
<!-- /wp:paragraph -->

<!-- wp:more -->

                ]]>
            </summary>
        <content type="html">
            <![CDATA[
                <!-- wp:paragraph -->
<p>A couple of years ago I saw that somebody on the internet had made a Slow Movie Player, and that piqued my interest.  The basic idea is that your favourite film is  displayed on a screen at a really slow framerate.  Eink displays are ideal for this as they use no power except for when updating the image.  Their refresh rate is pretty poor compared to OLED displays, but if you're only updating once a minute, that's fine. A decent size eink display is pretty expensive though, so this idea went on the back burner.</p>
<!-- /wp:paragraph -->

<!-- wp:image {"id":1269,"sizeSlug":"medium","linkDestination":"media"} -->
<figure class="wp-block-image size-medium"><a href="https://sowen.com/wp-content/uploads/2022/12/Slow-Badger-34-scaled.jpg"><figure class="wp-image-1269"><img loading="lazy" src="https://sowen.com/media/posts/85/Slow-Badger-34-300x225.jpg" alt=""  sizes="(max-width: 768px) 100vw, 768px" srcset="https://sowen.com/media/posts/85/responsive/Slow-Badger-34-300x225-xs.jpg 300w ,https://sowen.com/media/posts/85/responsive/Slow-Badger-34-300x225-sm.jpg 480w ,https://sowen.com/media/posts/85/responsive/Slow-Badger-34-300x225-md.jpg 768w"></figure></a></figure>
<!-- /wp:image -->

<!-- wp:paragraph -->
<p>Earlier this year,<a href="https://shop.pimoroni.com/products/badger-2040"   target="_blank" class="extlink extlink-icon-1"  rel="noreferrer noopener"> Pimoroni released the Badger</a>. A small eink display with a built in RP2040 (Raspbrry Pi Pico) which was ideal as a programmable name badge - hence the name. This was really cool, although I didn't have a need for a name badge. This also went on the back burner.</p>
<!-- /wp:paragraph -->

<!-- wp:more -->

<!-- /wp:more -->

<!-- wp:heading -->
<h2>The Screenplay </h2>
<!-- /wp:heading -->

<!-- wp:paragraph -->
<p>Last week at EMF Camp, I picked up a badger, and suddenly my back burners collided. What... If... A... Badger... Was... A... Slow... Movie... Payer?</p>
<!-- /wp:paragraph -->

<!-- wp:image {"id":1271,"sizeSlug":"medium","linkDestination":"media"} -->
<figure class="wp-block-image size-medium"><a href="https://sowen.com/wp-content/uploads/2022/12/Slow-Badger-2-scaled.jpg"><figure class="wp-image-1271"><img loading="lazy" src="https://sowen.com/media/posts/85/Slow-Badger-2-300x225.jpg" alt=""  sizes="(max-width: 768px) 100vw, 768px" srcset="https://sowen.com/media/posts/85/responsive/Slow-Badger-2-300x225-xs.jpg 300w ,https://sowen.com/media/posts/85/responsive/Slow-Badger-2-300x225-sm.jpg 480w ,https://sowen.com/media/posts/85/responsive/Slow-Badger-2-300x225-md.jpg 768w"></figure></a></figure>
<!-- /wp:image -->

<!-- wp:paragraph -->
<p>The Badger runs Micro Python, and the documentation for this and the specific Badger stuff is great for a non-programmer like me.  Using Pimoroni's Python image converter, I could easily get the Badger to display a single image. That was all I needed to know to go ahead with this crazy idea. All I needed was every single frame from a film and set it to display them one at a time. How hard can that be?</p>
<!-- /wp:paragraph -->

<!-- wp:image {"id":1273,"sizeSlug":"medium","linkDestination":"media"} -->
<figure class="wp-block-image size-medium"><a href="https://sowen.com/wp-content/uploads/2022/12/Slow-Badger-4-scaled.jpg"><figure class="wp-image-1273"><img loading="lazy" src="https://sowen.com/media/posts/85/Slow-Badger-4-300x225.jpg" alt=""  sizes="(max-width: 768px) 100vw, 768px" srcset="https://sowen.com/media/posts/85/responsive/Slow-Badger-4-300x225-xs.jpg 300w ,https://sowen.com/media/posts/85/responsive/Slow-Badger-4-300x225-sm.jpg 480w ,https://sowen.com/media/posts/85/responsive/Slow-Badger-4-300x225-md.jpg 768w"></figure></a></figure>
<!-- /wp:image -->

<!-- wp:heading -->
<h2>Enter Stumbling Block The First - Stage Left</h2>
<!-- /wp:heading -->

<!-- wp:paragraph -->
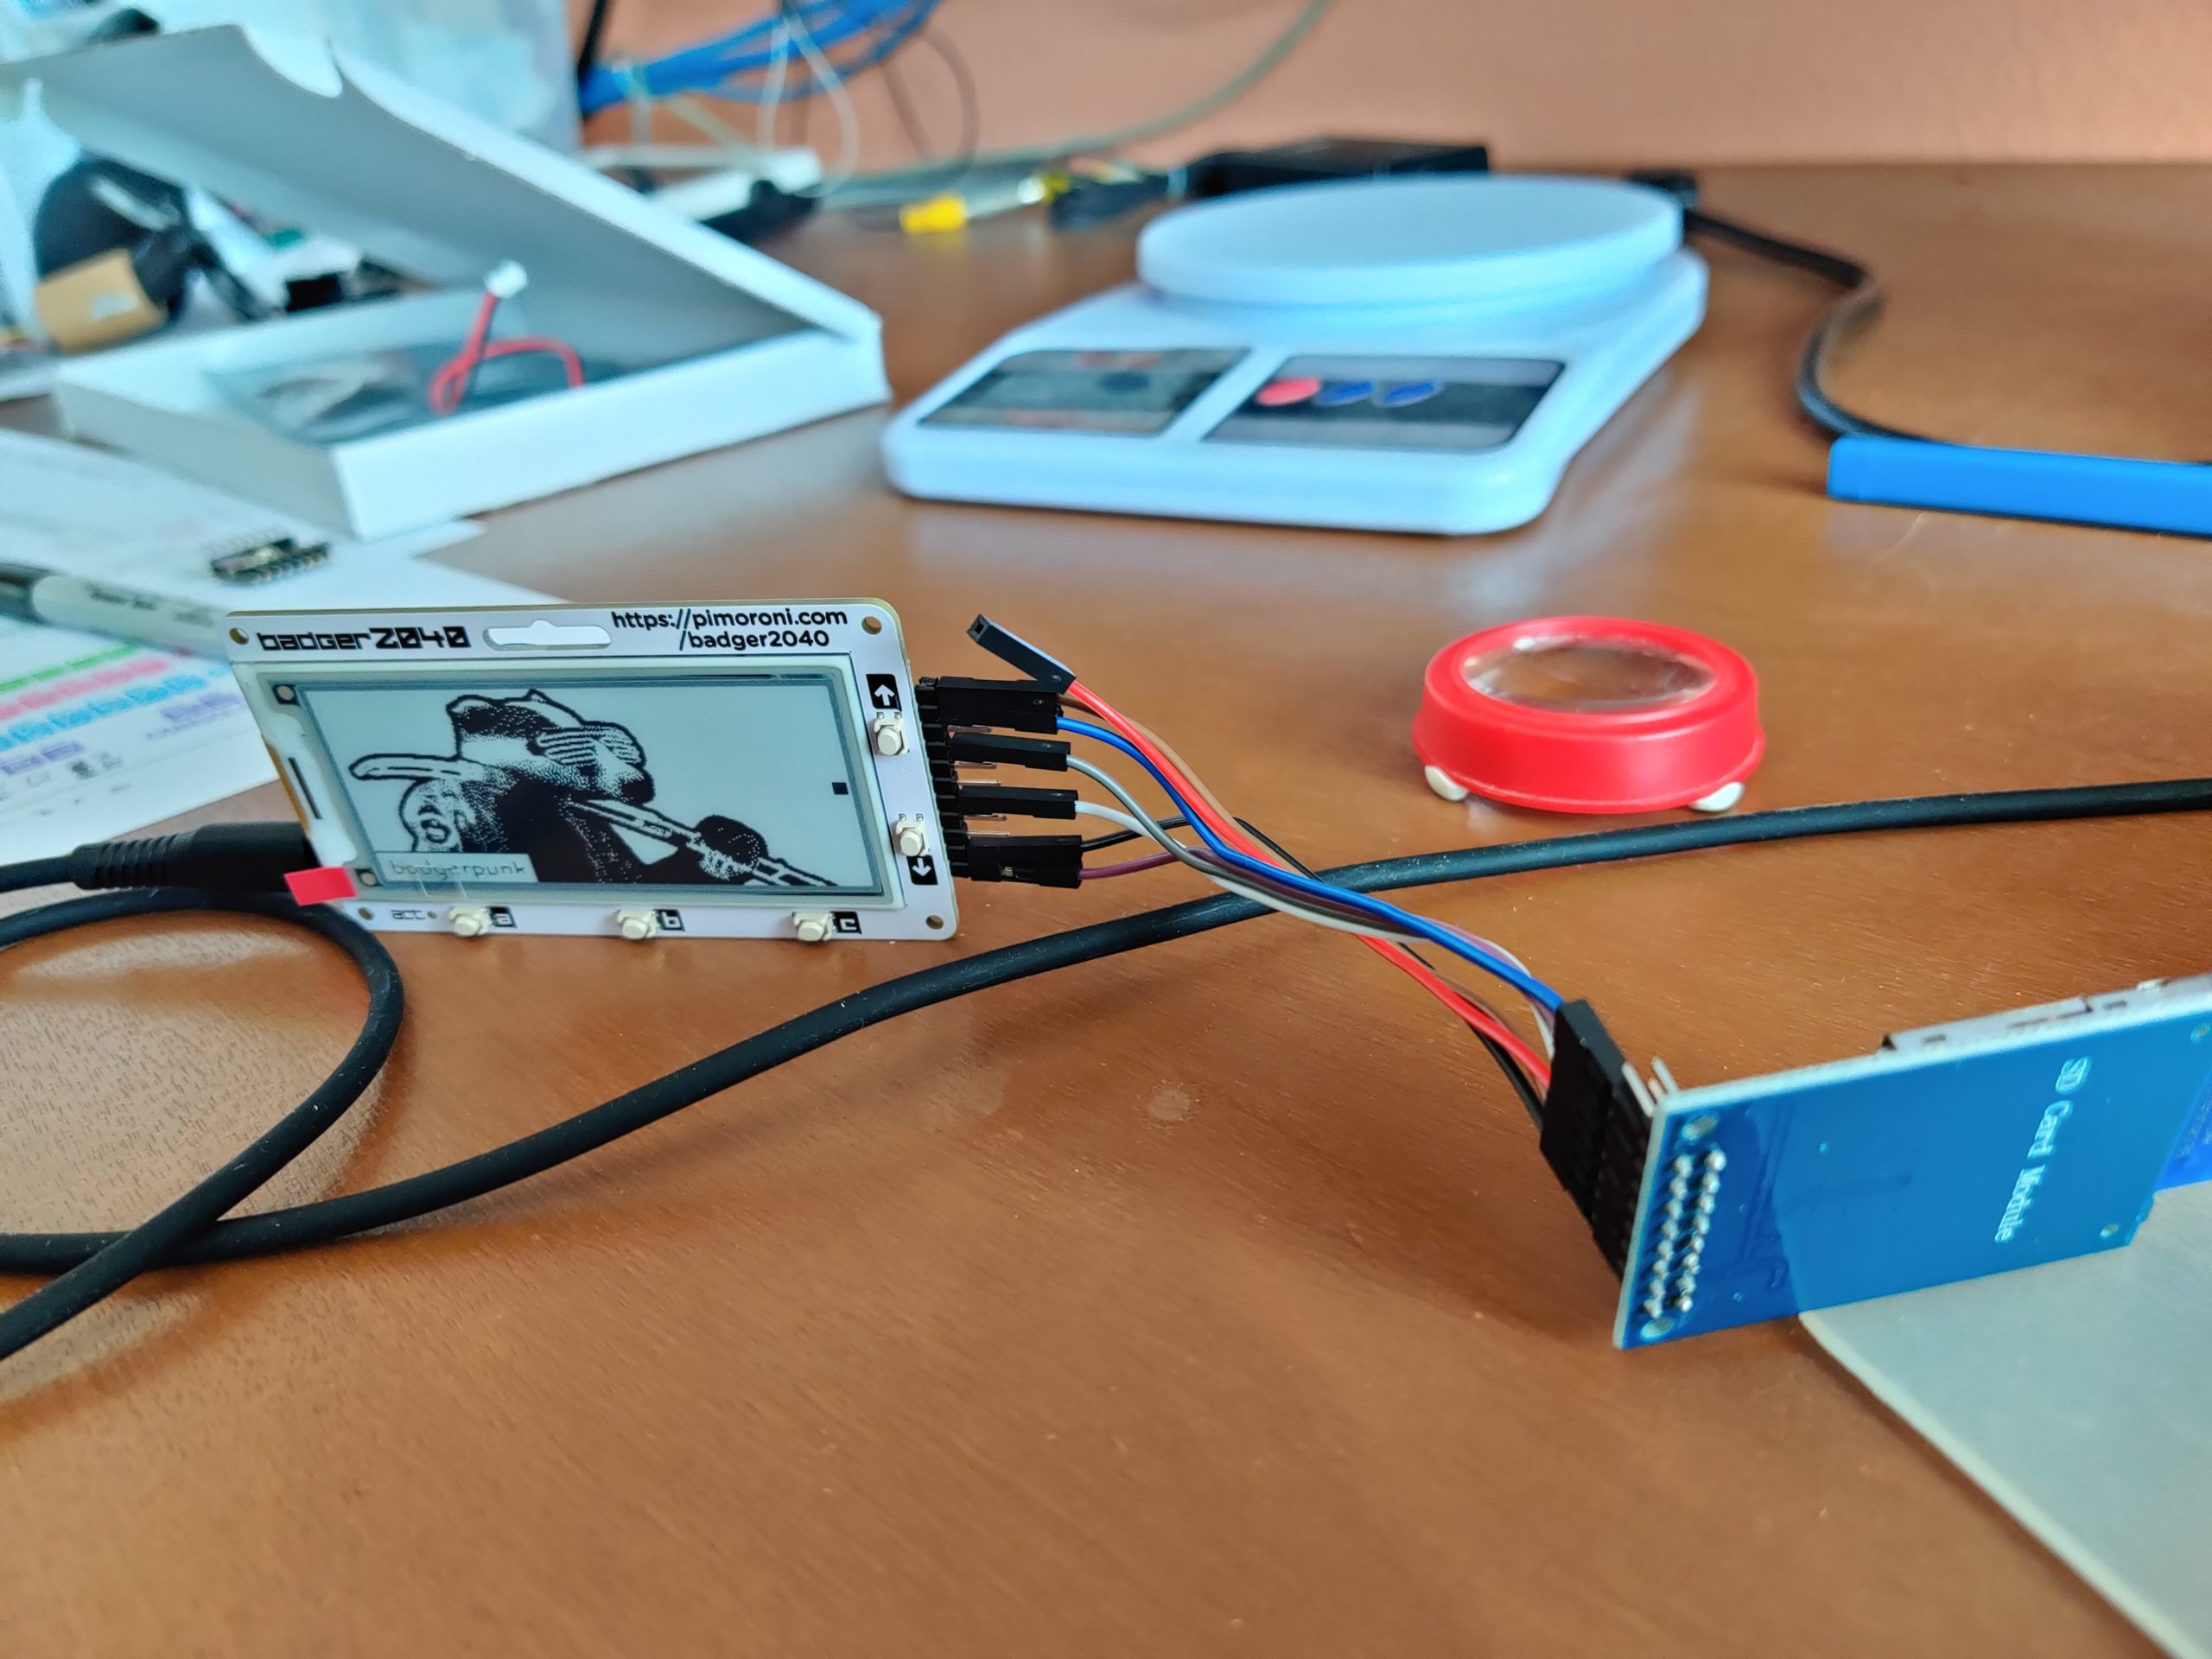
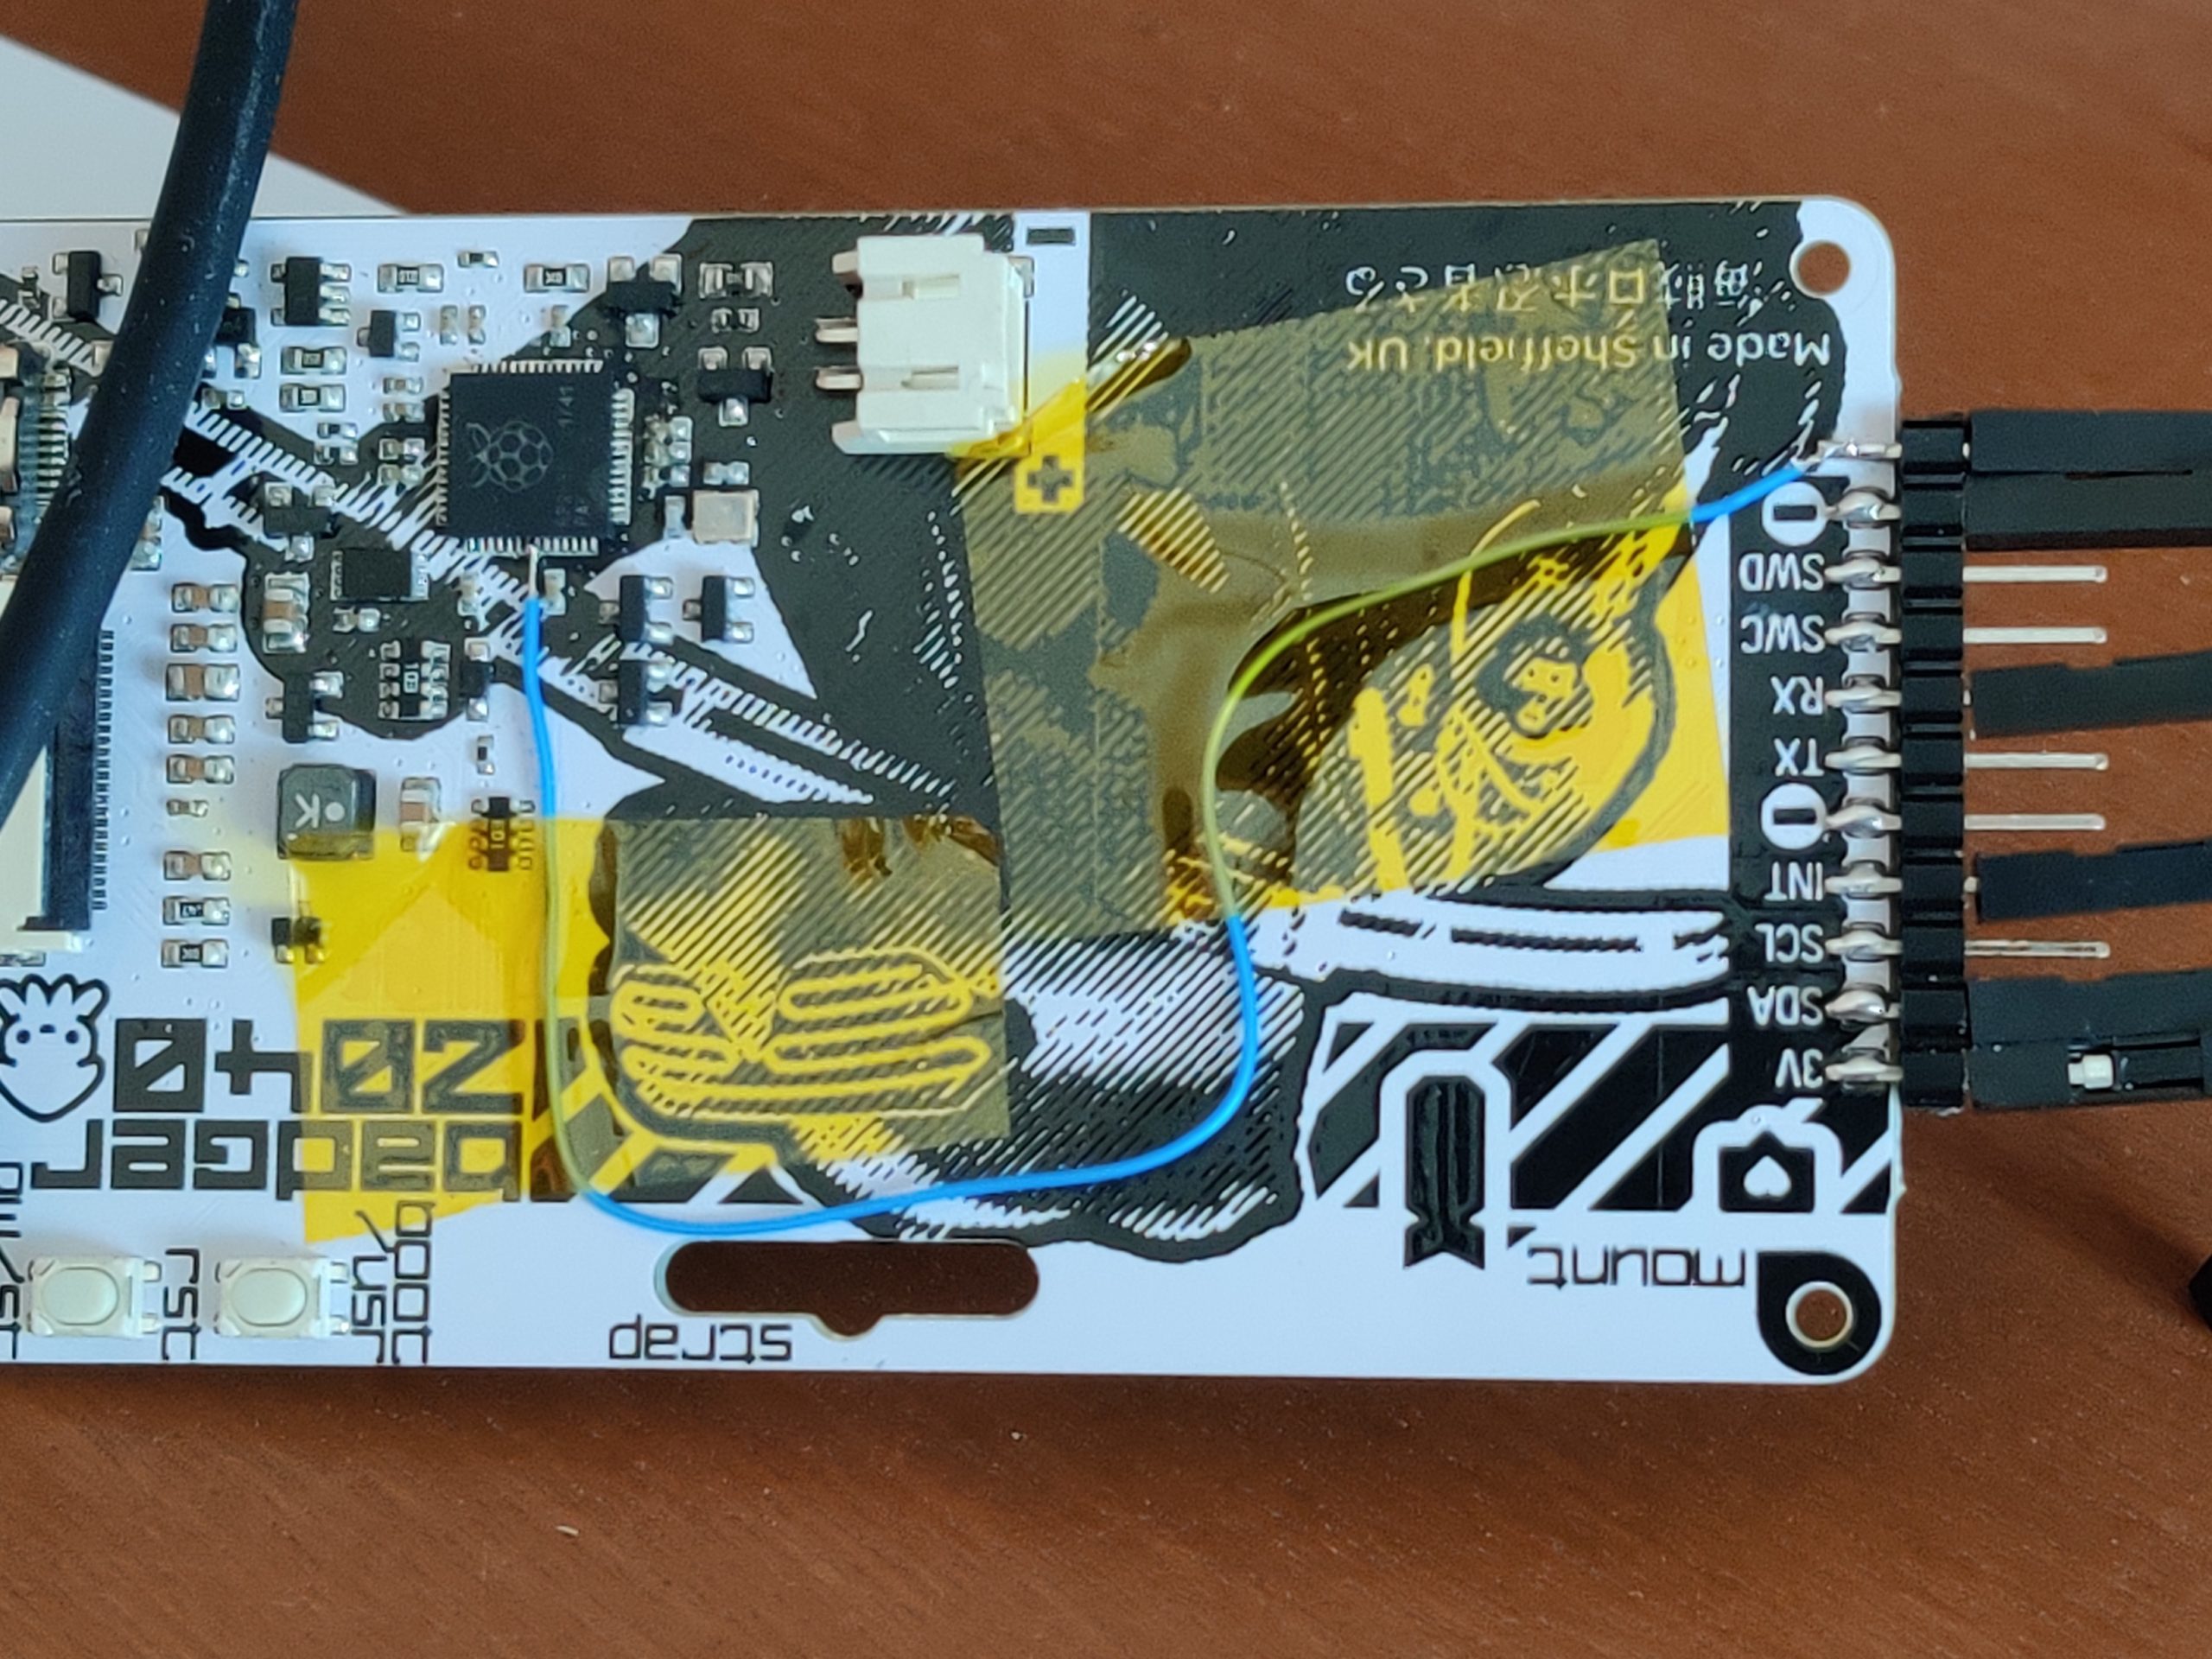
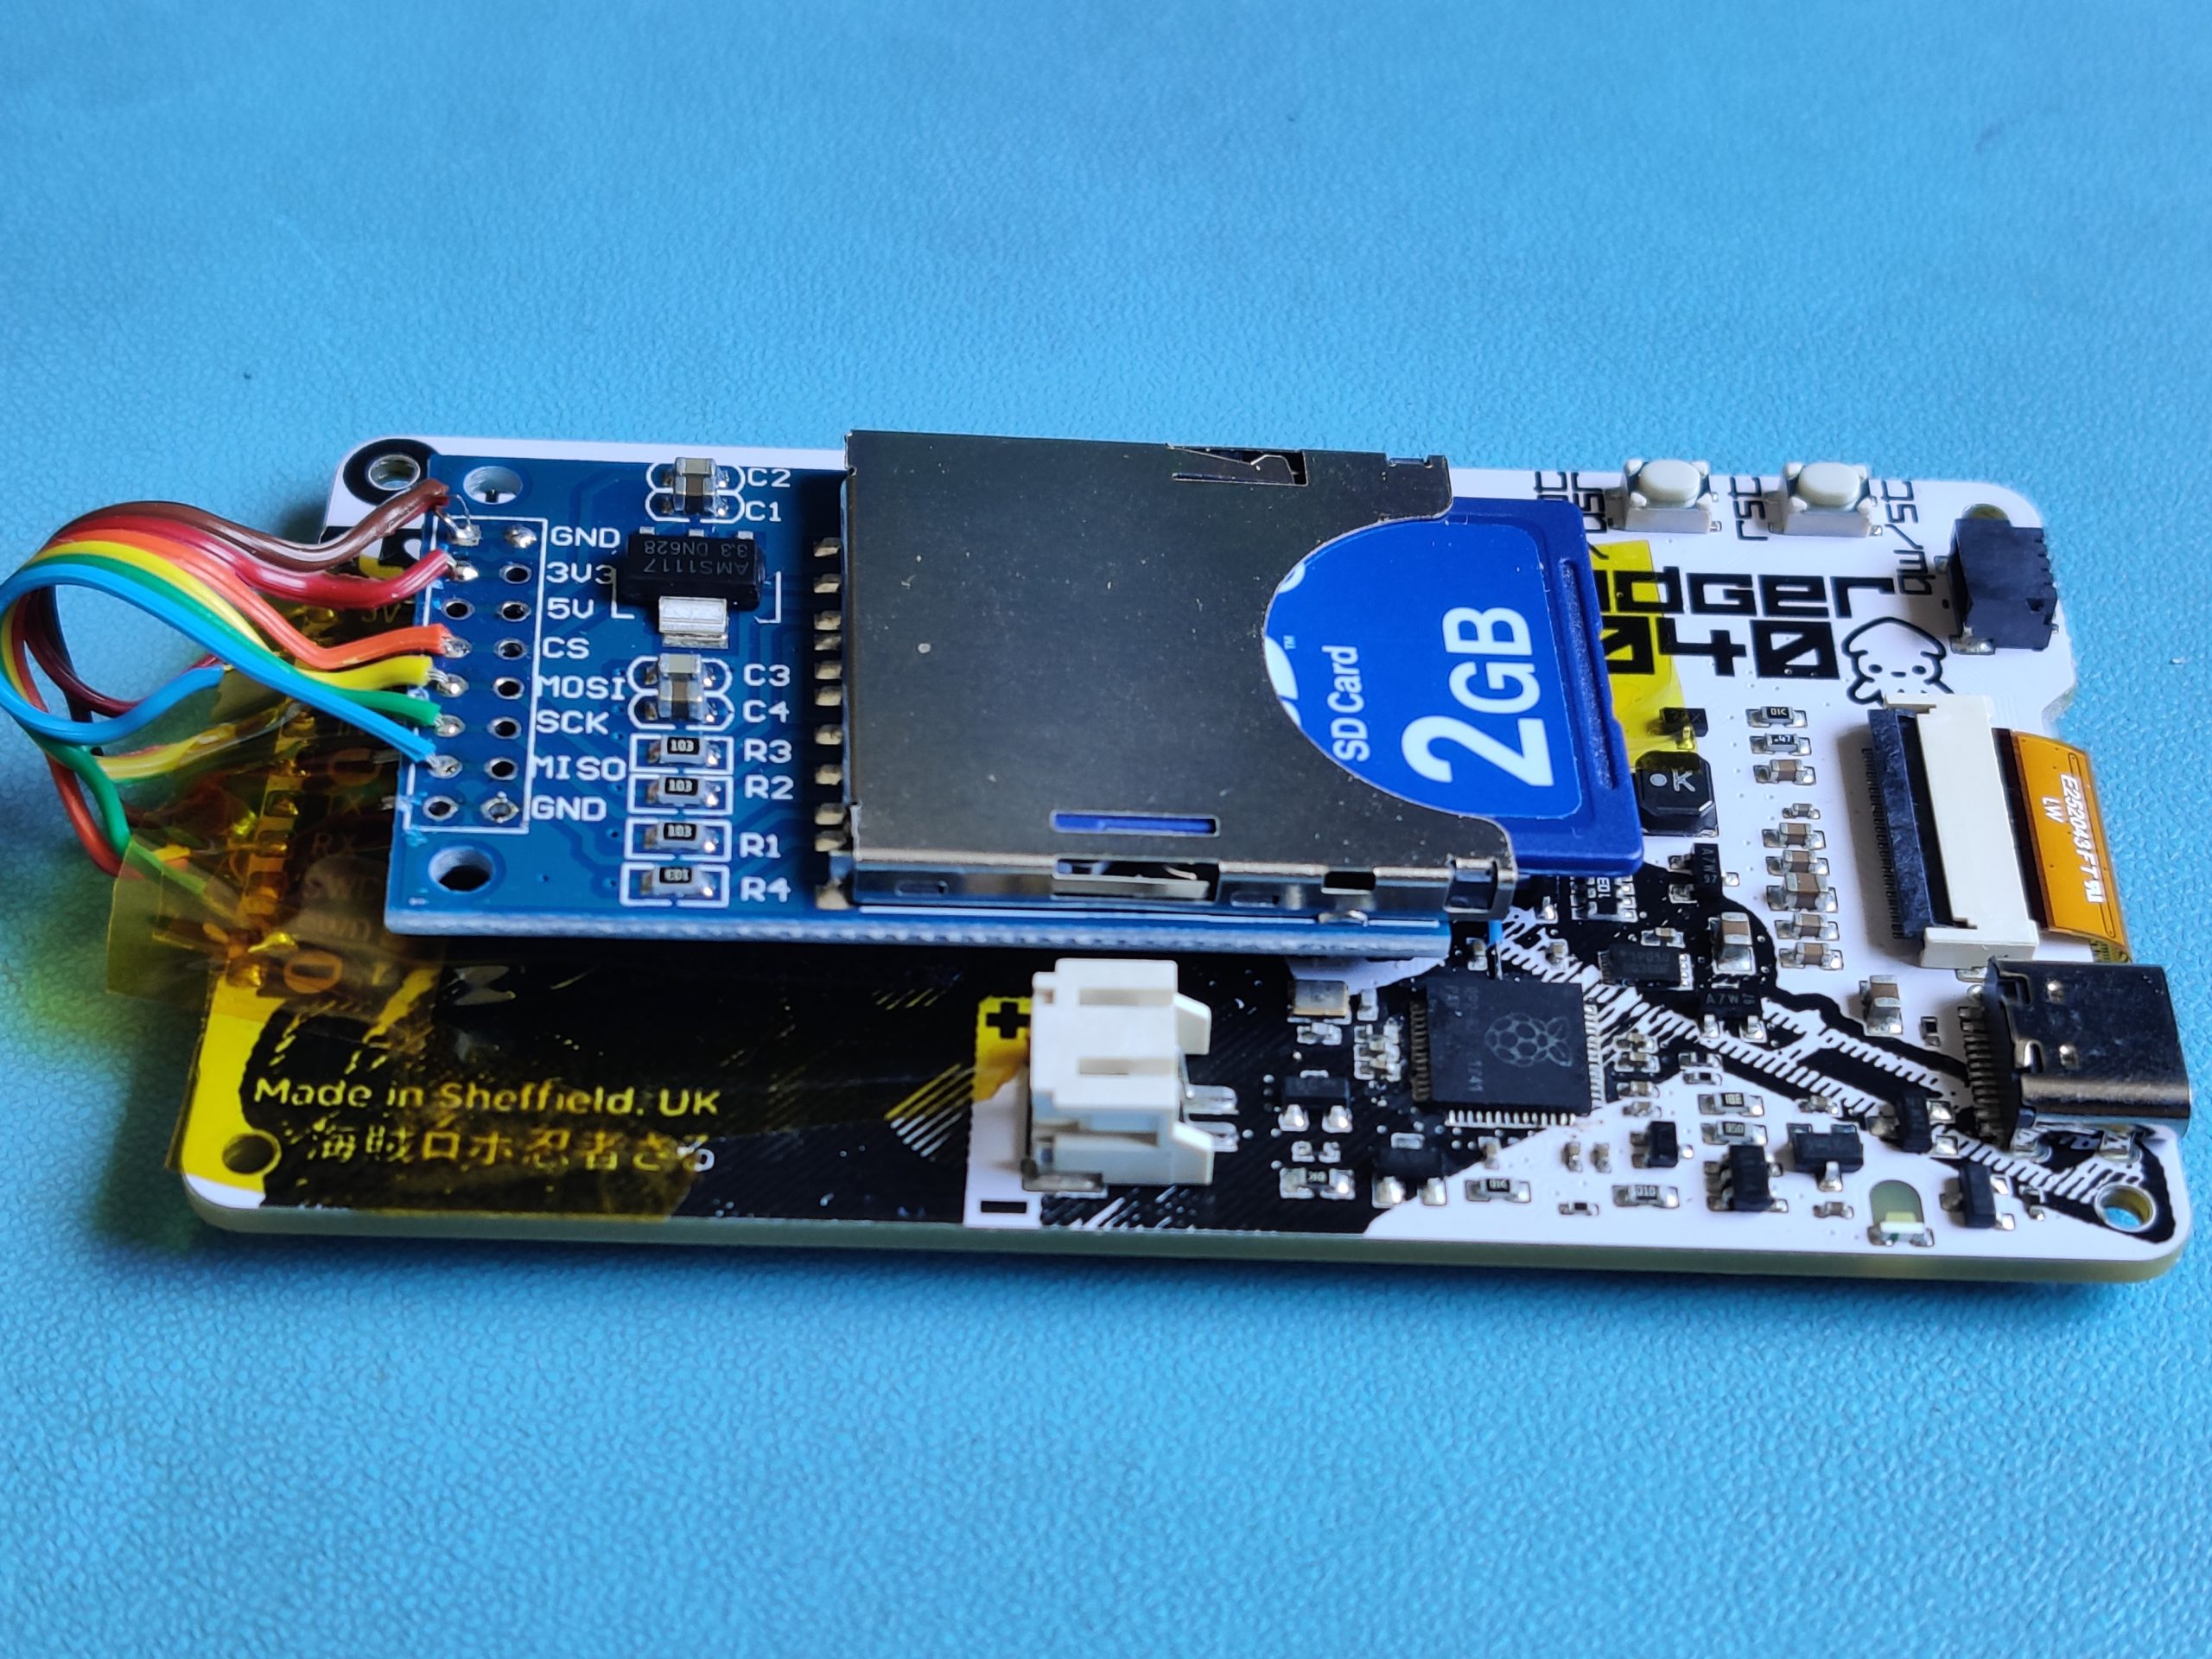
<p>A raw image of 296x128 pixels is pretty small (4.7k actually) but a film has a LOT of them! Typically 24 for every second of it. That soon adds up and is way too big for the Badgers memory. So some external storage is needed.  The good folk at Pimoroni thought ahead and were kind enough to add i2c pins and some other signals to the back of the Badger. Sadly, an SD Card needs SPI, and although some of the SPI pins were present, SCK wasn't. I really thought this was going to be a deal breaker here, however, the SCK that serves  MISO and MOSI 0 is simply unattached on the RP2040. An ideal excuse to add a Badger Bodge Wire!</p>
<!-- /wp:paragraph -->

<!-- wp:image {"id":1275,"sizeSlug":"medium","linkDestination":"media"} -->
<figure class="wp-block-image size-medium"><a href="https://sowen.com/wp-content/uploads/2022/12/Slow-Badger-7-scaled.jpg"><figure class="wp-image-1275"><img loading="lazy" src="https://sowen.com/media/posts/85/Slow-Badger-7-300x225.jpg" alt=""  sizes="(max-width: 768px) 100vw, 768px" srcset="https://sowen.com/media/posts/85/responsive/Slow-Badger-7-300x225-xs.jpg 300w ,https://sowen.com/media/posts/85/responsive/Slow-Badger-7-300x225-sm.jpg 480w ,https://sowen.com/media/posts/85/responsive/Slow-Badger-7-300x225-md.jpg 768w"></figure></a></figure>
<!-- /wp:image -->

<!-- wp:paragraph -->
<p>There was a certain amount of trial and error getting the Pico SD Library to work here, although this was mainly my error in not understanding how it worked  Once I'd got it working, displaying an image worked a treat.</p>
<!-- /wp:paragraph -->

<!-- wp:image {"id":1279,"sizeSlug":"medium","linkDestination":"media"} -->
<figure class="wp-block-image size-medium"><a href="https://sowen.com/wp-content/uploads/2022/12/Slow-Badger-8-scaled.jpg"><figure class="wp-image-1279"><img loading="lazy" src="https://sowen.com/media/posts/85/Slow-Badger-8-300x225.jpg" alt=""  sizes="(max-width: 768px) 100vw, 768px" srcset="https://sowen.com/media/posts/85/responsive/Slow-Badger-8-300x225-xs.jpg 300w ,https://sowen.com/media/posts/85/responsive/Slow-Badger-8-300x225-sm.jpg 480w ,https://sowen.com/media/posts/85/responsive/Slow-Badger-8-300x225-md.jpg 768w"></figure></a></figure>
<!-- /wp:image -->

<!-- wp:heading -->
<h2>Act 2: A Dress Rehearsal. </h2>
<!-- /wp:heading -->

<!-- wp:paragraph -->
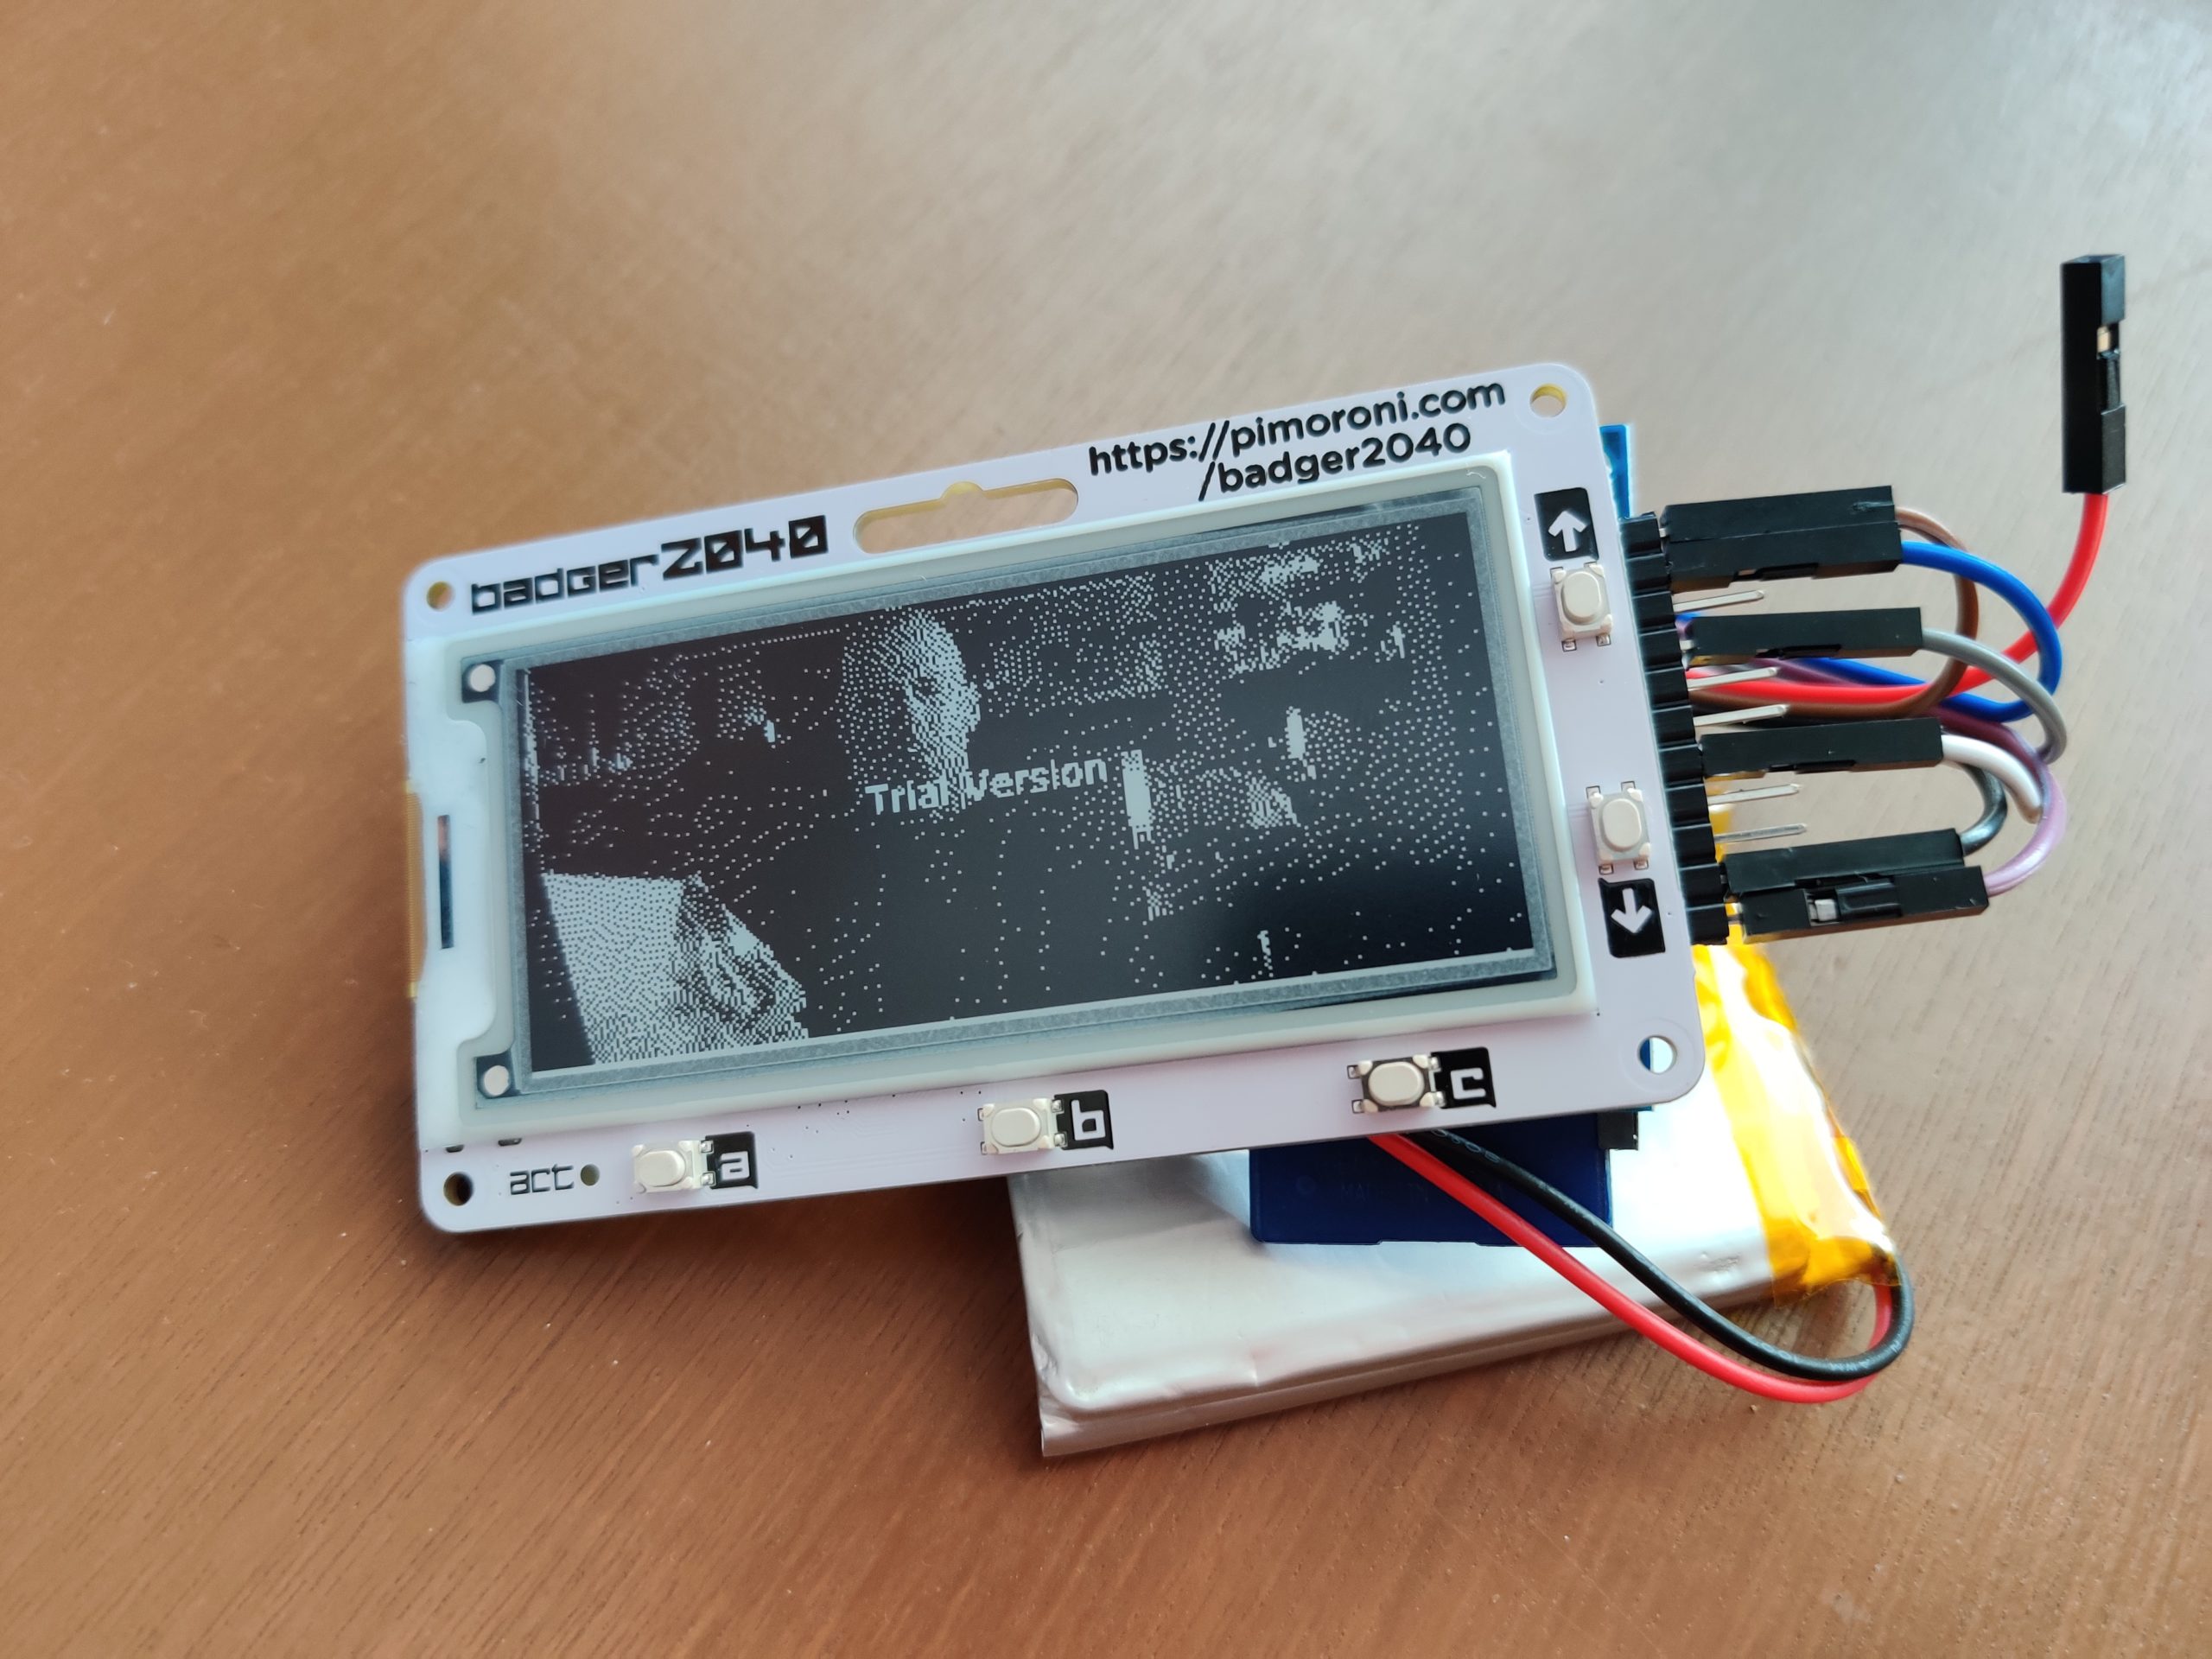
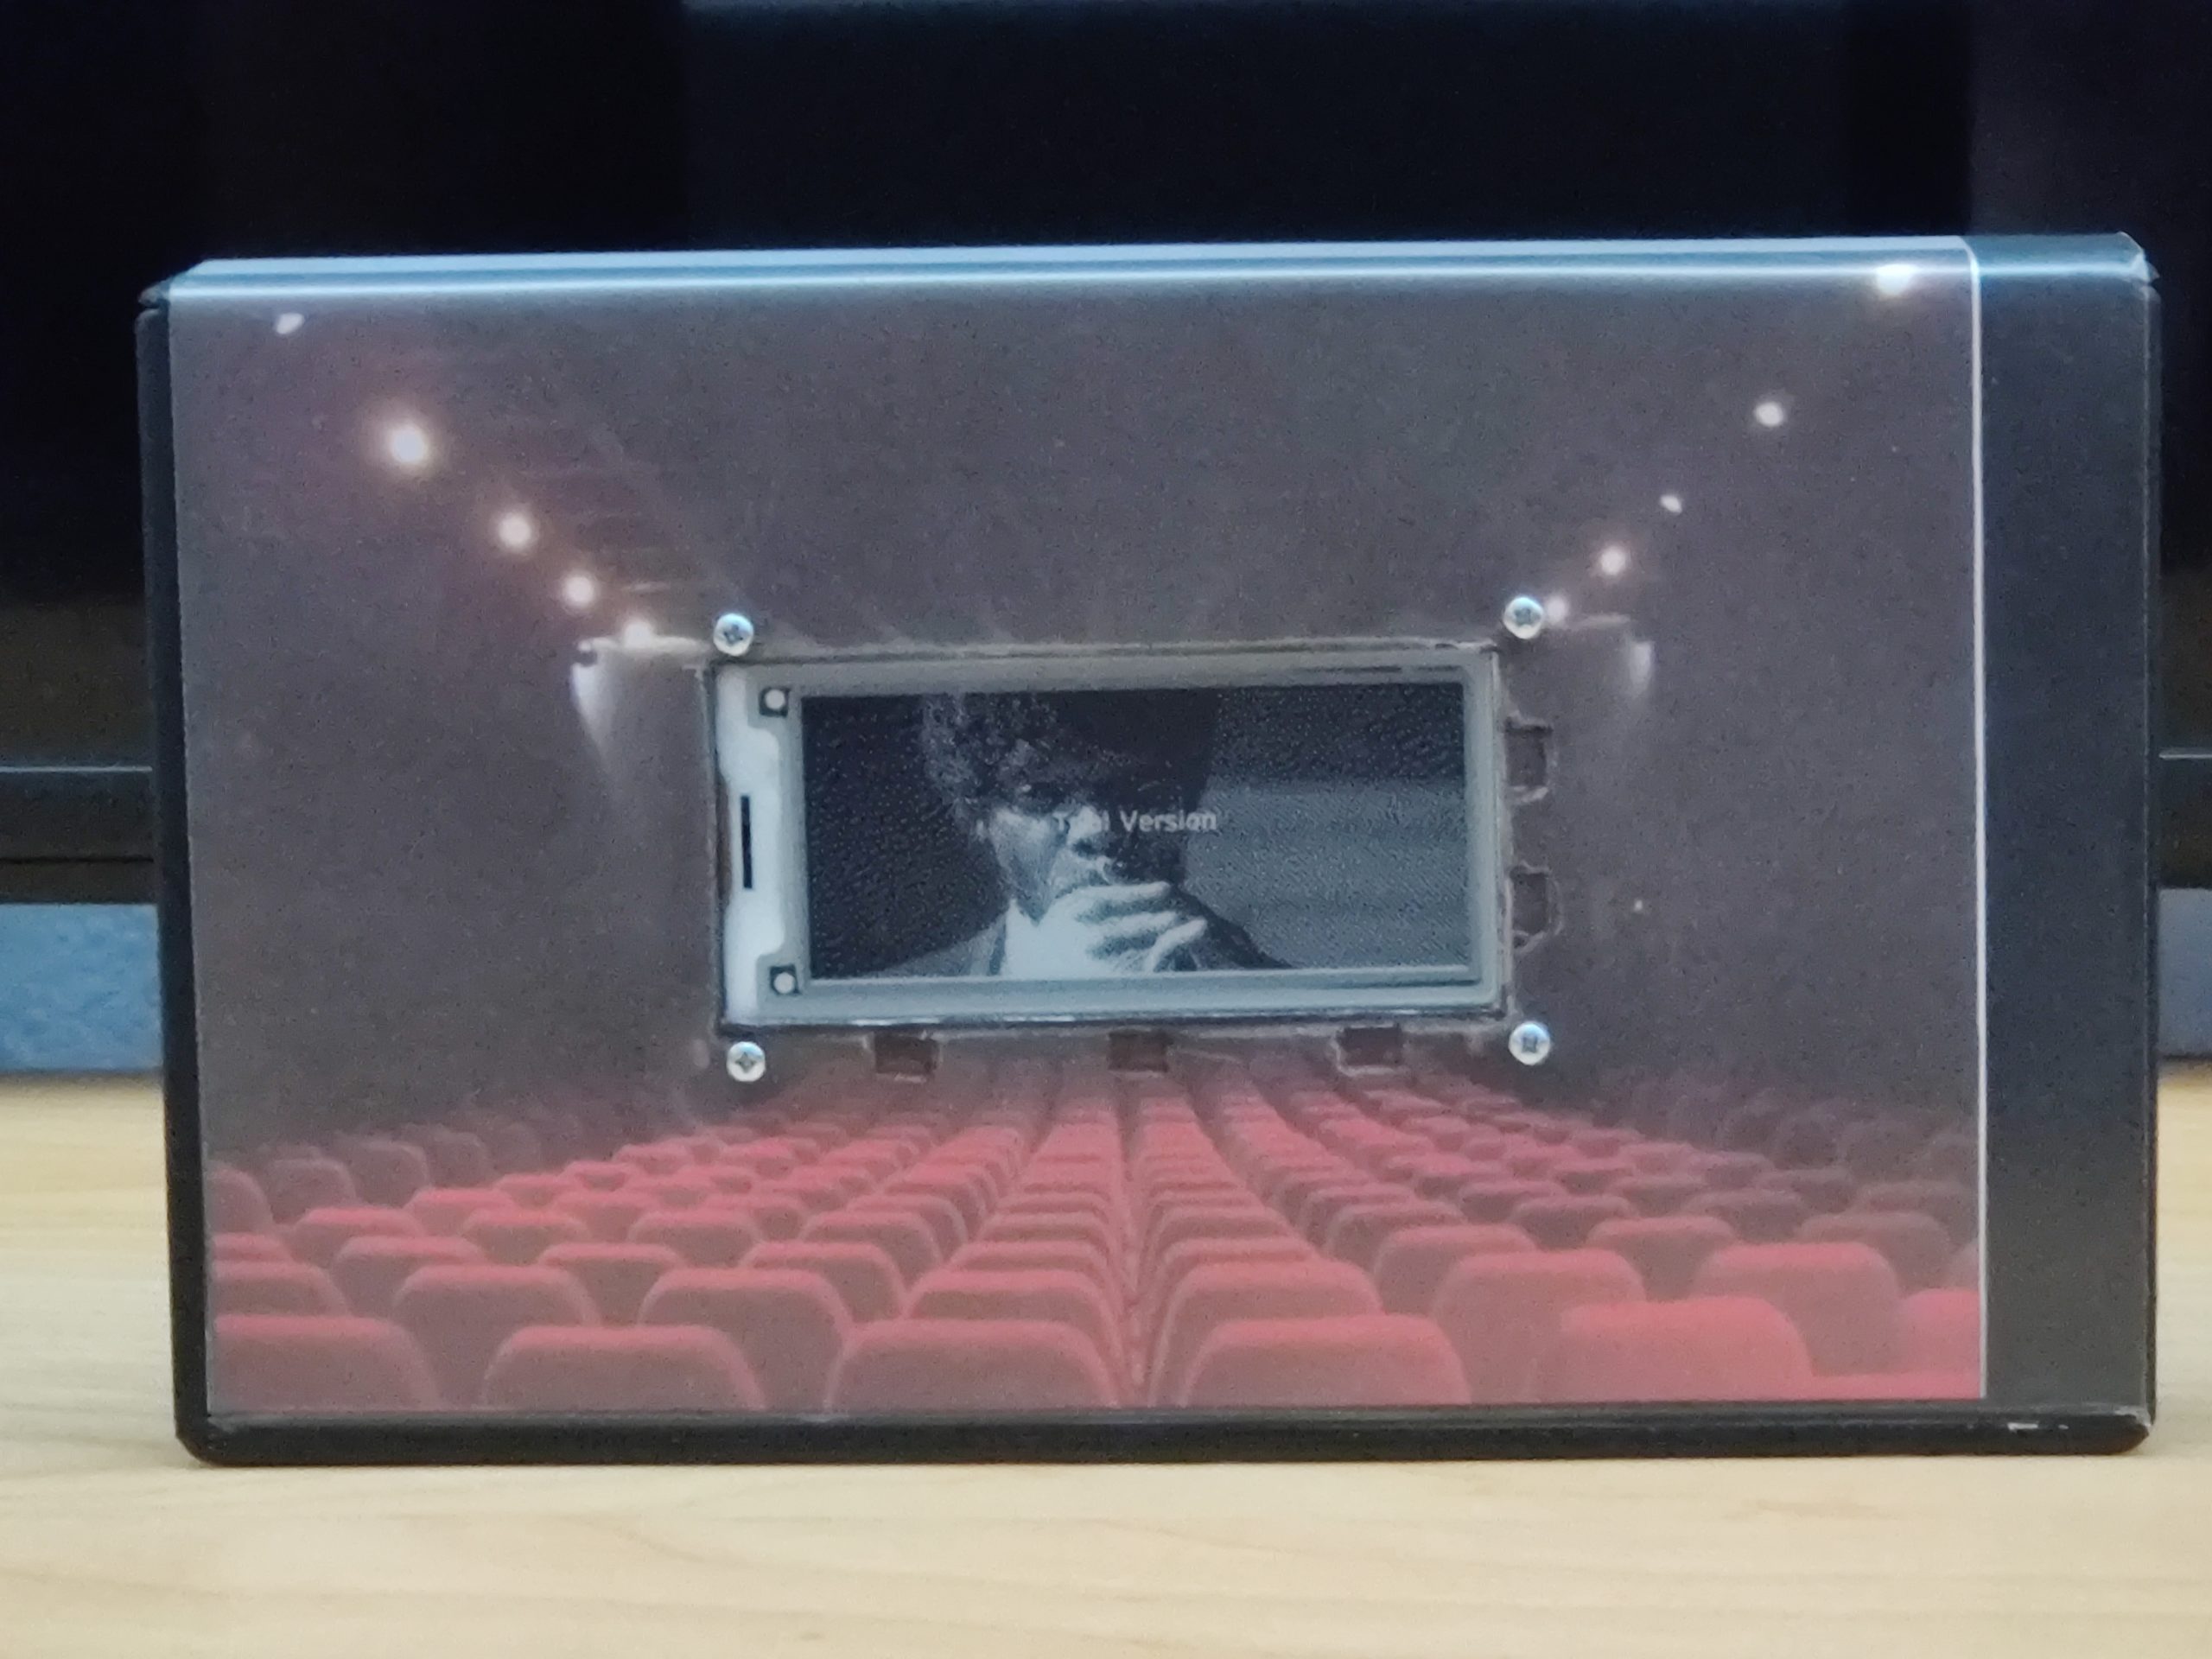
<p>The Image Converter program does a great job of converting .png files in to something the Badger likes. All I needed to do was find a way to get a .png for every frame in a movie. there are a lot of free online converters, but I tried  the demo version of <a href="http://www.hootech.com/total-video-audio-converter/" target="_blank"  class="extlink extlink-icon-1"  rel="noreferrer noopener">Total Video Audio Converter </a>and it seemed to do exactly what I wanted, albeit with Trial Version stamped on ever frame. It was $29 for the full paid for version though, so after being happy that it did what I wanted it to do, I paid for a licence code.</p>
<!-- /wp:paragraph -->

<!-- wp:image {"id":1281,"sizeSlug":"medium","linkDestination":"media"} -->
<figure class="wp-block-image size-medium"><a href="https://sowen.com/wp-content/uploads/2022/12/Slow-Badger-10-scaled.jpg"><figure class="wp-image-1281"><img loading="lazy" src="https://sowen.com/media/posts/85/Slow-Badger-10-300x225.jpg" alt=""  sizes="(max-width: 768px) 100vw, 768px" srcset="https://sowen.com/media/posts/85/responsive/Slow-Badger-10-300x225-xs.jpg 300w ,https://sowen.com/media/posts/85/responsive/Slow-Badger-10-300x225-sm.jpg 480w ,https://sowen.com/media/posts/85/responsive/Slow-Badger-10-300x225-md.jpg 768w"></figure></a></figure>
<!-- /wp:image -->

<!-- wp:paragraph -->
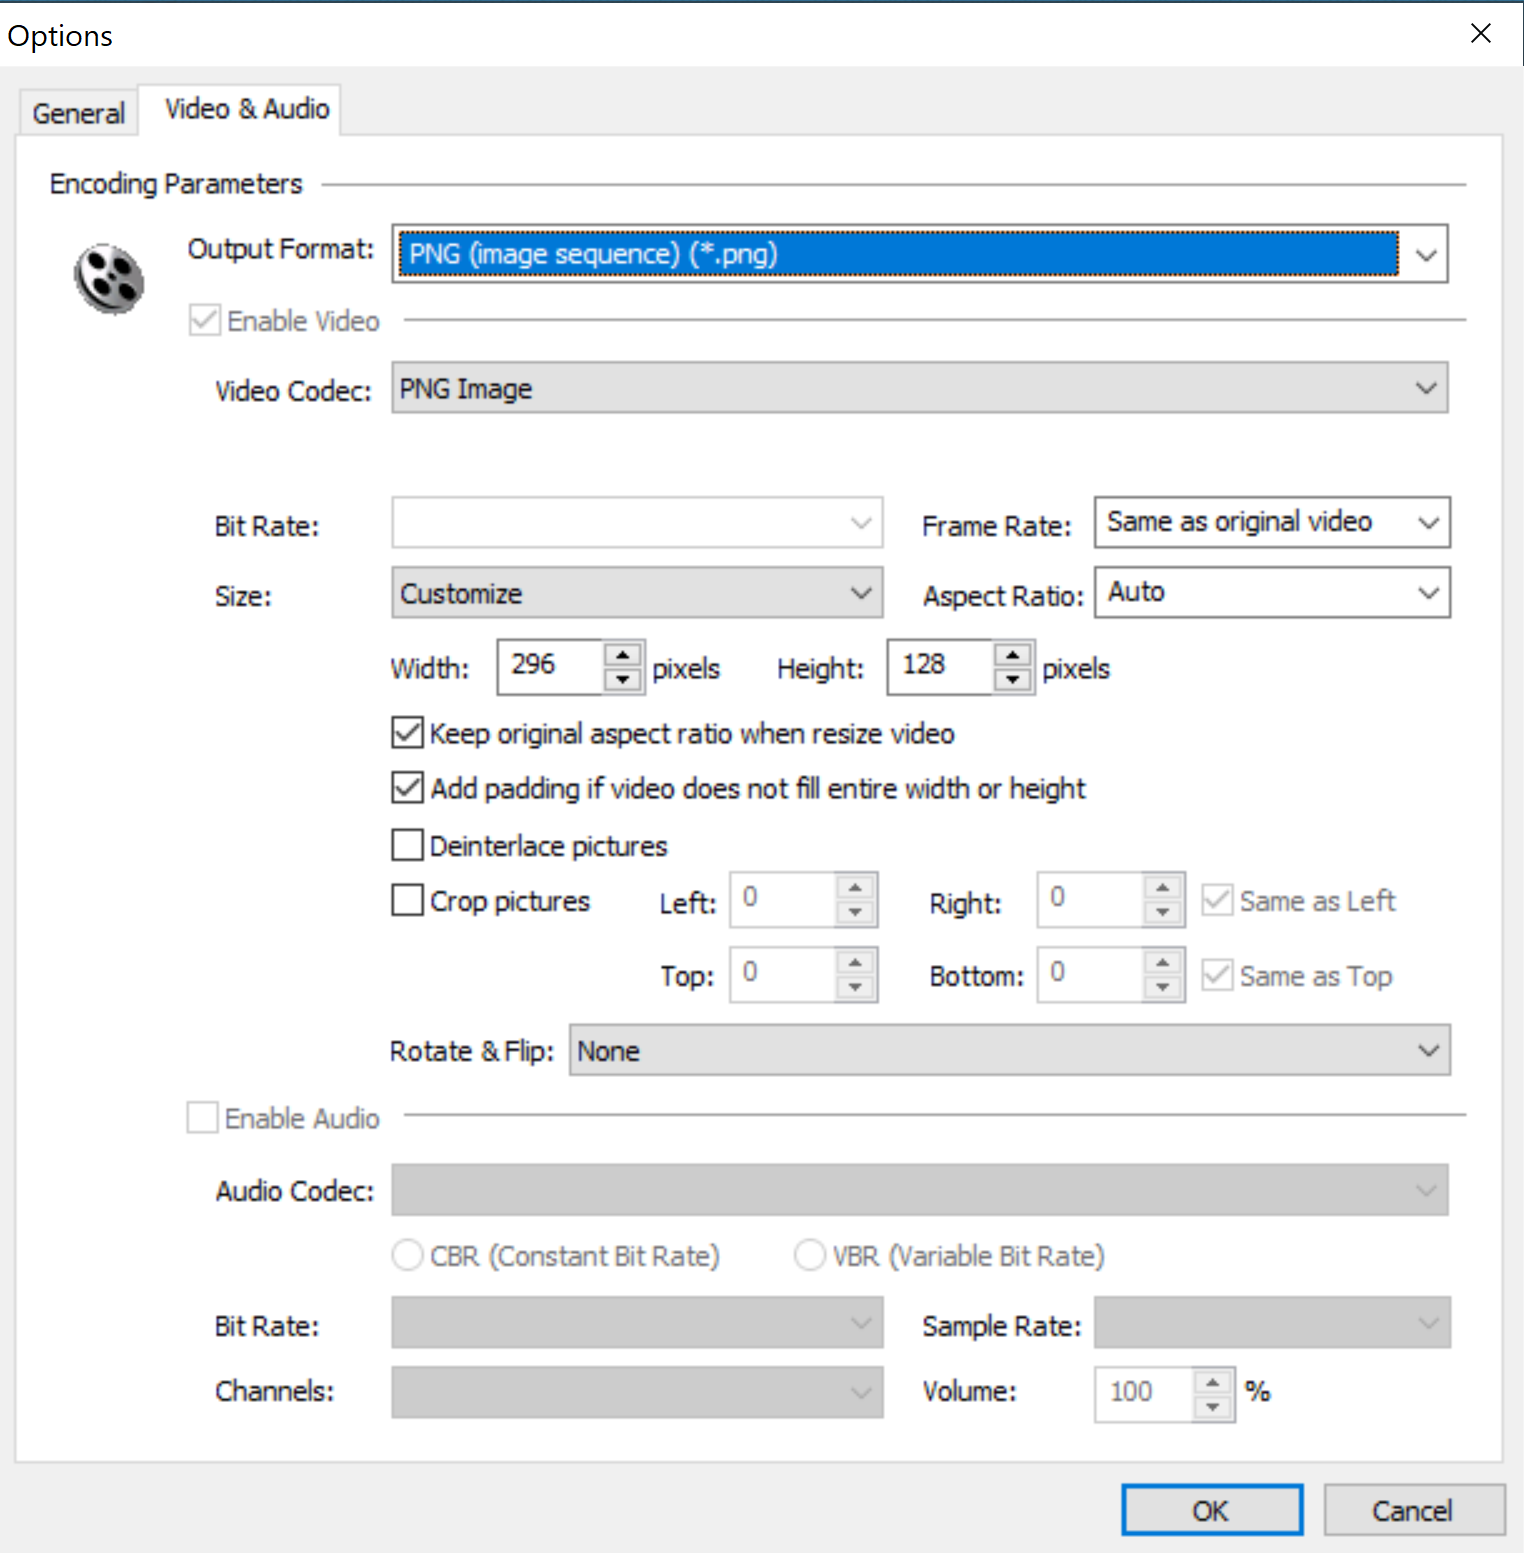
<p>The key settings for TVAC is to output .png files at a 296*128, keeping the original aspect ratio and adding padding where necessary.  A full movie takes ages to process (and would take much longer to watch!) so I picked a few seconds worth and gave it a try.</p>
<!-- /wp:paragraph -->

<!-- wp:image {"id":1283,"sizeSlug":"medium","linkDestination":"media"} -->
<figure class="wp-block-image size-medium"><a href="https://sowen.com/wp-content/uploads/2022/12/TVAC-Settings.png"><figure class="wp-image-1283"><img loading="lazy" src="https://sowen.com/media/posts/85/TVAC-Settings-294x300.png" alt=""  sizes="(max-width: 768px) 100vw, 768px" srcset="https://sowen.com/media/posts/85/responsive/TVAC-Settings-294x300-xs.png 300w ,https://sowen.com/media/posts/85/responsive/TVAC-Settings-294x300-sm.png 480w ,https://sowen.com/media/posts/85/responsive/TVAC-Settings-294x300-md.png 768w"></figure></a></figure>
<!-- /wp:image -->

<!-- wp:paragraph -->
<p></p>
<!-- /wp:paragraph -->

<!-- wp:heading -->
<h2>Lights! Camera! Action!</h2>
<!-- /wp:heading -->

<!-- wp:image {"id":1289,"sizeSlug":"medium","linkDestination":"media"} -->
<figure class="wp-block-image size-medium"><a href="https://sowen.com/wp-content/uploads/2022/12/Slow-Badger-20-scaled.jpg"><figure class="wp-image-1289"><img loading="lazy" src="https://sowen.com/media/posts/85/Slow-Badger-20-300x225.jpg" alt=""  sizes="(max-width: 768px) 100vw, 768px" srcset="https://sowen.com/media/posts/85/responsive/Slow-Badger-20-300x225-xs.jpg 300w ,https://sowen.com/media/posts/85/responsive/Slow-Badger-20-300x225-sm.jpg 480w ,https://sowen.com/media/posts/85/responsive/Slow-Badger-20-300x225-md.jpg 768w"></figure></a></figure>
<!-- /wp:image -->

<!-- wp:paragraph -->
<p>With dress rehearsals going well, it was time to make the final edits to the script.  Firstly the wiring between the Badger and the SD card module needed tidying up.  They are held together with Velcro, and this works pretty well.</p>
<!-- /wp:paragraph -->

<!-- wp:paragraph -->
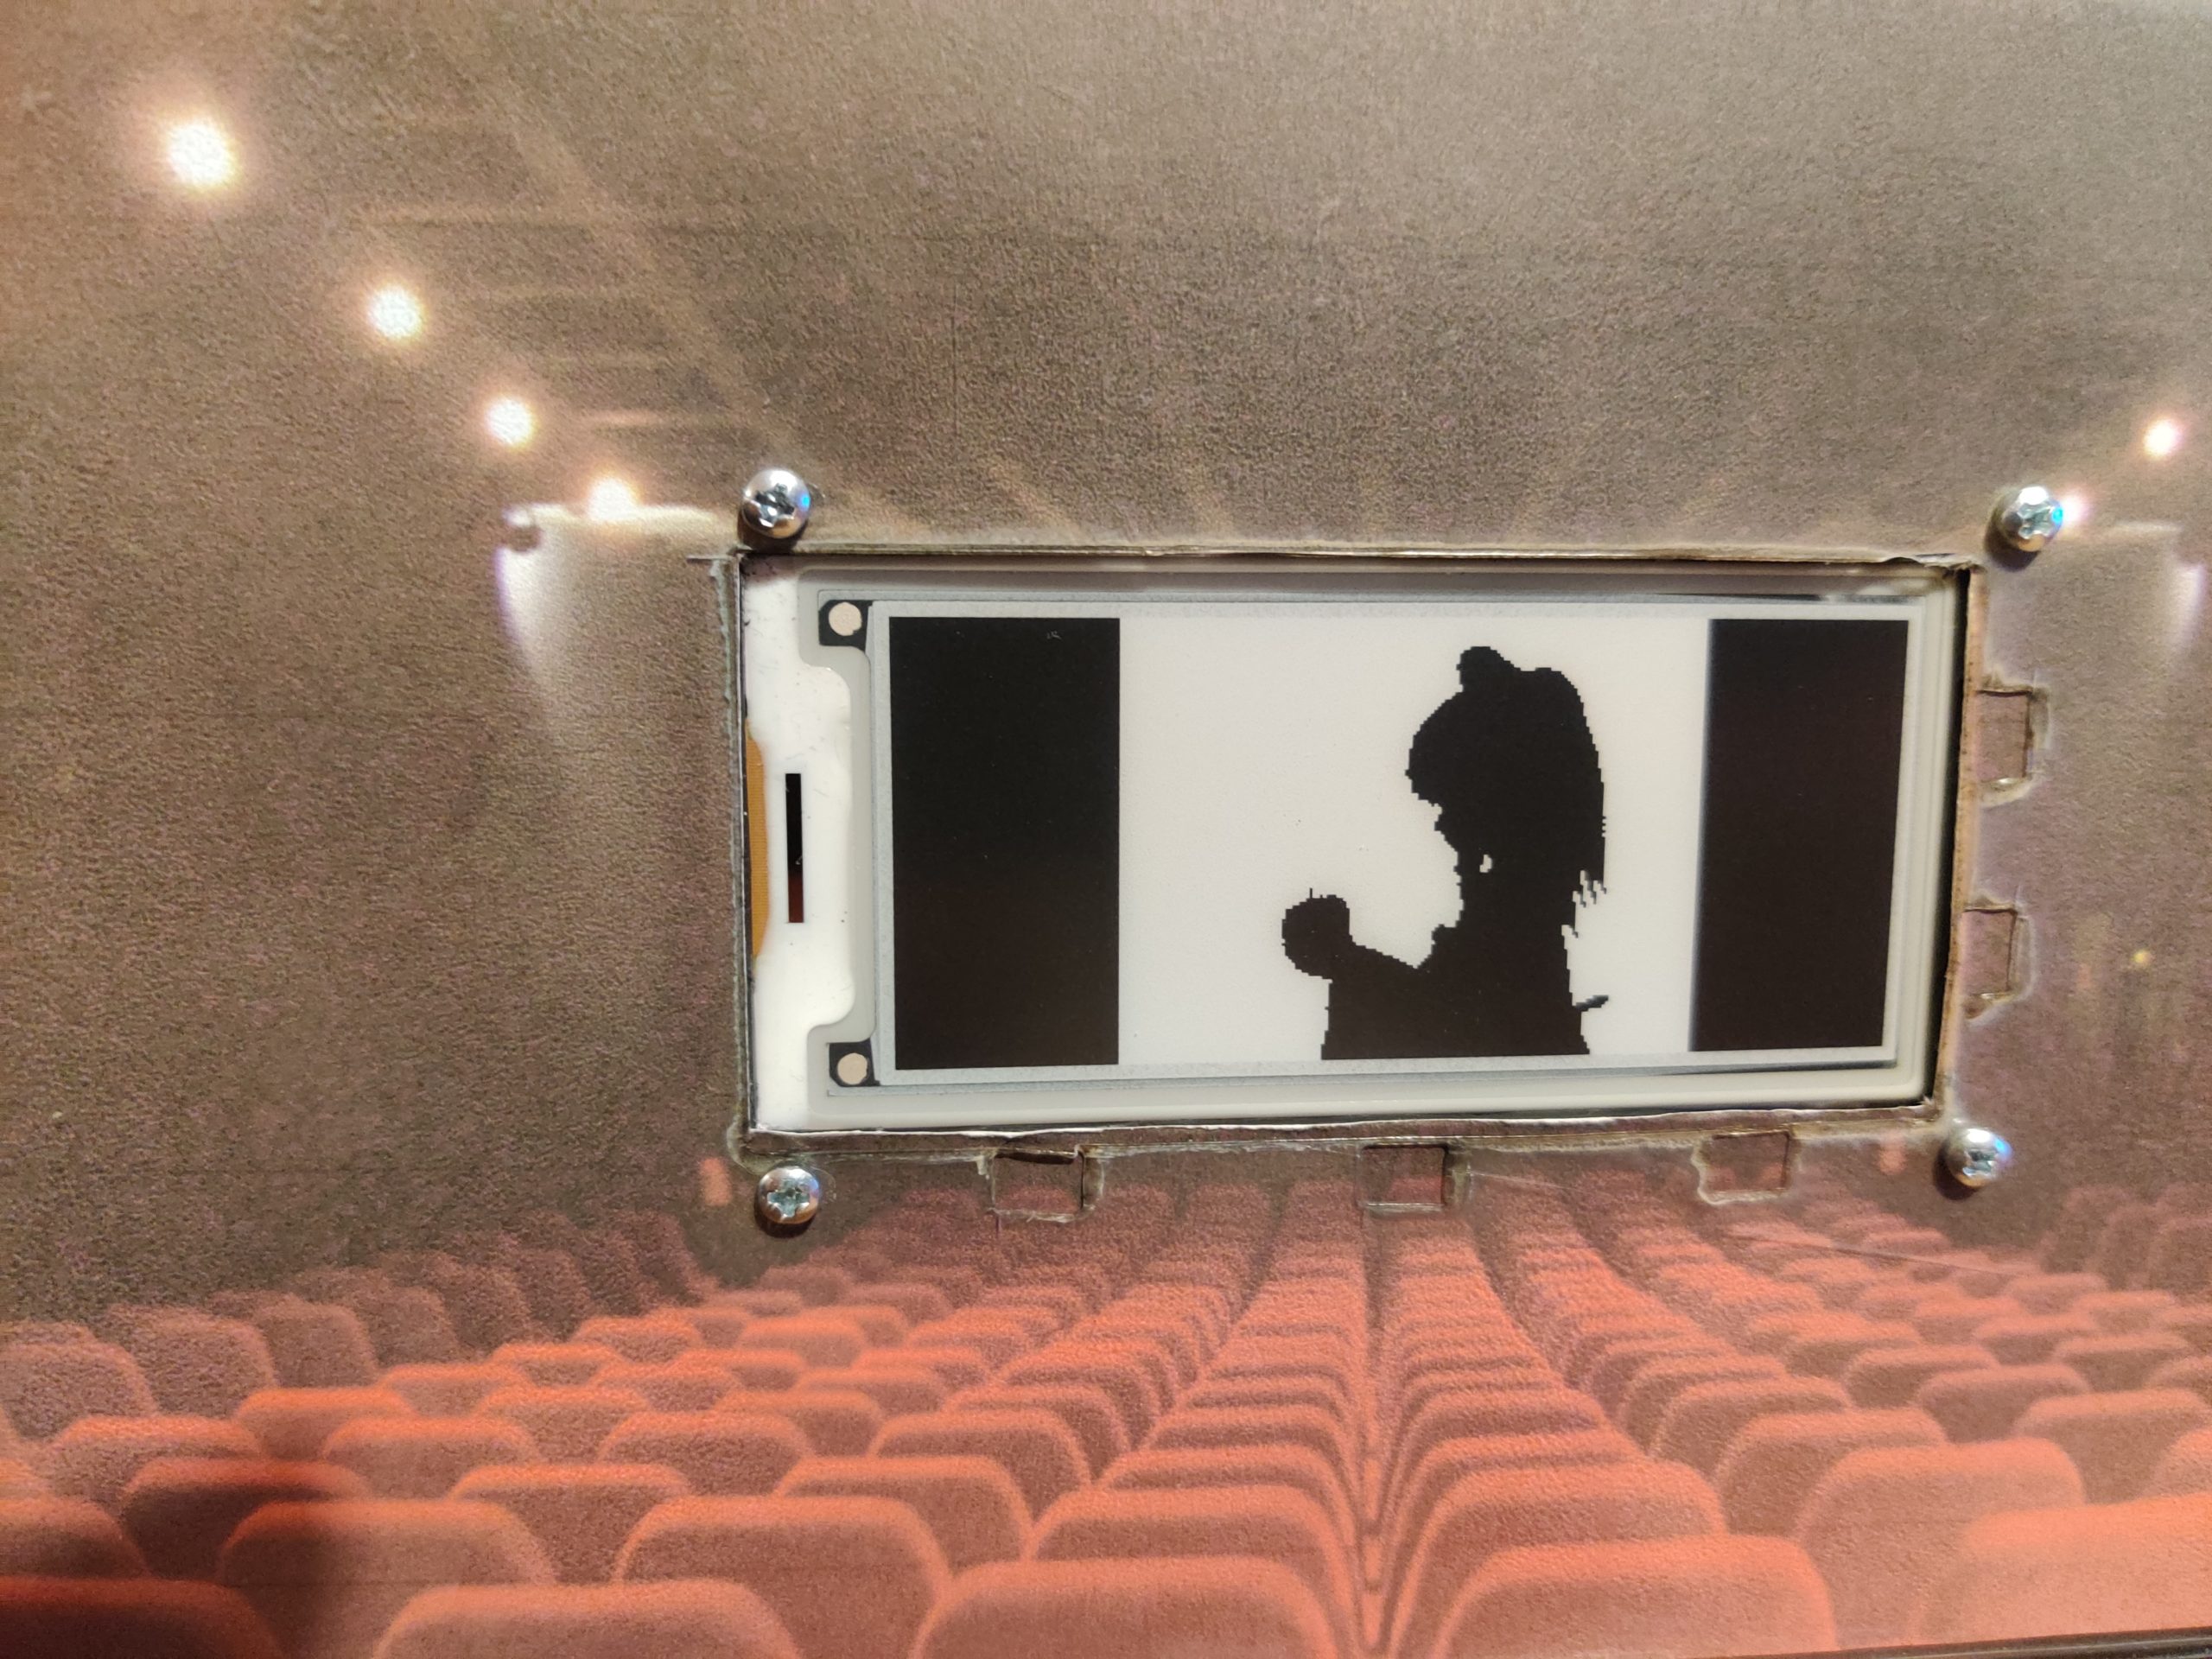
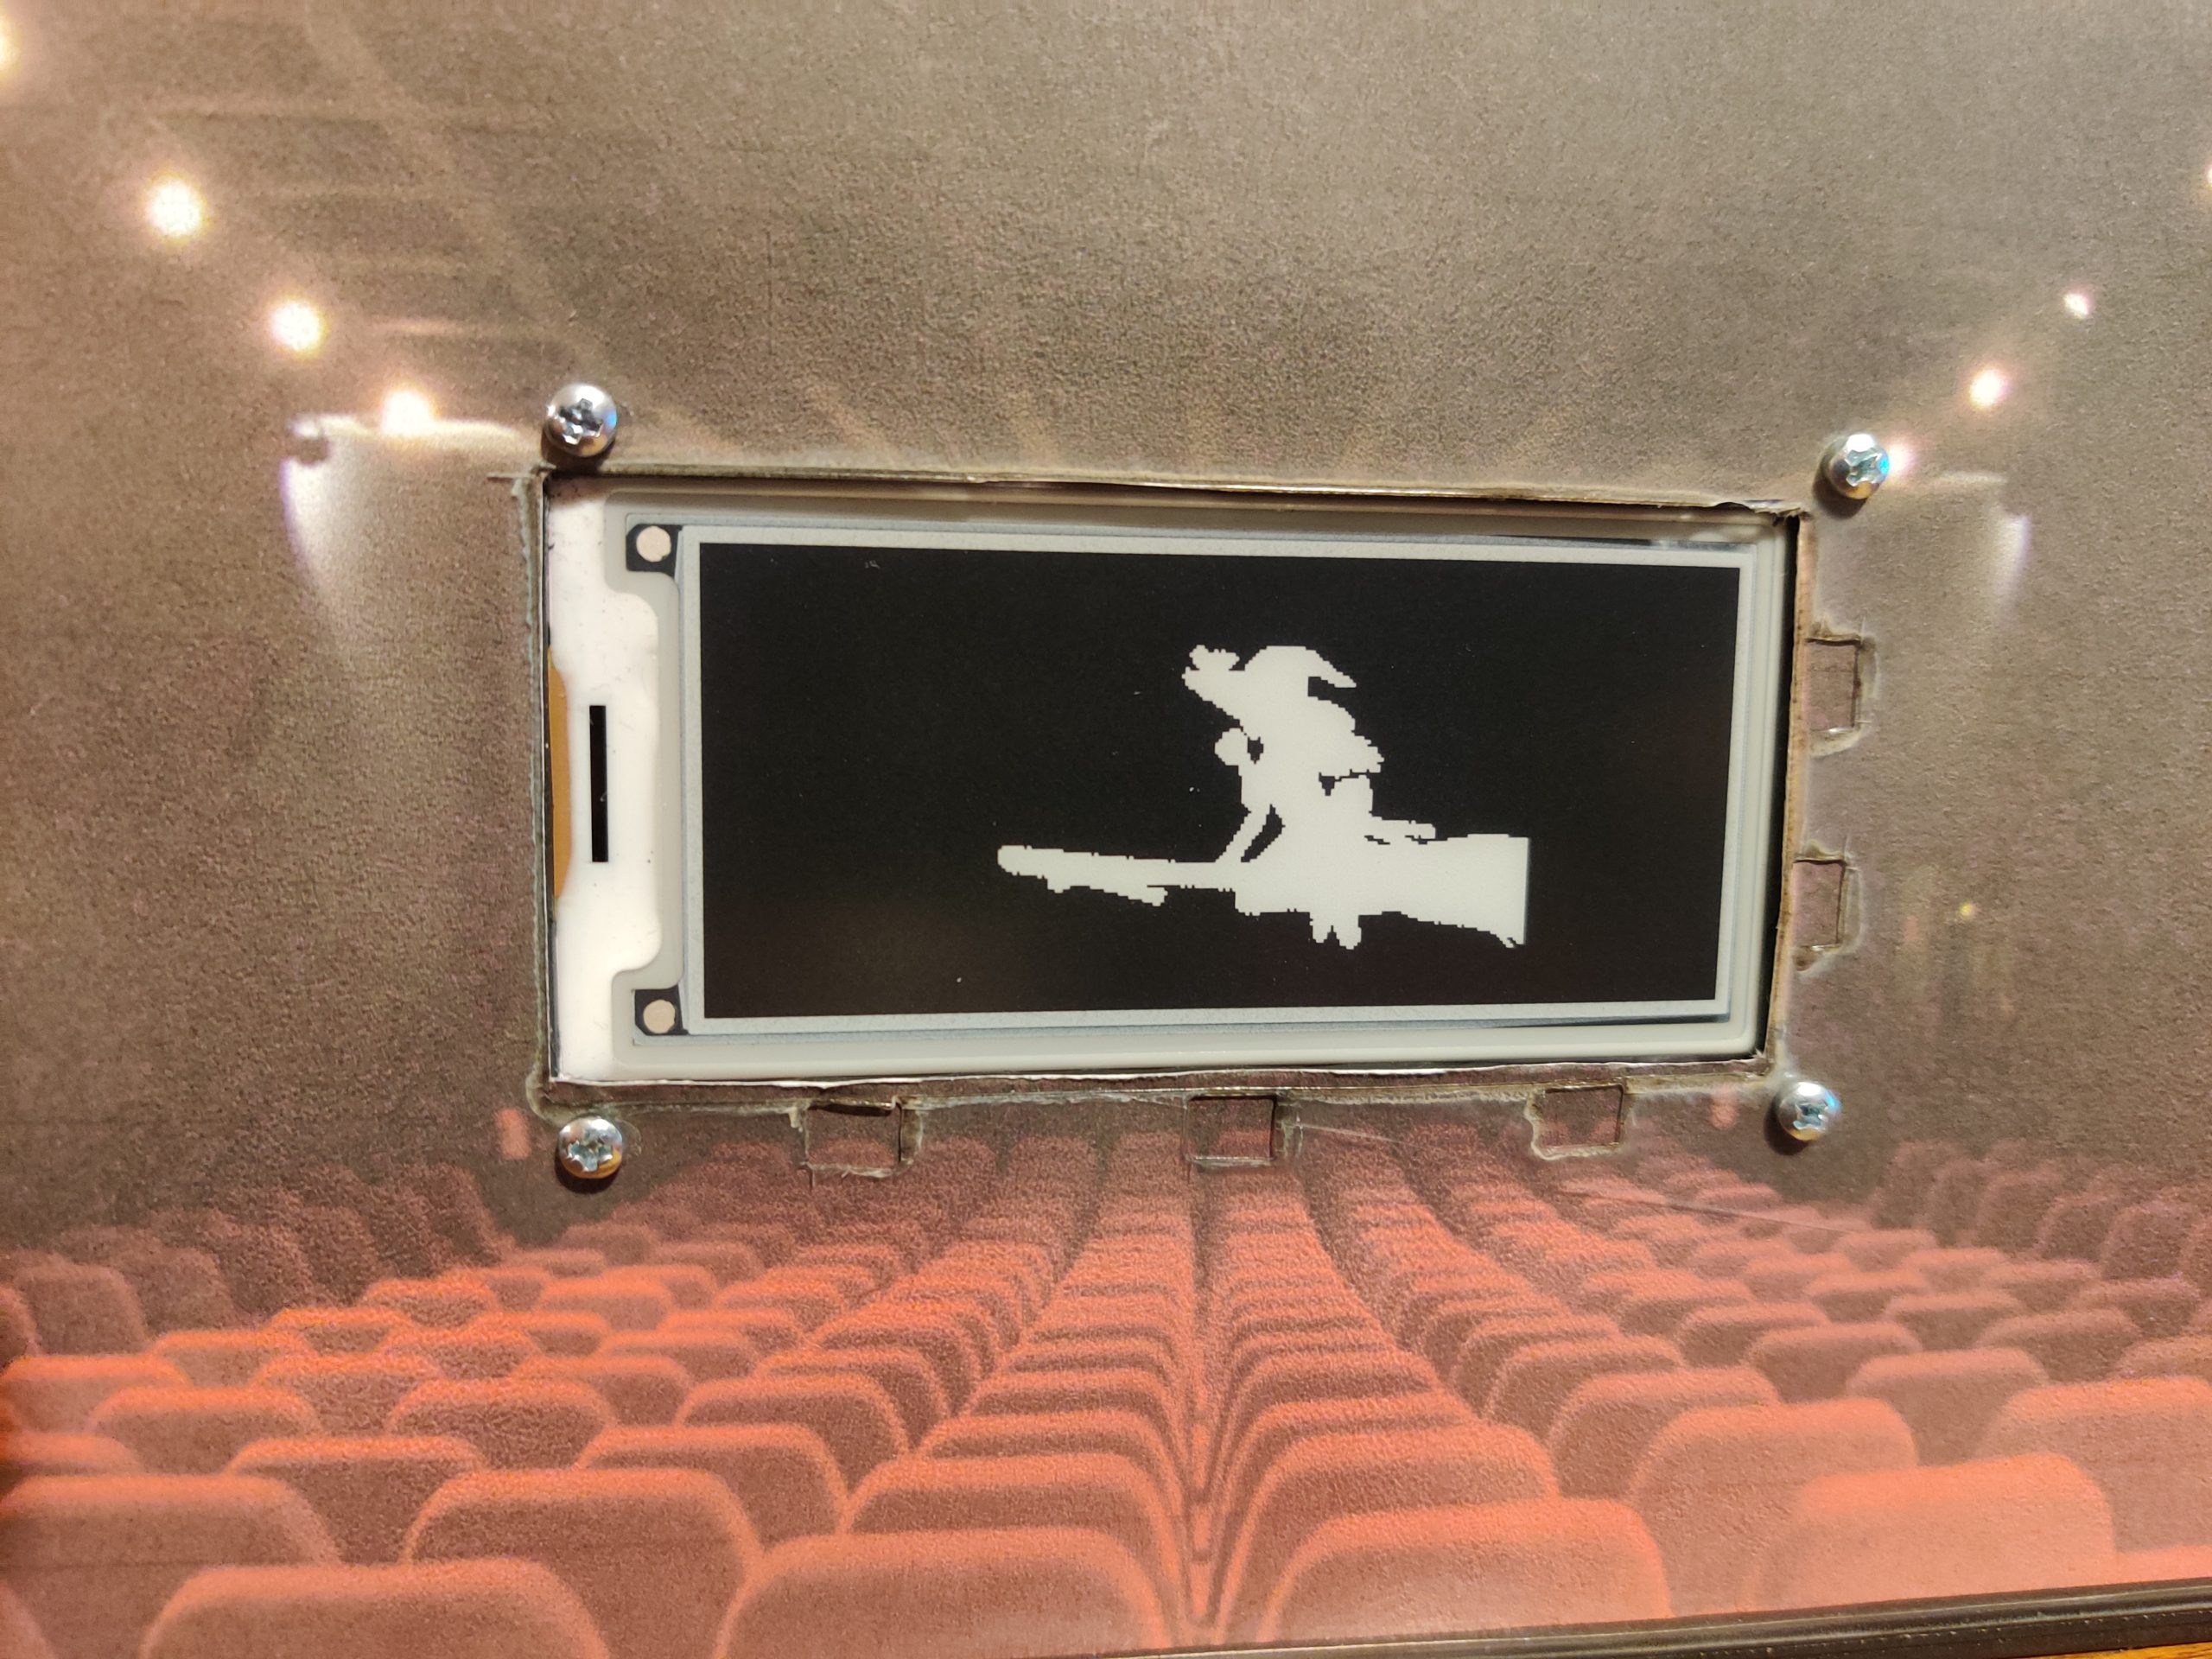
<p>With a full version of TVAC purchased, it was time to pick something suitable for the opening night. What better to demonstrate it than the ultimate demo <a href="https://www.youtube.com/watch?v=6QY4ekac1_Q" target="_blank"  class="extlink extlink-icon-1"  rel="noreferrer noopener">Bad Apple</a>.  Every single shot in this stands alone as a great image, and it is perfect for the black and white constraints of the Badger (although dithering works well)</p>
<!-- /wp:paragraph -->

<!-- wp:heading -->
<h2>Straight to VHS</h2>
<!-- /wp:heading -->

<!-- wp:image {"id":1291,"sizeSlug":"medium","linkDestination":"media"} -->
<figure class="wp-block-image size-medium"><a href="https://sowen.com/wp-content/uploads/2022/12/Slow-Badger-14-scaled.jpg"><figure class="wp-image-1291"><img loading="lazy" src="https://sowen.com/media/posts/85/Slow-Badger-14-300x225.jpg" alt=""  sizes="(max-width: 768px) 100vw, 768px" srcset="https://sowen.com/media/posts/85/responsive/Slow-Badger-14-300x225-xs.jpg 300w ,https://sowen.com/media/posts/85/responsive/Slow-Badger-14-300x225-sm.jpg 480w ,https://sowen.com/media/posts/85/responsive/Slow-Badger-14-300x225-md.jpg 768w"></figure></a></figure>
<!-- /wp:image -->

<!-- wp:paragraph -->
<p>A suitable enclosure can really make or break a hardware project.  For the Slow Badger Movie Player, it seemed appropriate to reuse an old VHS cassette box.  The dimensions were easily found, so I decided to use the laser cutter to make things as accurate as possible.  Although technically this worked, I would not recommend laser cutting a VHS box. The amount of (probably poisonous) smoke was quite worrying.</p>
<!-- /wp:paragraph -->

<!-- wp:image {"id":1293,"sizeSlug":"medium","linkDestination":"media"} -->
<figure class="wp-block-image size-medium"><a href="https://sowen.com/wp-content/uploads/2022/12/Slow-Badger-24-scaled.jpg"><figure class="wp-image-1293"><img loading="lazy" src="https://sowen.com/media/posts/85/Slow-Badger-24-300x225.jpg" alt=""  sizes="(max-width: 768px) 100vw, 768px" srcset="https://sowen.com/media/posts/85/responsive/Slow-Badger-24-300x225-xs.jpg 300w ,https://sowen.com/media/posts/85/responsive/Slow-Badger-24-300x225-sm.jpg 480w ,https://sowen.com/media/posts/85/responsive/Slow-Badger-24-300x225-md.jpg 768w"></figure></a></figure>
<!-- /wp:image -->

<!-- wp:paragraph -->
<p>With a suitable image printed out and put inside the case, everything was complete.  </p>
<!-- /wp:paragraph -->

<!-- wp:image {"id":1297,"sizeSlug":"medium","linkDestination":"media"} -->
<figure class="wp-block-image size-medium"><a href="https://sowen.com/wp-content/uploads/2022/12/Slow-Badger-36-scaled.jpg"><figure class="wp-image-1297"><img loading="lazy" src="https://sowen.com/media/posts/85/Slow-Badger-36-300x225.jpg" alt=""  sizes="(max-width: 768px) 100vw, 768px" srcset="https://sowen.com/media/posts/85/responsive/Slow-Badger-36-300x225-xs.jpg 300w ,https://sowen.com/media/posts/85/responsive/Slow-Badger-36-300x225-sm.jpg 480w ,https://sowen.com/media/posts/85/responsive/Slow-Badger-36-300x225-md.jpg 768w"></figure></a></figure>
<!-- /wp:image -->

<!-- wp:image {"id":1299,"sizeSlug":"medium","linkDestination":"media"} -->
<figure class="wp-block-image size-medium"><a href="https://sowen.com/wp-content/uploads/2022/12/Slow-Badger-37-scaled.jpg"><figure class="wp-image-1299"><img loading="lazy" src="https://sowen.com/media/posts/85/Slow-Badger-37-300x225.jpg" alt=""  sizes="(max-width: 768px) 100vw, 768px" srcset="https://sowen.com/media/posts/85/responsive/Slow-Badger-37-300x225-xs.jpg 300w ,https://sowen.com/media/posts/85/responsive/Slow-Badger-37-300x225-sm.jpg 480w ,https://sowen.com/media/posts/85/responsive/Slow-Badger-37-300x225-md.jpg 768w"></figure></a></figure>
<!-- /wp:image -->

<!-- wp:paragraph -->
<p>Over all, I'm really pleased with how this turned out. It works really well, and takes just over 2 days to get through Bad Apple (Vs 244 seconds original speed) at 2 frames per minute.  This is also just within the Lipo battery life too, so a full length movie would definitely need a mains adapter to power it.  The small size is a bit of limitation, although larger screens increase the cost and complexity a lot, so I'm happy to call this a wrap.</p>
<!-- /wp:paragraph -->
            ]]>
        </content>
    </entry>
    <entry>
        <title>The Unknown Pleasures of CP1919</title>
        <author>
            <name>Spencer</name>
        </author>
        <link href="https://sowen.com/the-unknown-pleasures-of-cp1919.html"/>
        <id>https://sowen.com/the-unknown-pleasures-of-cp1919.html</id>

        <updated>2022-12-01T16:40:28+00:00</updated>
            <summary type="html">
                <![CDATA[
                    <!-- wp:paragraph -->
<p>During the 2021 lockdown I started a laser cutting project I'd wanted to do for a while. It turned out that the research on this went much much deeper than I first expected.</p>
<!-- /wp:paragraph -->

<!-- wp:image {"id":1223,"sizeSlug":"medium","linkDestination":"media"} -->
<figure class="wp-block-image size-medium"><a href="https://sowen.com/wp-content/uploads/2022/12/CP1919-1-scaled.jpg"><figure class="wp-image-1223"><img loading="lazy" src="https://sowen.com/media/posts/86/CP1919-1-225x300.jpg" alt=""  sizes="(max-width: 768px) 100vw, 768px" srcset="https://sowen.com/media/posts/86/responsive/CP1919-1-225x300-xs.jpg 300w ,https://sowen.com/media/posts/86/responsive/CP1919-1-225x300-sm.jpg 480w ,https://sowen.com/media/posts/86/responsive/CP1919-1-225x300-md.jpg 768w"></figure></a></figure>
<!-- /wp:image -->

<!-- wp:paragraph -->
<p>You probably recognise this image, and think you know where it comes from. But what if I told you the story goes back further than you think. </p>
<!-- /wp:paragraph -->

<!-- wp:more -->

                ]]>
            </summary>
        <content type="html">
            <![CDATA[
                <!-- wp:paragraph -->
<p>During the 2021 lockdown I started a laser cutting project I'd wanted to do for a while. It turned out that the research on this went much much deeper than I first expected.</p>
<!-- /wp:paragraph -->

<!-- wp:image {"id":1223,"sizeSlug":"medium","linkDestination":"media"} -->
<figure class="wp-block-image size-medium"><a href="https://sowen.com/wp-content/uploads/2022/12/CP1919-1-scaled.jpg"><figure class="wp-image-1223"><img loading="lazy" src="https://sowen.com/media/posts/86/CP1919-1-225x300.jpg" alt=""  sizes="(max-width: 768px) 100vw, 768px" srcset="https://sowen.com/media/posts/86/responsive/CP1919-1-225x300-xs.jpg 300w ,https://sowen.com/media/posts/86/responsive/CP1919-1-225x300-sm.jpg 480w ,https://sowen.com/media/posts/86/responsive/CP1919-1-225x300-md.jpg 768w"></figure></a></figure>
<!-- /wp:image -->

<!-- wp:paragraph -->
<p>You probably recognise this image, and think you know where it comes from. But what if I told you the story goes back further than you think. </p>
<!-- /wp:paragraph -->

<!-- wp:more -->

<!-- /wp:more -->

<!-- wp:video {"id":1257} -->
<figure class="wp-block-video"><video loading="lazy" autoplay src="https://sowen.com/wp-content/uploads/2022/12/YouCut_20221201_160202219.mp4" playsinline></video></figure>
<!-- /wp:video -->

<!-- wp:paragraph -->
<p>CP1919 is the first radio pulsar discovered in 1967 by Jocelyn Bell Burnell. It transmits radio waves with a pulse 0.04 seconds wide every 1.3373 seconds. This is part of a plot recorded in 1970.</p>
<!-- /wp:paragraph -->

<!-- wp:image {"id":1225,"sizeSlug":"medium","linkDestination":"media"} -->
<figure class="wp-block-image size-medium"><a href="https://sowen.com/wp-content/uploads/2022/12/CP1919-2.jpg"><figure class="wp-image-1225"><img loading="lazy" src="https://sowen.com/media/posts/86/CP1919-2-225x300.jpg" alt=""  sizes="(max-width: 768px) 100vw, 768px" srcset="https://sowen.com/media/posts/86/responsive/CP1919-2-225x300-xs.jpg 300w ,https://sowen.com/media/posts/86/responsive/CP1919-2-225x300-sm.jpg 480w ,https://sowen.com/media/posts/86/responsive/CP1919-2-225x300-md.jpg 768w"></figure></a></figure>
<!-- /wp:image -->

<!-- wp:paragraph -->
<p></p>
<!-- /wp:paragraph -->

<!-- wp:paragraph -->
<p>Not every pulse is the same shape or size, and for a while it was thought that it was an extraterrestrial beacon, so it was nicknamed LGM-1 for Little Green Men. This was subsequently disproved. Burnells original plot from Wikipedia.</p>
<!-- /wp:paragraph -->

<!-- wp:image {"id":1227,"sizeSlug":"medium","linkDestination":"media"} -->
<figure class="wp-block-image size-medium"><a href="https://sowen.com/wp-content/uploads/2022/12/CP1919-5-scaled.jpg"><figure class="wp-image-1227"><img loading="lazy" src="https://sowen.com/media/posts/86/CP1919-5-62x300.jpg" alt=""  sizes="(max-width: 768px) 100vw, 768px" srcset="https://sowen.com/media/posts/86/responsive/CP1919-5-62x300-xs.jpg 300w ,https://sowen.com/media/posts/86/responsive/CP1919-5-62x300-sm.jpg 480w ,https://sowen.com/media/posts/86/responsive/CP1919-5-62x300-md.jpg 768w"></figure></a></figure>
<!-- /wp:image -->

<!-- wp:paragraph -->
<p>Interpreting a long wiggly line is difficult, and hard to get info from it, but it can be split up in to sections of 1.3373 seconds for a clearer view of each pulse.</p>
<!-- /wp:paragraph -->

<!-- wp:image {"id":1229,"sizeSlug":"medium","linkDestination":"media"} -->
<figure class="wp-block-image size-medium"><a href="https://sowen.com/wp-content/uploads/2022/12/CP1919-3-scaled.jpg"><figure class="wp-image-1229"><img loading="lazy" src="https://sowen.com/media/posts/86/CP1919-3-225x300.jpg" alt=""  sizes="(max-width: 768px) 100vw, 768px" srcset="https://sowen.com/media/posts/86/responsive/CP1919-3-225x300-xs.jpg 300w ,https://sowen.com/media/posts/86/responsive/CP1919-3-225x300-sm.jpg 480w ,https://sowen.com/media/posts/86/responsive/CP1919-3-225x300-md.jpg 768w"></figure></a></figure>
<!-- /wp:image -->

<!-- wp:paragraph -->
<p>Lining up successive pulses vertically gives a clearer impression of what the pulses look like, although rather than a very wide page, you're going to end up with a very tall page.</p>
<!-- /wp:paragraph -->

<!-- wp:image {"id":1231,"sizeSlug":"medium","linkDestination":"media"} -->
<figure class="wp-block-image size-medium"><a href="https://sowen.com/wp-content/uploads/2022/12/CP1919-4.jpg"><figure class="wp-image-1231"><img loading="lazy" src="https://sowen.com/media/posts/86/CP1919-4-240x300.jpg" alt=""  sizes="(max-width: 768px) 100vw, 768px" srcset="https://sowen.com/media/posts/86/responsive/CP1919-4-240x300-xs.jpg 300w ,https://sowen.com/media/posts/86/responsive/CP1919-4-240x300-sm.jpg 480w ,https://sowen.com/media/posts/86/responsive/CP1919-4-240x300-md.jpg 768w"></figure></a></figure>
<!-- /wp:image -->

<!-- wp:paragraph -->
<p>In 1970 Harold Craft published a PHD thesis on "Radio observations of the pulse profiles and dispersion measures of twelve pulsars" which featured 80 plots stacked on top of each other.</p>
<!-- /wp:paragraph -->

<!-- wp:columns -->
<div class="wp-block-columns"><!-- wp:column -->
<div class="wp-block-column"><!-- wp:image {"id":1233,"sizeSlug":"full","linkDestination":"media"} -->
<figure class="wp-block-image size-full"><a href="https://sowen.com/media/posts/86/CP1919-1.png"><figure class="wp-image-1233"><img loading="lazy" src="https://sowen.com/media/posts/86/CP1919-1.png" alt=""  sizes="(max-width: 768px) 100vw, 768px" srcset="https://sowen.com/media/posts/86/responsive/CP1919-1-xs.png 300w ,https://sowen.com/media/posts/86/responsive/CP1919-1-sm.png 480w ,https://sowen.com/media/posts/86/responsive/CP1919-1-md.png 768w"></figure></a></figure>
<!-- /wp:image --></div>
<!-- /wp:column -->

<!-- wp:column -->
<div class="wp-block-column"><!-- wp:image {"id":1237,"sizeSlug":"medium","linkDestination":"media"} -->
<figure class="wp-block-image size-medium"><a href="https://sowen.com/wp-content/uploads/2022/12/CP1919-14.jpg"><figure class="wp-image-1237"><img loading="lazy" src="https://sowen.com/media/posts/86/CP1919-14-300x225.jpg" alt=""  sizes="(max-width: 768px) 100vw, 768px" srcset="https://sowen.com/media/posts/86/responsive/CP1919-14-300x225-xs.jpg 300w ,https://sowen.com/media/posts/86/responsive/CP1919-14-300x225-sm.jpg 480w ,https://sowen.com/media/posts/86/responsive/CP1919-14-300x225-md.jpg 768w"></figure></a></figure>
<!-- /wp:image --></div>
<!-- /wp:column --></div>
<!-- /wp:columns -->

<!-- wp:paragraph -->
<p>This plot went on to feature on the cover of the IAU General Assembly in 1970, a 1971 Sci Am article, in 1974 in Graphics Diagrams: The Visualization of Abstract Data by Walter Herdeg and the cover of The Cambridge Encyclopaedia of Astronomy.</p>
<!-- /wp:paragraph -->

<!-- wp:image {"id":1235,"sizeSlug":"medium","linkDestination":"media"} -->
<figure class="wp-block-image size-medium"><a href="https://sowen.com/wp-content/uploads/2022/12/CP1919-6-scaled.jpg"><figure class="wp-image-1235"><img loading="lazy" src="https://sowen.com/media/posts/86/CP1919-6-300x225.jpg" alt=""  sizes="(max-width: 768px) 100vw, 768px" srcset="https://sowen.com/media/posts/86/responsive/CP1919-6-300x225-xs.jpg 300w ,https://sowen.com/media/posts/86/responsive/CP1919-6-300x225-sm.jpg 480w ,https://sowen.com/media/posts/86/responsive/CP1919-6-300x225-md.jpg 768w"></figure></a></figure>
<!-- /wp:image -->

<!-- wp:image {"id":1241,"sizeSlug":"medium","linkDestination":"media"} -->
<figure class="wp-block-image size-medium"><a href="https://sowen.com/wp-content/uploads/2022/12/CP1919-7-scaled.jpg"><figure class="wp-image-1241"><img loading="lazy" src="https://sowen.com/media/posts/86/CP1919-7-300x225.jpg" alt=""  sizes="(max-width: 768px) 100vw, 768px" srcset="https://sowen.com/media/posts/86/responsive/CP1919-7-300x225-xs.jpg 300w ,https://sowen.com/media/posts/86/responsive/CP1919-7-300x225-sm.jpg 480w ,https://sowen.com/media/posts/86/responsive/CP1919-7-300x225-md.jpg 768w"></figure></a></figure>
<!-- /wp:image -->

<!-- wp:paragraph -->
<p></p>
<!-- /wp:paragraph -->

<!-- wp:paragraph -->
<p>If the individual 1.3373 second sections are converted to an appropriate file format, they can be cut from clear acrylic, in a similar way to cutting up the paper tape.</p>
<!-- /wp:paragraph -->

<!-- wp:image {"id":1243,"sizeSlug":"medium","linkDestination":"media"} -->
<figure class="wp-block-image size-medium"><a href="https://sowen.com/wp-content/uploads/2022/12/CP1919-12-scaled.jpg"><figure class="wp-image-1243"><img loading="lazy" src="https://sowen.com/media/posts/86/CP1919-12-225x300.jpg" alt=""  sizes="(max-width: 768px) 100vw, 768px" srcset="https://sowen.com/media/posts/86/responsive/CP1919-12-225x300-xs.jpg 300w ,https://sowen.com/media/posts/86/responsive/CP1919-12-225x300-sm.jpg 480w ,https://sowen.com/media/posts/86/responsive/CP1919-12-225x300-md.jpg 768w"></figure></a></figure>
<!-- /wp:image -->

<!-- wp:paragraph -->
<p>Sequential sections of acrylic can then be stacked up, similar to what Harold Craft did in 1970 with the black and white plot in his thesis.</p>
<!-- /wp:paragraph -->

<!-- wp:image {"id":1245,"sizeSlug":"medium","linkDestination":"media"} -->
<figure class="wp-block-image size-medium"><a href="https://sowen.com/wp-content/uploads/2022/12/CP1919-8-scaled.jpg"><figure class="wp-image-1245"><img loading="lazy" src="https://sowen.com/media/posts/86/CP1919-8-225x300.jpg" alt=""  sizes="(max-width: 768px) 100vw, 768px" srcset="https://sowen.com/media/posts/86/responsive/CP1919-8-225x300-xs.jpg 300w ,https://sowen.com/media/posts/86/responsive/CP1919-8-225x300-sm.jpg 480w ,https://sowen.com/media/posts/86/responsive/CP1919-8-225x300-md.jpg 768w"></figure></a></figure>
<!-- /wp:image -->

<!-- wp:image {"id":1247,"sizeSlug":"medium","linkDestination":"media"} -->
<figure class="wp-block-image size-medium"><a href="https://sowen.com/wp-content/uploads/2022/12/CP1919-10-scaled.jpg"><figure class="wp-image-1247"><img loading="lazy" src="https://sowen.com/media/posts/86/CP1919-10-225x300.jpg" alt=""  sizes="(max-width: 768px) 100vw, 768px" srcset="https://sowen.com/media/posts/86/responsive/CP1919-10-225x300-xs.jpg 300w ,https://sowen.com/media/posts/86/responsive/CP1919-10-225x300-sm.jpg 480w ,https://sowen.com/media/posts/86/responsive/CP1919-10-225x300-md.jpg 768w"></figure></a></figure>
<!-- /wp:image -->

<!-- wp:image {"id":1249,"sizeSlug":"medium","linkDestination":"media"} -->
<figure class="wp-block-image size-medium"><a href="https://sowen.com/wp-content/uploads/2022/12/CP1919-11-scaled.jpg"><figure class="wp-image-1249"><img loading="lazy" src="https://sowen.com/media/posts/86/CP1919-11-300x225.jpg" alt=""  sizes="(max-width: 768px) 100vw, 768px" srcset="https://sowen.com/media/posts/86/responsive/CP1919-11-300x225-xs.jpg 300w ,https://sowen.com/media/posts/86/responsive/CP1919-11-300x225-sm.jpg 480w ,https://sowen.com/media/posts/86/responsive/CP1919-11-300x225-md.jpg 768w"></figure></a></figure>
<!-- /wp:image -->

<!-- wp:paragraph -->
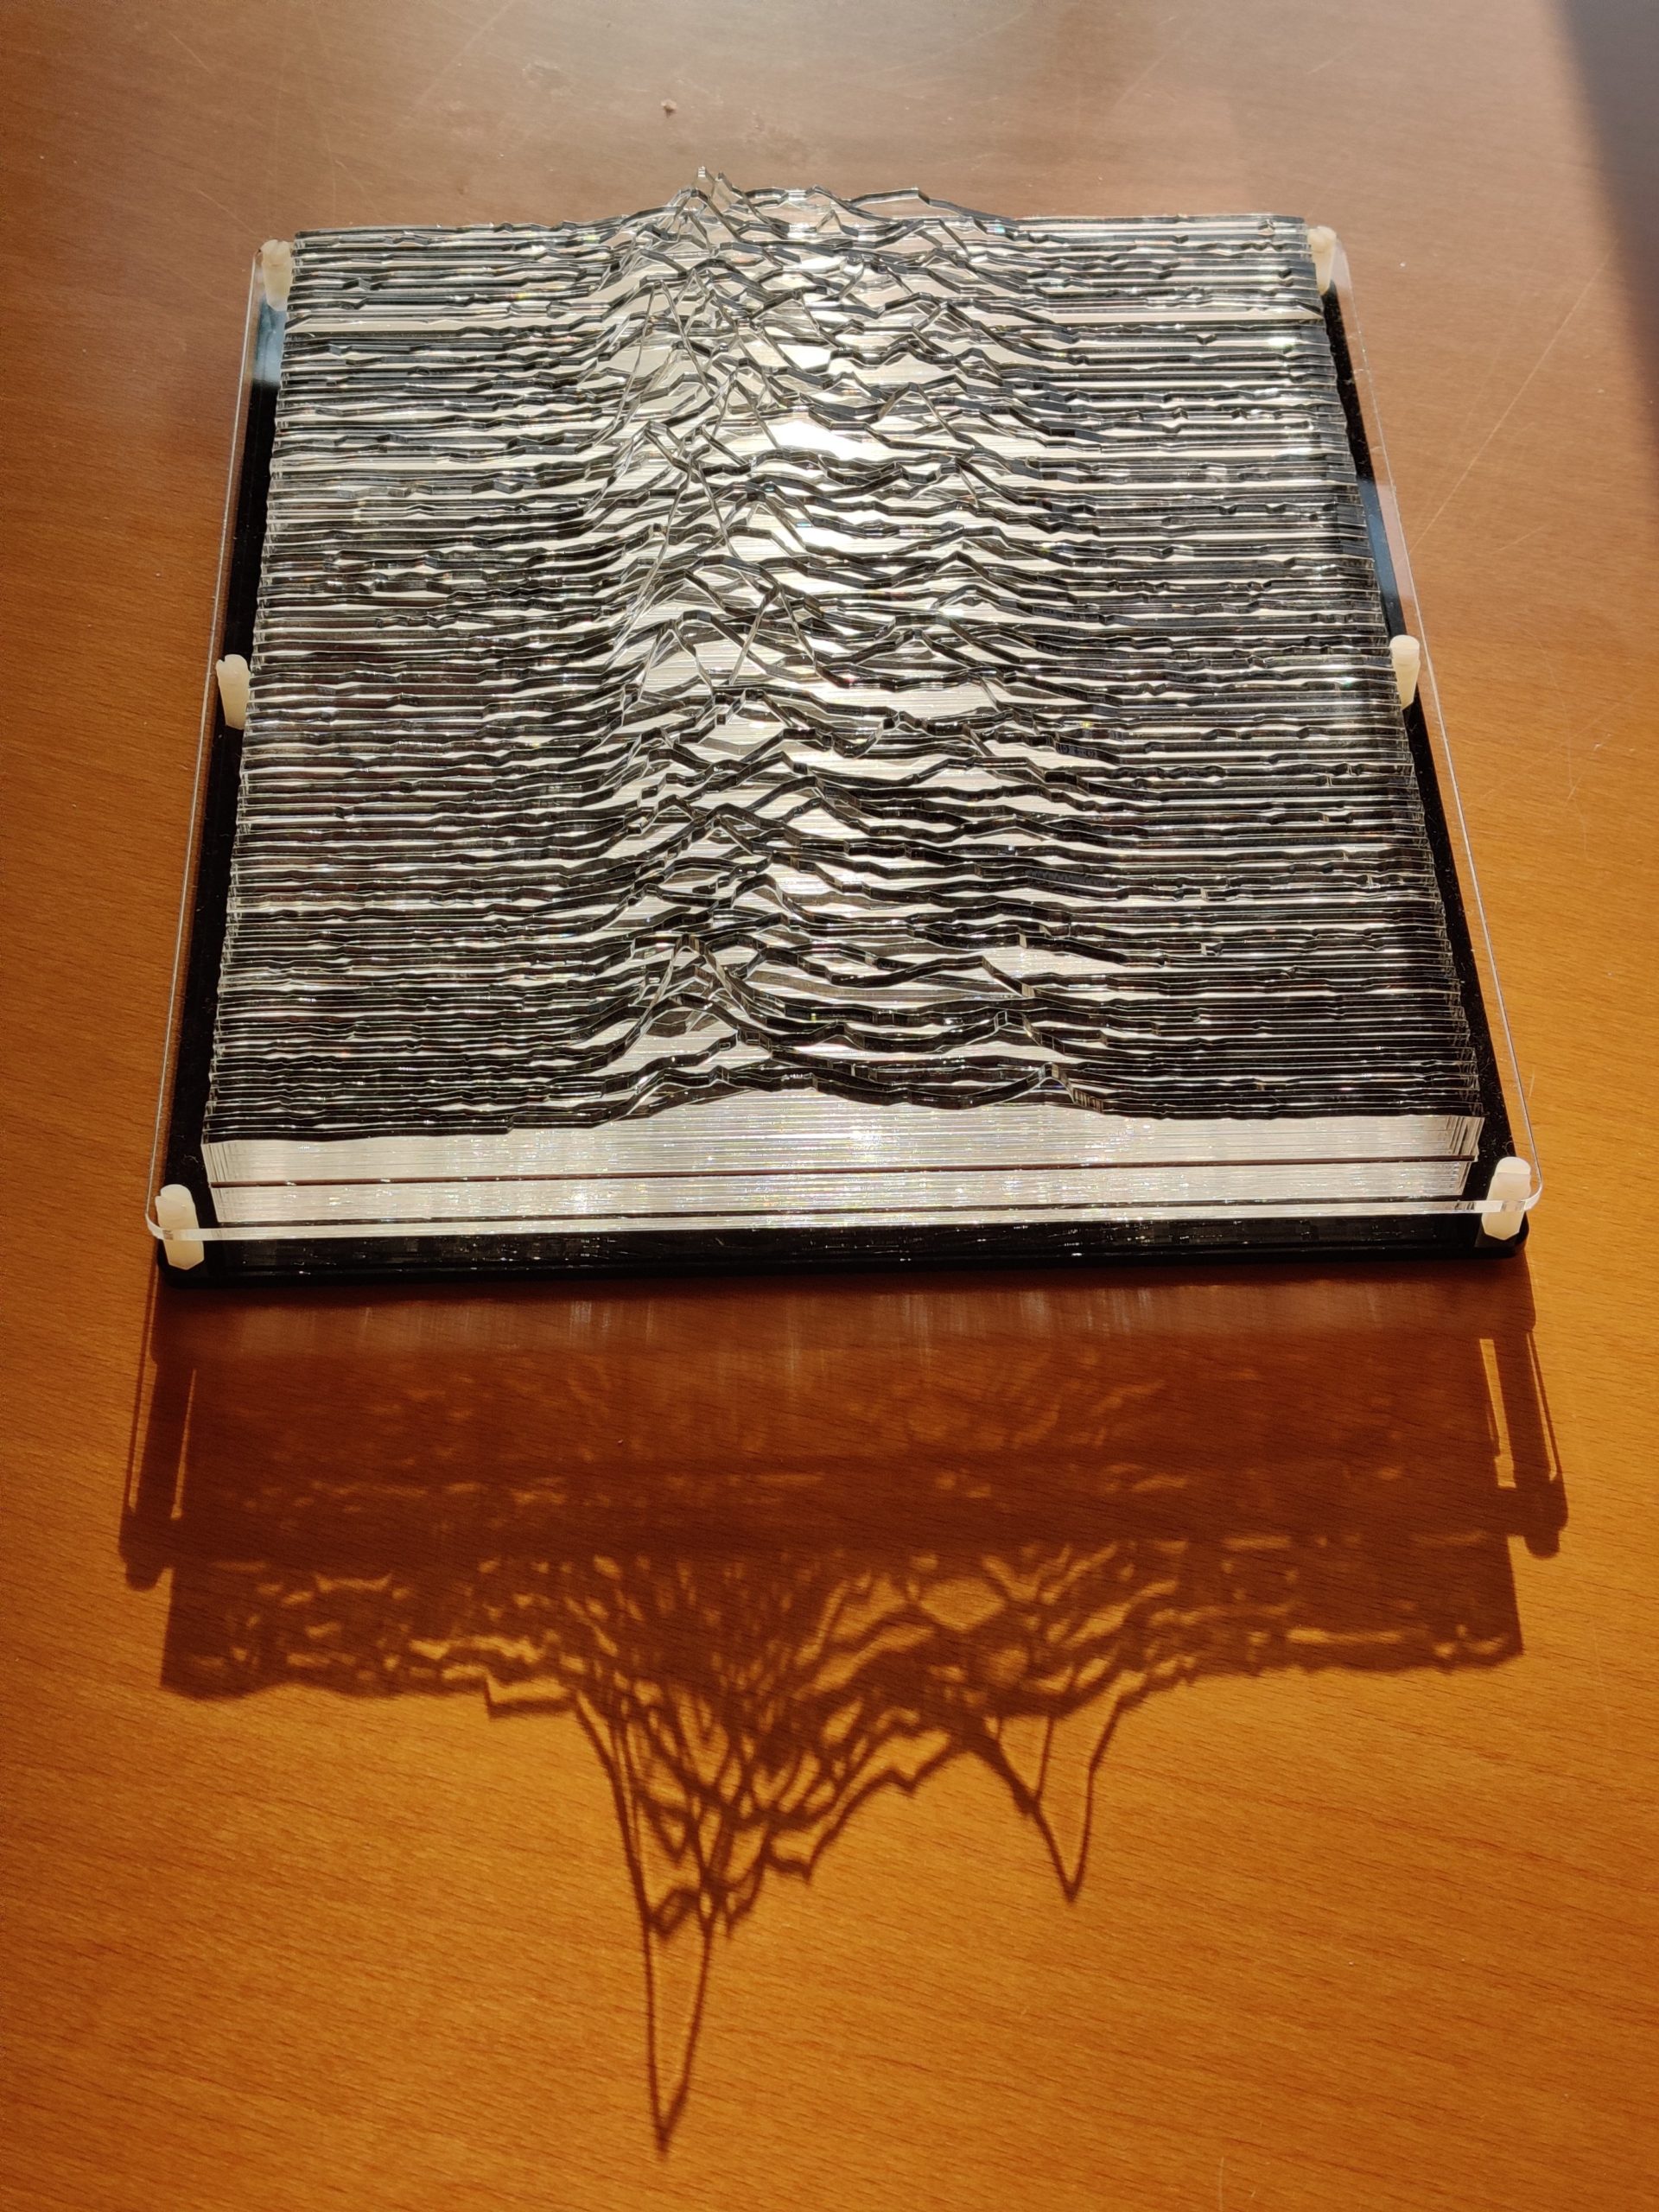
<p>Putting all 80 pieces of acrylic in the right order (and right orientation!) is both satisfying and frustrating. However, I think the end results are absolutely stunning.</p>
<!-- /wp:paragraph -->

<!-- wp:image {"id":1251,"sizeSlug":"medium","linkDestination":"media"} -->
<figure class="wp-block-image size-medium"><a href="https://sowen.com/wp-content/uploads/2022/12/CP1919-13.jpg"><figure class="wp-image-1251"><img loading="lazy" src="https://sowen.com/media/posts/86/CP1919-13-279x300.jpg" alt=""  sizes="(max-width: 768px) 100vw, 768px" srcset="https://sowen.com/media/posts/86/responsive/CP1919-13-279x300-xs.jpg 300w ,https://sowen.com/media/posts/86/responsive/CP1919-13-279x300-sm.jpg 480w ,https://sowen.com/media/posts/86/responsive/CP1919-13-279x300-md.jpg 768w"></figure></a></figure>
<!-- /wp:image -->

<!-- wp:paragraph -->
<p>If you think you recognise this plot, but didn't know about CP1919, then you probably know it from the cover of Joy Divisions Unknown Pleasures album which was designed by Peter Saville, taking the image from Cambridge Encyclopaedia Astronomy and inverting it.</p>
<!-- /wp:paragraph -->
            ]]>
        </content>
    </entry>
    <entry>
        <title>Rock Light</title>
        <author>
            <name>Spencer</name>
        </author>
        <link href="https://sowen.com/rock-light.html"/>
        <id>https://sowen.com/rock-light.html</id>

        <updated>2017-11-16T12:29:42+00:00</updated>
            <summary type="html">
                <![CDATA[
                    This is one of those little projects that didn't need to be done, or could have been done very simply.  Despite a lot of feature creep, everything just came together at the right time, and I'm really pleased with the results.

<a href="https://www.sowen.com/1154/rock-light/rocklight/" rel="attachment wp-att-1170"><figure class="alignnone size-medium wp-image-1170"><img loading="lazy"  src="https://sowen.com/media/posts/84/RockLight-300x227.jpg" alt="" width="300" height="227"  sizes="(max-width: 768px) 100vw, 768px" srcset="https://sowen.com/media/posts/84/responsive/RockLight-300x227-xs.jpg 300w ,https://sowen.com/media/posts/84/responsive/RockLight-300x227-sm.jpg 480w ,https://sowen.com/media/posts/84/responsive/RockLight-300x227-md.jpg 768w"></figure></a>


                ]]>
            </summary>
        <content type="html">
            <![CDATA[
                This is one of those little projects that didn't need to be done, or could have been done very simply.  Despite a lot of feature creep, everything just came together at the right time, and I'm really pleased with the results.

<a href="https://www.sowen.com/1154/rock-light/rocklight/"   rel="attachment wp-att-1170"><figure class="alignnone size-medium wp-image-1170"><img loading="lazy"  src="https://sowen.com/media/posts/84/RockLight-300x227.jpg" alt="" width="300" height="227"  sizes="(max-width: 768px) 100vw, 768px" srcset="https://sowen.com/media/posts/84/responsive/RockLight-300x227-xs.jpg 300w ,https://sowen.com/media/posts/84/responsive/RockLight-300x227-sm.jpg 480w ,https://sowen.com/media/posts/84/responsive/RockLight-300x227-md.jpg 768w"></figure></a>

Firstly, a bit of background.  My mum celebrated her birthday a couple of months ago, and the present my sister bought her was a geode that she picked up on a recent holiday to the United States.  Not just a regular geode, though, but one that had a hole drilled out and a light attachment that went inside so it glowed nicely.  Well, it would have glowed nicely, except that the US bulb was rated for 110v, not our full strength 220v electricity.  So the millisecond it glowed nicely for was followed by a loud bang and the bulb turning black.

As I was there to see this, I figured I could easily get a light fitting and bulb from Ikea and we're all good.  Then I wondered if LED lights might be a better idea.  At the same time, I was starting a project for the RC2014 involving a ESP8266 wifi enabled micro controller.  Coincidentally, I'd just bought a couple of WS2812 based <a href="https://www.kitronik.co.uk/35129-zip-strip.html"  class="extlink extlink-icon-1"  >Zip Sticks</a>.  So, you can guess where I'm going with this, right?  Yup, use the ESP8266 to set all the LEDs to a nice shade of blue, and job done!

Well, that would have been within my programming abilities.  However, I wondered if anybody else had controlled WS2812 LEDs from an ESP8266.  Would you believe they had?  And not only that, but I found McLighting from Toblum on <a href="https://github.com/toblum/McLighting"  class="extlink extlink-icon-1"  >GitHub</a> which enables wifi control from your phone or computer to not only set the colour, but a whole stack of pretty effects.

[embed]https://youtu.be/rc6QVHKAXBs[/embed]

Time to fire up KiCad and get a PCB designed.  I'd taken the rough measurement of the hole in the geode, and had a 40mm diameter round PCB to fit everything on.  With a mixture of through-hole and surface mount components, and using both sides of the board, everything went on well.  Because I only needed a very small run, <a href="https://oshpark.com/"  class="extlink extlink-icon-1"  >OSHPark </a>was the obvious choice.  And at only $11.25, it was a real bargain!

<a href="https://www.sowen.com/1154/rock-light/rocklight_oshpark/"   rel="attachment wp-att-1155"><figure class="alignnone size-medium wp-image-1155"><img loading="lazy"  src="https://sowen.com/media/posts/84/RockLight_OSHPark-300x157.png" alt="" width="300" height="157"  sizes="(max-width: 768px) 100vw, 768px" srcset="https://sowen.com/media/posts/84/responsive/RockLight_OSHPark-300x157-xs.png 300w ,https://sowen.com/media/posts/84/responsive/RockLight_OSHPark-300x157-sm.png 480w ,https://sowen.com/media/posts/84/responsive/RockLight_OSHPark-300x157-md.png 768w"></figure></a>

A few days later and 3 lovely purple PCBs arrived.  It wasn't long before I got the soldering iron out and started to assemble them.  I assumed that my selection of every single value of surface mount capacitor would have contained what I needed, but sadly it didn't even get close, so I had to resort to bodging in a couple of through-hole electrolytic caps.  I also noticed that I hadn't indicated the +ve or -ve power terminals.  A rookie mistake, but not the end of the world.  Once it was all together, though, it worked just great!

<a href="https://www.sowen.com/1154/rock-light/rocklight-3/"   rel="attachment wp-att-1158"><figure class="alignnone size-full wp-image-1158"><img  src="https://sowen.com/media/posts/84/RockLight-3.jpg" alt="" width="256" height="179"  sizes="(max-width: 768px) 100vw, 768px" srcset="https://sowen.com/media/posts/84/responsive/RockLight-3-xs.jpg 300w ,https://sowen.com/media/posts/84/responsive/RockLight-3-sm.jpg 480w ,https://sowen.com/media/posts/84/responsive/RockLight-3-md.jpg 768w"></figure></a> <a href="https://www.sowen.com/1154/rock-light/rocklight-6/"   rel="attachment wp-att-1160"><figure class="alignnone size-medium wp-image-1160"><img loading="lazy"  src="https://sowen.com/media/posts/84/RockLight-6.jpg" alt="" width="236" height="255"  sizes="(max-width: 768px) 100vw, 768px" srcset="https://sowen.com/media/posts/84/responsive/RockLight-6-xs.jpg 300w ,https://sowen.com/media/posts/84/responsive/RockLight-6-sm.jpg 480w ,https://sowen.com/media/posts/84/responsive/RockLight-6-md.jpg 768w"></figure></a> <a href="https://www.sowen.com/1154/rock-light/rocklight-5/"   rel="attachment wp-att-1159"><figure class="alignnone size-medium wp-image-1159"><img loading="lazy"  src="https://sowen.com/media/posts/84/RockLight-5-300x156.jpg" alt="" width="300" height="156"  sizes="(max-width: 768px) 100vw, 768px" srcset="https://sowen.com/media/posts/84/responsive/RockLight-5-300x156-xs.jpg 300w ,https://sowen.com/media/posts/84/responsive/RockLight-5-300x156-sm.jpg 480w ,https://sowen.com/media/posts/84/responsive/RockLight-5-300x156-md.jpg 768w"></figure></a>

A quick test, and a run through of the settings and things were looking really good.  But would it fit the geode?  Time for a trip down to my parents house and try it out.

<a href="https://www.sowen.com/1154/rock-light/rocklight-11/"   rel="attachment wp-att-1162"><figure class="alignnone size-medium wp-image-1162"><img loading="lazy"  src="https://sowen.com/media/posts/84/RockLight-11-300x169.jpg" alt="" width="300" height="169"  sizes="(max-width: 768px) 100vw, 768px" srcset="https://sowen.com/media/posts/84/responsive/RockLight-11-300x169-xs.jpg 300w ,https://sowen.com/media/posts/84/responsive/RockLight-11-300x169-sm.jpg 480w ,https://sowen.com/media/posts/84/responsive/RockLight-11-300x169-md.jpg 768w"></figure></a>

The PCB went in to the geode with no problem at all.  If anything it was slightly undersized, but I'd prefer it to be a little bit too small than too big.  A plastic ring that was a snug fit held it securely in place.

<a href="https://www.sowen.com/1154/rock-light/rocklight-2/"   rel="attachment wp-att-1165"><figure class="alignnone size-medium wp-image-1165"><img loading="lazy"  src="https://sowen.com/media/posts/84/RockLight-2-169x300.jpg" alt="" width="169" height="300"  sizes="(max-width: 768px) 100vw, 768px" srcset="https://sowen.com/media/posts/84/responsive/RockLight-2-169x300-xs.jpg 300w ,https://sowen.com/media/posts/84/responsive/RockLight-2-169x300-sm.jpg 480w ,https://sowen.com/media/posts/84/responsive/RockLight-2-169x300-md.jpg 768w"></figure></a>

In the daylight, it looks absolutely awesome!

<a href="https://www.sowen.com/1154/rock-light/rocklight-12/"   rel="attachment wp-att-1163"><figure class="alignnone size-medium wp-image-1163"><img  src="https://sowen.com/media/posts/84/RockLight-12-300x169.jpg" alt="" width="300" height="169"  sizes="(max-width: 768px) 100vw, 768px" srcset="https://sowen.com/media/posts/84/responsive/RockLight-12-300x169-xs.jpg 300w ,https://sowen.com/media/posts/84/responsive/RockLight-12-300x169-sm.jpg 480w ,https://sowen.com/media/posts/84/responsive/RockLight-12-300x169-md.jpg 768w"></figure> </a><a href="https://www.sowen.com/1154/rock-light/rocklight-9/"   rel="attachment wp-att-1161"><figure class="alignnone size-medium wp-image-1161"><img loading="lazy"  src="https://sowen.com/media/posts/84/RockLight-9-300x169.jpg" alt="" width="300" height="169"  sizes="(max-width: 768px) 100vw, 768px" srcset="https://sowen.com/media/posts/84/responsive/RockLight-9-300x169-xs.jpg 300w ,https://sowen.com/media/posts/84/responsive/RockLight-9-300x169-sm.jpg 480w ,https://sowen.com/media/posts/84/responsive/RockLight-9-300x169-md.jpg 768w"></figure></a> <a href="https://www.sowen.com/1154/rock-light/rocklight-1/"   rel="attachment wp-att-1164"><figure class="alignnone size-medium wp-image-1164"><img loading="lazy"  src="https://sowen.com/media/posts/84/RockLight-1-300x169.jpg" alt="" width="300" height="169"  sizes="(max-width: 768px) 100vw, 768px" srcset="https://sowen.com/media/posts/84/responsive/RockLight-1-300x169-xs.jpg 300w ,https://sowen.com/media/posts/84/responsive/RockLight-1-300x169-sm.jpg 480w ,https://sowen.com/media/posts/84/responsive/RockLight-1-300x169-md.jpg 768w"></figure></a>

By night it looks even better... although getting a good photograph isn't so easy!

<a href="https://www.sowen.com/1154/rock-light/img_20171017_191326-001/"   rel="attachment wp-att-1175"><figure class="alignnone size-medium wp-image-1175"><img loading="lazy"  src="https://sowen.com/media/posts/84/IMG_20171017_191326-001-225x300.jpg" alt="" width="225" height="300"  sizes="(max-width: 768px) 100vw, 768px" srcset="https://sowen.com/media/posts/84/responsive/IMG_20171017_191326-001-225x300-xs.jpg 300w ,https://sowen.com/media/posts/84/responsive/IMG_20171017_191326-001-225x300-sm.jpg 480w ,https://sowen.com/media/posts/84/responsive/IMG_20171017_191326-001-225x300-md.jpg 768w"></figure></a>
            ]]>
        </content>
    </entry>
    <entry>
        <title>Retro Challenge 2017/4 - Rack Teardown and Wrap Up</title>
        <author>
            <name>Spencer</name>
        </author>
        <link href="https://sowen.com/retro-challenge-20174-rack-teardown-and-wrap-up.html"/>
        <id>https://sowen.com/retro-challenge-20174-rack-teardown-and-wrap-up.html</id>

        <updated>2017-05-02T22:30:43+01:00</updated>
            <summary type="html">
                <![CDATA[
                    Ok, firstly, apologies for the lateness of this post.  The stuff below was actually done a couple of weeks ago, but time has just got away from me.  Hence this is being written up 2 days past the closing date for RC2017/4.  Sorry

<a href="http://www.sowen.com/1096/retro-challenge-20174-rack-teardown-and-wrap-up/rack1/" rel="attachment wp-att-1106"><figure class="alignnone size-medium wp-image-1106"><img loading="lazy"  src="https://sowen.com/media/posts/83/Rack1-300x169.jpg" alt="" width="300" height="169"  sizes="(max-width: 768px) 100vw, 768px" srcset="https://sowen.com/media/posts/83/responsive/Rack1-300x169-xs.jpg 300w ,https://sowen.com/media/posts/83/responsive/Rack1-300x169-sm.jpg 480w ,https://sowen.com/media/posts/83/responsive/Rack1-300x169-md.jpg 768w"></figure></a>

Anyway, this part of my challenge involves investigating a rack that came as part of the old stuff that I picked up.  Looks like a 3 bay x 12 slot Eurocard rack.  Lets take a closer look...


                ]]>
            </summary>
        <content type="html">
            <![CDATA[
                Ok, firstly, apologies for the lateness of this post.  The stuff below was actually done a couple of weeks ago, but time has just got away from me.  Hence this is being written up 2 days past the closing date for RC2017/4.  Sorry

<a href="http://www.sowen.com/1096/retro-challenge-20174-rack-teardown-and-wrap-up/rack1/"   rel="attachment wp-att-1106"><figure class="alignnone size-medium wp-image-1106"><img loading="lazy"  src="https://sowen.com/media/posts/83/Rack1-300x169.jpg" alt="" width="300" height="169"  sizes="(max-width: 768px) 100vw, 768px" srcset="https://sowen.com/media/posts/83/responsive/Rack1-300x169-xs.jpg 300w ,https://sowen.com/media/posts/83/responsive/Rack1-300x169-sm.jpg 480w ,https://sowen.com/media/posts/83/responsive/Rack1-300x169-md.jpg 768w"></figure></a>

Anyway, this part of my challenge involves investigating a rack that came as part of the old stuff that I picked up.  Looks like a 3 bay x 12 slot Eurocard rack.  Lets take a closer look...


<a href="http://www.sowen.com/1096/retro-challenge-20174-rack-teardown-and-wrap-up/rack3/"   rel="attachment wp-att-1098"><figure class="alignnone size-medium wp-image-1098"><img loading="lazy"  src="https://sowen.com/media/posts/83/Rack3-169x300.jpg" alt="" width="169" height="300"  sizes="(max-width: 768px) 100vw, 768px" srcset="https://sowen.com/media/posts/83/responsive/Rack3-169x300-xs.jpg 300w ,https://sowen.com/media/posts/83/responsive/Rack3-169x300-sm.jpg 480w ,https://sowen.com/media/posts/83/responsive/Rack3-169x300-md.jpg 768w"></figure></a>

At the back of the rack there's 3 big power supplies.  Very big!  One for each of the 3 bays supplying 12v and 5v.

<figure class="alignnone size-medium wp-image-1097"><img loading="lazy"  src="https://sowen.com/media/posts/83/Rack2-169x300.jpg" alt="" width="169" height="300"  sizes="(max-width: 768px) 100vw, 768px" srcset="https://sowen.com/media/posts/83/responsive/Rack2-169x300-xs.jpg 300w ,https://sowen.com/media/posts/83/responsive/Rack2-169x300-sm.jpg 480w ,https://sowen.com/media/posts/83/responsive/Rack2-169x300-md.jpg 768w"></figure>

There were no cards in the rack when I got it, so the obvious thing to do is check they fit... well, no, not quite.  The guides take the cards in at quite an angle.  I assumed that there's some adjustment and it just needs a bit of tweaking to get everything straight.  Lets start taking things apart to do that...

<a href="http://www.sowen.com/1096/retro-challenge-20174-rack-teardown-and-wrap-up/rack4/"   rel="attachment wp-att-1099"><figure class="alignnone size-medium wp-image-1099"><img loading="lazy"  src="https://sowen.com/media/posts/83/Rack4-300x169.jpg" alt="" width="300" height="169"  sizes="(max-width: 768px) 100vw, 768px" srcset="https://sowen.com/media/posts/83/responsive/Rack4-300x169-xs.jpg 300w ,https://sowen.com/media/posts/83/responsive/Rack4-300x169-sm.jpg 480w ,https://sowen.com/media/posts/83/responsive/Rack4-300x169-md.jpg 768w"></figure></a>

The top and bottom panels slide out without too much trouble after removing a couple of screws...

<a href="http://www.sowen.com/1096/retro-challenge-20174-rack-teardown-and-wrap-up/rack5/"   rel="attachment wp-att-1100"><figure class="alignnone size-medium wp-image-1100"><img loading="lazy"  src="https://sowen.com/media/posts/83/Rack5-300x169.jpg" alt="" width="300" height="169"  sizes="(max-width: 768px) 100vw, 768px" srcset="https://sowen.com/media/posts/83/responsive/Rack5-300x169-xs.jpg 300w ,https://sowen.com/media/posts/83/responsive/Rack5-300x169-sm.jpg 480w ,https://sowen.com/media/posts/83/responsive/Rack5-300x169-md.jpg 768w"></figure></a>

The 3 power supplies need to be removed to get at the back of the bays

<a href="http://www.sowen.com/1096/retro-challenge-20174-rack-teardown-and-wrap-up/rack6/"   rel="attachment wp-att-1101"><figure class="alignnone size-medium wp-image-1101"><img loading="lazy"  src="https://sowen.com/media/posts/83/Rack6-300x169.jpg" alt="" width="300" height="169"  sizes="(max-width: 768px) 100vw, 768px" srcset="https://sowen.com/media/posts/83/responsive/Rack6-300x169-xs.jpg 300w ,https://sowen.com/media/posts/83/responsive/Rack6-300x169-sm.jpg 480w ,https://sowen.com/media/posts/83/responsive/Rack6-300x169-md.jpg 768w"></figure></a>

Can't see any adjustment yet.  However, we can see where the power rails are connected

<a href="http://www.sowen.com/1096/retro-challenge-20174-rack-teardown-and-wrap-up/rack7/"   rel="attachment wp-att-1102"><figure class="alignnone size-medium wp-image-1102"><img loading="lazy"  src="https://sowen.com/media/posts/83/Rack7-300x169.jpg" alt="" width="300" height="169"  sizes="(max-width: 768px) 100vw, 768px" srcset="https://sowen.com/media/posts/83/responsive/Rack7-300x169-xs.jpg 300w ,https://sowen.com/media/posts/83/responsive/Rack7-300x169-sm.jpg 480w ,https://sowen.com/media/posts/83/responsive/Rack7-300x169-md.jpg 768w"></figure></a>

Looks like the power rails are very very beefy!

<a href="http://www.sowen.com/1096/retro-challenge-20174-rack-teardown-and-wrap-up/rack8/"   rel="attachment wp-att-1103"><figure class="alignnone size-medium wp-image-1103"><img loading="lazy"  src="https://sowen.com/media/posts/83/Rack8-300x150.jpg" alt="" width="300" height="150"  sizes="(max-width: 768px) 100vw, 768px" srcset="https://sowen.com/media/posts/83/responsive/Rack8-300x150-xs.jpg 300w ,https://sowen.com/media/posts/83/responsive/Rack8-300x150-sm.jpg 480w ,https://sowen.com/media/posts/83/responsive/Rack8-300x150-md.jpg 768w"></figure></a>

On closer inspection, the PCBs are trippled up!  3 layers of PCB! Why?  The sockets are, I assume, wire-wrap sockets, hence having leads long enough to get through 3 boards.

<a href="http://www.sowen.com/1096/retro-challenge-20174-rack-teardown-and-wrap-up/rack9/"   rel="attachment wp-att-1104"><figure class="alignnone size-medium wp-image-1104"><img loading="lazy"  src="https://sowen.com/media/posts/83/Rack9-300x239.jpg" alt="" width="300" height="239"  sizes="(max-width: 768px) 100vw, 768px" srcset="https://sowen.com/media/posts/83/responsive/Rack9-300x239-xs.jpg 300w ,https://sowen.com/media/posts/83/responsive/Rack9-300x239-sm.jpg 480w ,https://sowen.com/media/posts/83/responsive/Rack9-300x239-md.jpg 768w"></figure></a>

And, not only that, but everything apart from the power has been disconnected between sockets.  Judging by the straightness, it's been cut by hand!

<a href="http://www.sowen.com/1096/retro-challenge-20174-rack-teardown-and-wrap-up/rack10/"   rel="attachment wp-att-1105"><figure class="alignnone size-medium wp-image-1105"><img loading="lazy"  src="https://sowen.com/media/posts/83/Rack10-169x300.jpg" alt="" width="169" height="300"  sizes="(max-width: 768px) 100vw, 768px" srcset="https://sowen.com/media/posts/83/responsive/Rack10-169x300-xs.jpg 300w ,https://sowen.com/media/posts/83/responsive/Rack10-169x300-sm.jpg 480w ,https://sowen.com/media/posts/83/responsive/Rack10-169x300-md.jpg 768w"></figure></a>

And, looking at all the support rails and hardware, they have all been cut to length by hand too... but not with any consistency - hence the wonkyness of the cards.

<a href="http://www.sowen.com/1096/retro-challenge-20174-rack-teardown-and-wrap-up/rack-teardown/"   rel="attachment wp-att-1107"><figure class="alignnone size-medium wp-image-1107"><img loading="lazy"  src="https://sowen.com/media/posts/83/rack-teardown-300x169.jpg" alt="" width="300" height="169"  sizes="(max-width: 768px) 100vw, 768px" srcset="https://sowen.com/media/posts/83/responsive/rack-teardown-300x169-xs.jpg 300w ,https://sowen.com/media/posts/83/responsive/rack-teardown-300x169-sm.jpg 480w ,https://sowen.com/media/posts/83/responsive/rack-teardown-300x169-md.jpg 768w"></figure></a>

Further investigation shows that nothing is likely to line up, the backplane is, well, just odd, but that the new backplane boards (which would feature in a later part of this Retro Challenge) would fit.

In all honesty, I really don't know what to do with this.  I suspect that it was probably built as some kind of test rig, but I doubt that it's actually been put to any use otherwise cards would slide in and out.  Apart from a lot of dust, there's not really any signs of use.  However, I've got some 10 slot and 12 slot backplane PCBs that are new and unused, so it is tempting to re-cut all the hardware to accommodate 3 of those.  But, that would still beg the question about what I would do with it.  Hmmm... maybe this will reappear in another Retro Challenge some time in the future.  Who knows?
            ]]>
        </content>
    </entry>
    <entry>
        <title>Retro Challenge 2017/4 - Keyboard Investigations</title>
        <author>
            <name>Spencer</name>
        </author>
        <link href="https://sowen.com/retro-challenge-20174-keyboard-investigations.html"/>
        <id>https://sowen.com/retro-challenge-20174-keyboard-investigations.html</id>

        <updated>2017-04-12T15:44:47+01:00</updated>
            <summary type="html">
                <![CDATA[
                    <!-- wp:paragraph -->
<p>After a visual check of the keyboards (see <a href="http://www.sowen.com/1070/retro-challenge-20174-the-keyboard-to-happiness/">this </a>post), I had a couple of questions, which were do the keyboards work? and how do the keyboards work?</p>
<!-- /wp:paragraph -->

<!-- wp:paragraph -->
<p>On the basis that neither of the Alphameric had their EPROM windows covered, and that one of the Cherry keyboards had already been modified, I chose the other Cherry one as the most likely to work. &nbsp;After opening it up (again), I checked the 20 pin header. &nbsp;It was quite easy to find out what the 5v and Ground pins were (traceable to the power pins on the logic chips and corresponds to red and black wires on pin 1 &amp; 2!), but the others were going to need something more to diagnose</p>
<!-- /wp:paragraph -->

<!-- wp:image {"id":1082,"linkDestination":"custom"} -->
<figure class="wp-block-image"><a href="http://www.sowen.com/1080/retro-challenge-20174-keyboard-investigations/keyboard-investigation-1/" rel="attachment wp-att-1082"><figure class="wp-image-1082"><img loading="lazy" src="https://sowen.com/media/posts/82/Keyboard-Investigation-1-300x169.jpg" alt=""  sizes="(max-width: 768px) 100vw, 768px" srcset="https://sowen.com/media/posts/82/responsive/Keyboard-Investigation-1-300x169-xs.jpg 300w ,https://sowen.com/media/posts/82/responsive/Keyboard-Investigation-1-300x169-sm.jpg 480w ,https://sowen.com/media/posts/82/responsive/Keyboard-Investigation-1-300x169-md.jpg 768w"></figure></a></figure>
<!-- /wp:image -->

<!-- wp:paragraph -->
<p>Time to break out the oscilloscope! &nbsp;It didn't take long to discover that the pins 3-9 changed upon pressing a key. &nbsp;Curiously, they didn't didn't change when releasing the key though. &nbsp;Also, depending on which key was pressed, they might not change at all. &nbsp;Pin 9 was most likely to change and pin 3 was least likely to change.</p>
<!-- /wp:paragraph -->

<!-- wp:more -->

                ]]>
            </summary>
        <content type="html">
            <![CDATA[
                <!-- wp:paragraph -->
<p>After a visual check of the keyboards (see <a href="http://www.sowen.com/1070/retro-challenge-20174-the-keyboard-to-happiness/"  class="extlink extlink-icon-1"  >this </a>post), I had a couple of questions, which were do the keyboards work? and how do the keyboards work?</p>
<!-- /wp:paragraph -->

<!-- wp:paragraph -->
<p>On the basis that neither of the Alphameric had their EPROM windows covered, and that one of the Cherry keyboards had already been modified, I chose the other Cherry one as the most likely to work. &nbsp;After opening it up (again), I checked the 20 pin header. &nbsp;It was quite easy to find out what the 5v and Ground pins were (traceable to the power pins on the logic chips and corresponds to red and black wires on pin 1 &amp; 2!), but the others were going to need something more to diagnose</p>
<!-- /wp:paragraph -->

<!-- wp:image {"id":1082,"linkDestination":"custom"} -->
<figure class="wp-block-image"><a href="http://www.sowen.com/1080/retro-challenge-20174-keyboard-investigations/keyboard-investigation-1/"   rel="attachment wp-att-1082"><figure class="wp-image-1082"><img loading="lazy" src="https://sowen.com/media/posts/82/Keyboard-Investigation-1-300x169.jpg" alt=""  sizes="(max-width: 768px) 100vw, 768px" srcset="https://sowen.com/media/posts/82/responsive/Keyboard-Investigation-1-300x169-xs.jpg 300w ,https://sowen.com/media/posts/82/responsive/Keyboard-Investigation-1-300x169-sm.jpg 480w ,https://sowen.com/media/posts/82/responsive/Keyboard-Investigation-1-300x169-md.jpg 768w"></figure></a></figure>
<!-- /wp:image -->

<!-- wp:paragraph -->
<p>Time to break out the oscilloscope! &nbsp;It didn't take long to discover that the pins 3-9 changed upon pressing a key. &nbsp;Curiously, they didn't didn't change when releasing the key though. &nbsp;Also, depending on which key was pressed, they might not change at all. &nbsp;Pin 9 was most likely to change and pin 3 was least likely to change.</p>
<!-- /wp:paragraph -->

<!-- wp:more -->

<!-- /wp:more -->

<!-- wp:image {"id":1083,"linkDestination":"custom"} -->
<figure class="wp-block-image"><a href="http://www.sowen.com/1080/retro-challenge-20174-keyboard-investigations/keyboard-investigation-2/"   rel="attachment wp-att-1083"><figure class="wp-image-1083"><img loading="lazy" src="https://sowen.com/media/posts/82/Keyboard-Investigation-2-169x300.jpg" alt=""  sizes="(max-width: 768px) 100vw, 768px" srcset="https://sowen.com/media/posts/82/responsive/Keyboard-Investigation-2-169x300-xs.jpg 300w ,https://sowen.com/media/posts/82/responsive/Keyboard-Investigation-2-169x300-sm.jpg 480w ,https://sowen.com/media/posts/82/responsive/Keyboard-Investigation-2-169x300-md.jpg 768w"></figure></a></figure>
<!-- /wp:image -->

<!-- wp:paragraph -->
<p>So, there we have a 7 bit ASCII pattern! &nbsp;The value was being latched, and pin 11 was a pulse to indicate that a valid signal was ready to be read.</p>
<!-- /wp:paragraph -->

<!-- wp:paragraph -->
<p>For last years Retro Challenge <a href="http://www.randomorbit.co.uk/?p=1137"  class="extlink extlink-icon-1"  >Andy Collins</a> had done pretty much the same but opposite thing, where he had a faulty Alphameric keyboard that he replaced with an Arduino &amp; USB keyboard. &nbsp;The timing diagram was particularly useful, so thanks Andy!</p>
<!-- /wp:paragraph -->

<!-- wp:image {"id":1084,"linkDestination":"custom"} -->
<figure class="wp-block-image"><a href="http://www.sowen.com/1080/retro-challenge-20174-keyboard-investigations/keyboard-investigation-3/"   rel="attachment wp-att-1084"><figure class="wp-image-1084"><img loading="lazy" src="https://sowen.com/media/posts/82/Keyboard-Investigation-3-300x169.jpg" alt=""  sizes="(max-width: 768px) 100vw, 768px" srcset="https://sowen.com/media/posts/82/responsive/Keyboard-Investigation-3-300x169-xs.jpg 300w ,https://sowen.com/media/posts/82/responsive/Keyboard-Investigation-3-300x169-sm.jpg 480w ,https://sowen.com/media/posts/82/responsive/Keyboard-Investigation-3-300x169-md.jpg 768w"></figure></a></figure>
<!-- /wp:image -->

<!-- wp:paragraph -->
<p>If an Arduino can be used to simulate being a keyboard, then it can also be used to read one! &nbsp;So I plugged in a cheap Uno that I had lying around and wrote a quick sketch to read the data pins D0 - D6 every time the strobe pin goes high, then convert this in to an ASCII number and print the character on the serial port. &nbsp;I also got it to print out the ASCII code itself, which was handy for working out what keys had non-printable characters</p>
<!-- /wp:paragraph -->

<!-- wp:image {"id":1085,"linkDestination":"custom"} -->
<figure class="wp-block-image"><a href="http://www.sowen.com/1080/retro-challenge-20174-keyboard-investigations/keyboard-investigation-4/"   rel="attachment wp-att-1085"><figure class="wp-image-1085"><img loading="lazy" src="https://sowen.com/media/posts/82/Keyboard-Investigation-4-300x118.jpg" alt=""  sizes="(max-width: 768px) 100vw, 768px" srcset="https://sowen.com/media/posts/82/responsive/Keyboard-Investigation-4-300x118-xs.jpg 300w ,https://sowen.com/media/posts/82/responsive/Keyboard-Investigation-4-300x118-sm.jpg 480w ,https://sowen.com/media/posts/82/responsive/Keyboard-Investigation-4-300x118-md.jpg 768w"></figure></a></figure>
<!-- /wp:image -->

<!-- wp:paragraph -->
<p>The regular keys A-Z were affected by the two modifier keys to give 3 different characters (a, A and ASCII 1, or b, B and ASCII 2 etc.). &nbsp;The Del key was the only other one to have 2 modified outputs, but most of the others had just one output regardless of the shift or control key being pushed.</p>
<!-- /wp:paragraph -->

<!-- wp:image {"id":1086,"linkDestination":"custom"} -->
<figure class="wp-block-image"><a href="http://www.sowen.com/1080/retro-challenge-20174-keyboard-investigations/keyboard-investigation-5/"   rel="attachment wp-att-1086"><figure class="wp-image-1086"><img loading="lazy" src="https://sowen.com/media/posts/82/Keyboard-Investigation-5-300x206.jpg" alt=""  sizes="(max-width: 768px) 100vw, 768px" srcset="https://sowen.com/media/posts/82/responsive/Keyboard-Investigation-5-300x206-xs.jpg 300w ,https://sowen.com/media/posts/82/responsive/Keyboard-Investigation-5-300x206-sm.jpg 480w ,https://sowen.com/media/posts/82/responsive/Keyboard-Investigation-5-300x206-md.jpg 768w"></figure></a></figure>
<!-- /wp:image -->

<!-- wp:paragraph -->
<p>I had a spare Arduino Mini Pro clone lying around and also a 25 pin D socket, so I figured it might be handy to make up a slightly more permanent adaptor that will plug in to the keyboard. &nbsp;Some of the soldering is a bit dodgy here, but it's all solid enough :-)</p>
<!-- /wp:paragraph -->

<!-- wp:image {"id":1087,"linkDestination":"custom"} -->
<figure class="wp-block-image"><a href="http://www.sowen.com/1080/retro-challenge-20174-keyboard-investigations/keyboard-investigation-6/"   rel="attachment wp-att-1087"><figure class="wp-image-1087"><img loading="lazy" src="https://sowen.com/media/posts/82/Keyboard-Investigation-6-169x300.jpg" alt=""  sizes="(max-width: 768px) 100vw, 768px" srcset="https://sowen.com/media/posts/82/responsive/Keyboard-Investigation-6-169x300-xs.jpg 300w ,https://sowen.com/media/posts/82/responsive/Keyboard-Investigation-6-169x300-sm.jpg 480w ,https://sowen.com/media/posts/82/responsive/Keyboard-Investigation-6-169x300-md.jpg 768w"></figure></a></figure>
<!-- /wp:image -->

<!-- wp:paragraph -->
<p>Also, the important thing is that it all fits inside the 25 pin D shell!</p>
<!-- /wp:paragraph -->

<!-- wp:image {"id":1088,"linkDestination":"custom"} -->
<figure class="wp-block-image"><a href="http://www.sowen.com/1080/retro-challenge-20174-keyboard-investigations/keyboard-investigation-7/"   rel="attachment wp-att-1088"><figure class="wp-image-1088"><img loading="lazy" src="https://sowen.com/media/posts/82/Keyboard-Investigation-7-300x169.jpg" alt=""  sizes="(max-width: 768px) 100vw, 768px" srcset="https://sowen.com/media/posts/82/responsive/Keyboard-Investigation-7-300x169-xs.jpg 300w ,https://sowen.com/media/posts/82/responsive/Keyboard-Investigation-7-300x169-sm.jpg 480w ,https://sowen.com/media/posts/82/responsive/Keyboard-Investigation-7-300x169-md.jpg 768w"></figure></a></figure>
<!-- /wp:image -->

<!-- wp:paragraph -->
<p>The Cherry keyboard worked exactly as expected, and allows me to use it with my RC2014! &nbsp;However, I wanted to know if the other, Alphameric keyboards would work too.</p>
<!-- /wp:paragraph -->

<!-- wp:image {"id":1089,"linkDestination":"custom"} -->
<figure class="wp-block-image"><a href="http://www.sowen.com/1080/retro-challenge-20174-keyboard-investigations/keyboard-investigation-8/"   rel="attachment wp-att-1089"><figure class="wp-image-1089"><img loading="lazy" src="https://sowen.com/media/posts/82/Keyboard-Investigation-8-300x169.jpg" alt=""  sizes="(max-width: 768px) 100vw, 768px" srcset="https://sowen.com/media/posts/82/responsive/Keyboard-Investigation-8-300x169-xs.jpg 300w ,https://sowen.com/media/posts/82/responsive/Keyboard-Investigation-8-300x169-sm.jpg 480w ,https://sowen.com/media/posts/82/responsive/Keyboard-Investigation-8-300x169-md.jpg 768w"></figure></a></figure>
<!-- /wp:image -->

<!-- wp:paragraph -->
<p>They had the same connection, although I hadn't done any of the diagnostic work that I did with the Cherry one - but it was worth taking a chance. &nbsp;And it turns out that yes, they work too! &nbsp;Well, the regular Alphameric keyboard works exactly as the Cherry one does!</p>
<!-- /wp:paragraph -->

<!-- wp:image {"id":1090,"linkDestination":"custom"} -->
<figure class="wp-block-image"><a href="http://www.sowen.com/1080/retro-challenge-20174-keyboard-investigations/keyboard-investigation-9/"   rel="attachment wp-att-1090"><figure class="wp-image-1090"><img loading="lazy" src="https://sowen.com/media/posts/82/Keyboard-Investigation-9-300x169.jpg" alt=""  sizes="(max-width: 768px) 100vw, 768px" srcset="https://sowen.com/media/posts/82/responsive/Keyboard-Investigation-9-300x169-xs.jpg 300w ,https://sowen.com/media/posts/82/responsive/Keyboard-Investigation-9-300x169-sm.jpg 480w ,https://sowen.com/media/posts/82/responsive/Keyboard-Investigation-9-300x169-md.jpg 768w"></figure></a></figure>
<!-- /wp:image -->

<!-- wp:paragraph -->
<p>The one with the hex keyboard, though, only partially works. &nbsp;The main keyboard section works as expected, however, the hex keypad sends out odd key codes. &nbsp;Some of them output several characters, and can even put the RC2014 or the Arduino adaptor in to a weird mode that means the main keyboard types weird stuff until it is reset. &nbsp;Not sure if this is something to do with bit corruption in the EPROM, or some other kind of error, or if it's actually by design - however, that's for diagnosis another time. &nbsp;There's still lots more stuff I need to go through yet and time is ticking away...</p>
<!-- /wp:paragraph -->

<!-- wp:image {"id":1081,"linkDestination":"custom"} -->
<figure class="wp-block-image"><a href="http://www.sowen.com/1080/retro-challenge-20174-keyboard-investigations/keyboard-investigation-10/"   rel="attachment wp-att-1081"><figure class="wp-image-1081"><img loading="lazy" src="https://sowen.com/media/posts/82/Keyboard-Investigation-10-300x169.jpg" alt=""  sizes="(max-width: 768px) 100vw, 768px" srcset="https://sowen.com/media/posts/82/responsive/Keyboard-Investigation-10-300x169-xs.jpg 300w ,https://sowen.com/media/posts/82/responsive/Keyboard-Investigation-10-300x169-sm.jpg 480w ,https://sowen.com/media/posts/82/responsive/Keyboard-Investigation-10-300x169-md.jpg 768w"></figure></a></figure>
<!-- /wp:image -->

<!-- wp:paragraph -->
<p>Arduino Code</p>
<!-- /wp:paragraph -->

<!-- wp:code -->
<pre class="wp-block-code"><code>#define Strobe 9
#define DATA0 8
#define DATA1 7
#define DATA2 6
#define DATA3 5
#define DATA4 4
#define DATA5 3
#define DATA6 2

int DATABYTE = 0;

void setup() {
  pinMode(DATA0, INPUT);
  pinMode(DATA1, INPUT);
  pinMode(DATA2, INPUT);
  pinMode(DATA3, INPUT);
  pinMode(DATA4, INPUT);
  pinMode(DATA5, INPUT);
  pinMode(DATA6, INPUT);
  pinMode(Strobe, INPUT);
  digitalWrite (Strobe, HIGH);
  Serial1.begin(115200);
  //Serial.println ("Started");
}

void loop() {
int pulse = digitalRead(Strobe);
  if (pulse == 0 ) {
    printASCII();
  }
}

void printASCII() {
  delay (1);
  DATABYTE = ((digitalRead(DATA0)) + (digitalRead(DATA1) * 2) + (digitalRead(DATA2) * 4) + (digitalRead(DATA3) * 8) + (digitalRead(DATA4) * 16) + (digitalRead(DATA5) * 32) + (digitalRead(DATA6) * 64));
  //Serial.print(DATABYTE);
  //Serial.print(" ");
  Serial1.print(char(DATABYTE));
  delay(10);
}
</code></pre>
<!-- /wp:code -->
            ]]>
        </content>
    </entry>
    <entry>
        <title>Retro Challenge 2017/4 - The Key(board) to Happiness</title>
        <author>
            <name>Spencer</name>
        </author>
        <link href="https://sowen.com/retro-challenge-20174-the-keyboard-to-happiness.html"/>
        <id>https://sowen.com/retro-challenge-20174-the-keyboard-to-happiness.html</id>

        <updated>2017-04-10T16:34:37+01:00</updated>
            <summary type="html">
                <![CDATA[
                    Next up on the things to investigate is the 4 keyboards

<a href="http://www.sowen.com/1029/retro-challenge-20174-getting-the-excuses-in-early/retrochallenge2017-5/" rel="attachment wp-att-1036"><figure class="alignnone size-medium wp-image-1036"><img loading="lazy"  src="https://sowen.com/media/posts/81/RetroChallenge2017-5-300x169.jpg" alt="" width="300" height="169"  sizes="(max-width: 768px) 100vw, 768px" srcset="https://sowen.com/media/posts/81/responsive/RetroChallenge2017-5-300x169-xs.jpg 300w ,https://sowen.com/media/posts/81/responsive/RetroChallenge2017-5-300x169-sm.jpg 480w ,https://sowen.com/media/posts/81/responsive/RetroChallenge2017-5-300x169-md.jpg 768w"></figure></a>

Judging by the connectors, it was obvious that these aren't modern (PS2, USB or even 5 pin DIN) keyboards.  Likely either a raw matrix or maybe parallel ASCII.  Lets open them up and have a poke around!


                ]]>
            </summary>
        <content type="html">
            <![CDATA[
                Next up on the things to investigate is the 4 keyboards

<a href="http://www.sowen.com/1029/retro-challenge-20174-getting-the-excuses-in-early/retrochallenge2017-5/"   rel="attachment wp-att-1036"><figure class="alignnone size-medium wp-image-1036"><img loading="lazy"  src="https://sowen.com/media/posts/81/RetroChallenge2017-5-300x169.jpg" alt="" width="300" height="169"  sizes="(max-width: 768px) 100vw, 768px" srcset="https://sowen.com/media/posts/81/responsive/RetroChallenge2017-5-300x169-xs.jpg 300w ,https://sowen.com/media/posts/81/responsive/RetroChallenge2017-5-300x169-sm.jpg 480w ,https://sowen.com/media/posts/81/responsive/RetroChallenge2017-5-300x169-md.jpg 768w"></figure></a>

Judging by the connectors, it was obvious that these aren't modern (PS2, USB or even 5 pin DIN) keyboards.  Likely either a raw matrix or maybe parallel ASCII.  Lets open them up and have a poke around!


First off the block was this dusty looking thing.

<a href="http://www.sowen.com/1070/retro-challenge-20174-the-keyboard-to-happiness/keyboard-2/"   rel="attachment wp-att-1073"><figure class="alignnone size-medium wp-image-1073"><img loading="lazy"  src="https://sowen.com/media/posts/81/Keyboard-2-300x169.jpg" alt="" width="300" height="169"  sizes="(max-width: 768px) 100vw, 768px" srcset="https://sowen.com/media/posts/81/responsive/Keyboard-2-300x169-xs.jpg 300w ,https://sowen.com/media/posts/81/responsive/Keyboard-2-300x169-sm.jpg 480w ,https://sowen.com/media/posts/81/responsive/Keyboard-2-300x169-md.jpg 768w"></figure></a>

Initially I didn't take much notice of the sticker on the bottom, so when I opened it up, I was surprised to see it was a Cherry keyboard.  Of course this was before the days before colour, so the Cherry Green or Cherry Red key switches weren't an option - These were just generic black.

The use of an EPROM in a keyboard came as a bit of a surprise to me too.  However, it makes sense.  There is a Philips<a href="https://www.silicon-ark.co.uk/datasheets/mab8035hl-datasheet-philips.pdf"  class="extlink extlink-icon-1"  > MAB8035HL </a>microprocessor onboard, which does all the row and column scanning, then, presumably , looks up the character that this key corresponds to on the EPROM, and puts the ASCII value of that character on the parallel connector.  Using an EPROM for this would allow for different locales.

This particular one had the original connector cable replaced with a 20 pin ribbon cable socket.  This may be of some relevance later in this Retro Challenge!

<a href="http://www.sowen.com/1070/retro-challenge-20174-the-keyboard-to-happiness/keyboard-3/"   rel="attachment wp-att-1074"><figure class="alignnone size-medium wp-image-1074"><img loading="lazy"  src="https://sowen.com/media/posts/81/Keyboard-3-300x169.jpg" alt="" width="300" height="169"  sizes="(max-width: 768px) 100vw, 768px" srcset="https://sowen.com/media/posts/81/responsive/Keyboard-3-300x169-xs.jpg 300w ,https://sowen.com/media/posts/81/responsive/Keyboard-3-300x169-sm.jpg 480w ,https://sowen.com/media/posts/81/responsive/Keyboard-3-300x169-md.jpg 768w"></figure></a>

Next up was another one virtually the same.  The only difference of note though is the original cable, terminated with a 25 pin D plug, was still in place.

<a href="http://www.sowen.com/1070/retro-challenge-20174-the-keyboard-to-happiness/keyboard-4/"   rel="attachment wp-att-1071"><figure class="alignnone size-medium wp-image-1071"><img loading="lazy"  src="https://sowen.com/media/posts/81/Keyboard-4-300x169.jpg" alt="" width="300" height="169"  sizes="(max-width: 768px) 100vw, 768px" srcset="https://sowen.com/media/posts/81/responsive/Keyboard-4-300x169-xs.jpg 300w ,https://sowen.com/media/posts/81/responsive/Keyboard-4-300x169-sm.jpg 480w ,https://sowen.com/media/posts/81/responsive/Keyboard-4-300x169-md.jpg 768w"></figure></a>

The third keyboard was a bit more solid construction, and was branded as Alphameric.  It had a similar design with an 8035 microprocessor and a 2k EPROM.  Interestingly, they had stuck an identifying sticker on the EPROM, but not over the window!  I've no idea how UV-proof the keyboard case is, or if it's been stored in a dark location for most of it's life, but I'd assume that at least some of the bits would have leaked out over time and got carried away on a sunbeam.

The external connector was a 25 pin D, although internally it was fed from a 16 way ribbon cable.

<a href="http://www.sowen.com/1070/retro-challenge-20174-the-keyboard-to-happiness/keyboard-1/"   rel="attachment wp-att-1072"><figure class="alignnone size-medium wp-image-1072"><img loading="lazy"  src="https://sowen.com/media/posts/81/Keyboard-1-300x169.jpg" alt="" width="300" height="169"  sizes="(max-width: 768px) 100vw, 768px" srcset="https://sowen.com/media/posts/81/responsive/Keyboard-1-300x169-xs.jpg 300w ,https://sowen.com/media/posts/81/responsive/Keyboard-1-300x169-sm.jpg 480w ,https://sowen.com/media/posts/81/responsive/Keyboard-1-300x169-md.jpg 768w"></figure></a>

Of the 4 keyboards, this last one was my favourite.  Really, who doesn't like a keyboard with a hexadecimal number pad!  Maybe the designers were very forward-looking and anticipated the rise of IPv6! ;-)

This was obviously from the same range as the previous Alphameric keyboard as everything about the PCB and layout was the same, with the obvious additional keys on the number pad.  Curiously, not only did this have all the numbers from 0-F, but 10 function keys and also 5 unmarked keys.  One of these keys had an extra heavy duty spring under it, so possibly this is a reset button or something else important that you don't want to push by accident.  Again, the EPROM window had been missed by the sticker!

The case itself is a combination of moulded plastic and some kind of compressed moulded heavy fibreboard type stuff for the base/sides.

Connection was via the same kind of ribbon cable to 25 pin D plug.  I traced a few of the connections through and have identified the power &amp; ground pins and 9 data pins (8 data and 1 strobe? or 7 data and 2 control lines?).

Next step is to feed them some power and see what data comes out.  I'm hopeful that the EPROMs with non-covered windows are still intact, but will start with one of the Cherry ones, just to get an idea of what to expect.  It will also be worth pulling the EPROMs and sticking them in a reader - partly to archive them, partly to see the code they run, and partly to play around with the character map.  That might not happen during this Retro Challenge time frame though.

Alphameric was disolved in 2007, however, the keyboard side of the business was sold off in 2004 to <a href="http://www.devlin.co.uk/products/input-devices/"  class="extlink extlink-icon-1"  >Devlin</a>, who make commercial input devices.
            ]]>
        </content>
    </entry>
    <entry>
        <title>Retro Challenge 2017/4 - ICE ICE Maybe</title>
        <author>
            <name>Spencer</name>
        </author>
        <link href="https://sowen.com/retro-challenge-20174-ice-ice-maybe.html"/>
        <id>https://sowen.com/retro-challenge-20174-ice-ice-maybe.html</id>

        <updated>2017-04-07T18:29:05+01:00</updated>
            <summary type="html">
                <![CDATA[
                    I decided the easiest thing to tackle first would be the three ICE (In-Circuit Emulators) as they're quite bulky things to get out of the way early.  There are two non-identical versions of the same model Adtek ICE Engine BX and a Zax ICD278 - all with manuals!

<a href="http://www.sowen.com/1048/retro-challenge-20174-ice-ice-maybe/2017-04-03-22-00-08/" rel="attachment wp-att-1065"><figure class="alignnone size-medium wp-image-1065"><img loading="lazy"  src="https://sowen.com/media/posts/80/2017-04-03-22.00.08-300x169.jpg" alt="" width="300" height="169"  sizes="(max-width: 768px) 100vw, 768px" srcset="https://sowen.com/media/posts/80/responsive/2017-04-03-22.00.08-300x169-xs.jpg 300w ,https://sowen.com/media/posts/80/responsive/2017-04-03-22.00.08-300x169-sm.jpg 480w ,https://sowen.com/media/posts/80/responsive/2017-04-03-22.00.08-300x169-md.jpg 768w"></figure></a>


                ]]>
            </summary>
        <content type="html">
            <![CDATA[
                I decided the easiest thing to tackle first would be the three ICE (In-Circuit Emulators) as they're quite bulky things to get out of the way early.  There are two non-identical versions of the same model Adtek ICE Engine BX and a Zax ICD278 - all with manuals!

<a href="http://www.sowen.com/1048/retro-challenge-20174-ice-ice-maybe/2017-04-03-22-00-08/"   rel="attachment wp-att-1065"><figure class="alignnone size-medium wp-image-1065"><img loading="lazy"  src="https://sowen.com/media/posts/80/2017-04-03-22.00.08-300x169.jpg" alt="" width="300" height="169"  sizes="(max-width: 768px) 100vw, 768px" srcset="https://sowen.com/media/posts/80/responsive/2017-04-03-22.00.08-300x169-xs.jpg 300w ,https://sowen.com/media/posts/80/responsive/2017-04-03-22.00.08-300x169-sm.jpg 480w ,https://sowen.com/media/posts/80/responsive/2017-04-03-22.00.08-300x169-md.jpg 768w"></figure></a>


Although they all have PAT stickers on to indicate they were tested safe in 2001/2002, before plugging anything in I wanted to check inside for bulging capacitors, leaky batteries or any metal debris that might be floating around inside.  Also, I wanted to know what was actually in these machines!

<a href="http://www.sowen.com/1048/retro-challenge-20174-ice-ice-maybe/2017-04-05-21-24-06/"   rel="attachment wp-att-1056"><figure class="alignnone size-medium wp-image-1056"><img  src="https://sowen.com/media/posts/80/2017-04-05-21.24.06-300x169.jpg" alt="" width="300" height="169"  sizes="(max-width: 768px) 100vw, 768px" srcset="https://sowen.com/media/posts/80/responsive/2017-04-05-21.24.06-300x169-xs.jpg 300w ,https://sowen.com/media/posts/80/responsive/2017-04-05-21.24.06-300x169-sm.jpg 480w ,https://sowen.com/media/posts/80/responsive/2017-04-05-21.24.06-300x169-md.jpg 768w"></figure></a><a href="http://www.sowen.com/1048/retro-challenge-20174-ice-ice-maybe/2017-04-05-21-56-28/"   rel="attachment wp-att-1058"><figure class="alignnone size-medium wp-image-1058"><img loading="lazy"  src="https://sowen.com/media/posts/80/2017-04-05-21.56.28-300x169.jpg" alt="" width="300" height="169"  sizes="(max-width: 768px) 100vw, 768px" srcset="https://sowen.com/media/posts/80/responsive/2017-04-05-21.56.28-300x169-xs.jpg 300w ,https://sowen.com/media/posts/80/responsive/2017-04-05-21.56.28-300x169-sm.jpg 480w ,https://sowen.com/media/posts/80/responsive/2017-04-05-21.56.28-300x169-md.jpg 768w"></figure></a>

Inside the ICE Engine Bx is quite full.  This unit is not only an ICE but also an EPROM programmer and a UV EPROM eraser too!  The bulk of it is made up of 3 boards with off the shelf logic, all connected to a backplane.  One of them had a 3 slot backplane the other had a 4 slot one, with one empty slot

<a href="http://www.sowen.com/1048/retro-challenge-20174-ice-ice-maybe/2017-04-05-22-07-11/"   rel="attachment wp-att-1061"><figure class="alignnone size-medium wp-image-1061"><img  src="https://sowen.com/media/posts/80/2017-04-05-22.07.11-300x169.jpg" alt="" width="300" height="169"  sizes="(max-width: 768px) 100vw, 768px" srcset="https://sowen.com/media/posts/80/responsive/2017-04-05-22.07.11-300x169-xs.jpg 300w ,https://sowen.com/media/posts/80/responsive/2017-04-05-22.07.11-300x169-sm.jpg 480w ,https://sowen.com/media/posts/80/responsive/2017-04-05-22.07.11-300x169-md.jpg 768w"></figure></a><a href="http://www.sowen.com/1048/retro-challenge-20174-ice-ice-maybe/2017-04-05-22-05-46/"   rel="attachment wp-att-1060"><figure class="alignnone size-medium wp-image-1060"><img loading="lazy"  src="https://sowen.com/media/posts/80/2017-04-05-22.05.46-300x169.jpg" alt="" width="300" height="169"  sizes="(max-width: 768px) 100vw, 768px" srcset="https://sowen.com/media/posts/80/responsive/2017-04-05-22.05.46-300x169-xs.jpg 300w ,https://sowen.com/media/posts/80/responsive/2017-04-05-22.05.46-300x169-sm.jpg 480w ,https://sowen.com/media/posts/80/responsive/2017-04-05-22.05.46-300x169-md.jpg 768w"></figure></a><figure class="alignnone wp-image-1059 size-medium"><img loading="lazy"  src="https://sowen.com/media/posts/80/2017-04-05-22.04.16-e1491583692309-300x169.jpg" alt="" width="300" height="169"  sizes="(max-width: 768px) 100vw, 768px" srcset="https://sowen.com/media/posts/80/responsive/2017-04-05-22.04.16-e1491583692309-300x169-xs.jpg 300w ,https://sowen.com/media/posts/80/responsive/2017-04-05-22.04.16-e1491583692309-300x169-sm.jpg 480w ,https://sowen.com/media/posts/80/responsive/2017-04-05-22.04.16-e1491583692309-300x169-md.jpg 768w"></figure>

<figure class="alignnone size-medium wp-image-1057"><img loading="lazy"  src="https://sowen.com/media/posts/80/2017-04-05-21.29.00-169x300.jpg" alt="" width="169" height="300"  sizes="(max-width: 768px) 100vw, 768px" srcset="https://sowen.com/media/posts/80/responsive/2017-04-05-21.29.00-169x300-xs.jpg 300w ,https://sowen.com/media/posts/80/responsive/2017-04-05-21.29.00-169x300-sm.jpg 480w ,https://sowen.com/media/posts/80/responsive/2017-04-05-21.29.00-169x300-md.jpg 768w"></figure>

Everything looked in order on both machines.  Even the rechargable battery on one of the boards was fine and showed no signs of leakage and all the caps were visually ok.

<a href="http://www.sowen.com/1048/retro-challenge-20174-ice-ice-maybe/2017-04-05-23-06-07/"   rel="attachment wp-att-1062"><figure class="alignnone size-medium wp-image-1062"><img loading="lazy"  src="https://sowen.com/media/posts/80/2017-04-05-23.06.07-169x300.jpg" alt="" width="169" height="300"  sizes="(max-width: 768px) 100vw, 768px" srcset="https://sowen.com/media/posts/80/responsive/2017-04-05-23.06.07-169x300-xs.jpg 300w ,https://sowen.com/media/posts/80/responsive/2017-04-05-23.06.07-169x300-sm.jpg 480w ,https://sowen.com/media/posts/80/responsive/2017-04-05-23.06.07-169x300-md.jpg 768w"></figure></a>

According to the manual, these could be connected to a CP/M machine running their software (which I did not have) or used with a dumb terminal.  The terminal options looked like the easy option, so I figured I'd give it a go with PuTTY running my Linux desktop

<figure class="alignnone size-medium wp-image-1049"><img loading="lazy"  src="https://sowen.com/media/posts/80/2017-04-06-19.16.04-169x300.jpg" alt="" width="169" height="300"  sizes="(max-width: 768px) 100vw, 768px" srcset="https://sowen.com/media/posts/80/responsive/2017-04-06-19.16.04-169x300-xs.jpg 300w ,https://sowen.com/media/posts/80/responsive/2017-04-06-19.16.04-169x300-sm.jpg 480w ,https://sowen.com/media/posts/80/responsive/2017-04-06-19.16.04-169x300-md.jpg 768w"></figure>

Sadly, no combination of serial cables, baud rates, ports, with or without the probe* gave any joy.  The units both powered up and the lights came on, but I just couldn't get anything coming out of the serial port.

* The probe needs two 60 pin ribbon cables - which I don't have.  The unit should work without (and should report 'No probe connected' if used for debugging.)  If I used 40 way cables, though, the lights came on - but still nothing on the serial port.

I wondered if all of the cables and adapters I had were faulty, but figured that plugging in the Zax ICD278 couldn't make things any worse

<a href="http://www.sowen.com/1048/retro-challenge-20174-ice-ice-maybe/2017-04-06-19-18-20/"   rel="attachment wp-att-1050"><figure class="alignnone size-medium wp-image-1050"><img loading="lazy"  src="https://sowen.com/media/posts/80/2017-04-06-19.18.20-169x300.jpg" alt="" width="169" height="300"  sizes="(max-width: 768px) 100vw, 768px" srcset="https://sowen.com/media/posts/80/responsive/2017-04-06-19.18.20-169x300-xs.jpg 300w ,https://sowen.com/media/posts/80/responsive/2017-04-06-19.18.20-169x300-sm.jpg 480w ,https://sowen.com/media/posts/80/responsive/2017-04-06-19.18.20-169x300-md.jpg 768w"></figure></a>

But it turns out that this sprang in to life with some console messages straight away!  I hadn't opened this one up to check the caps or battery, and I hadn't looked through the manual at all, but it seemed to work and typing random commands seemed to do things.  Typing a R for example showed the current state of all Z80 registers.  So, it was worth reading the manual and trying things out

<figure class="alignnone size-medium wp-image-1051"><img loading="lazy"  src="https://sowen.com/media/posts/80/2017-04-06-20.56.23-300x169.jpg" alt="" width="300" height="169"  sizes="(max-width: 768px) 100vw, 768px" srcset="https://sowen.com/media/posts/80/responsive/2017-04-06-20.56.23-300x169-xs.jpg 300w ,https://sowen.com/media/posts/80/responsive/2017-04-06-20.56.23-300x169-sm.jpg 480w ,https://sowen.com/media/posts/80/responsive/2017-04-06-20.56.23-300x169-md.jpg 768w"></figure>

One of the first things I learned is that the manual isn't for a Zax ICD278, but for a Zax ERX 64180 (well, ok, I could have just read what was written on the cover!).  Some of the instructions worked though, so, for example, DI 100,120 would show a disassembly of the code from 0x0100 to 0x0120.  However, a lot of things didn't work, so I needed to find out what I needed to do.

Luckily, <a href="https://archive.org/details/@jason_scott"  class="extlink extlink-icon-1"  >some kind soul</a> had already scanned the manual and uploaded it to <a href="https://ia800306.us.archive.org/18/items/icd278_part1/ICD278_Part1.pdf"  class="extlink extlink-icon-1"  >Archive.org</a> :-)

<a href="http://www.sowen.com/1048/retro-challenge-20174-ice-ice-maybe/2017-04-06-21-08-42-1/"   rel="attachment wp-att-1053"><figure class="alignnone size-medium wp-image-1053"><img loading="lazy"  src="https://sowen.com/media/posts/80/2017-04-06-21.08.42-1-300x214.jpg" alt="" width="300" height="214"  sizes="(max-width: 768px) 100vw, 768px" srcset="https://sowen.com/media/posts/80/responsive/2017-04-06-21.08.42-1-300x214-xs.jpg 300w ,https://sowen.com/media/posts/80/responsive/2017-04-06-21.08.42-1-300x214-sm.jpg 480w ,https://sowen.com/media/posts/80/responsive/2017-04-06-21.08.42-1-300x214-md.jpg 768w"></figure></a>

So, with a little bit of knowledge, it was time to plug this in to a Z80 machine and test it out.  By an amazing twist of fate, I happened to have a RC2014 to hand, so I whipped the CPU out and plugged in the long dangly attached to the Zax.

<a href="http://www.sowen.com/1048/retro-challenge-20174-ice-ice-maybe/2017-04-06-21-08-01-1/"   rel="attachment wp-att-1052"><figure class="alignnone size-medium wp-image-1052"><img loading="lazy"  src="https://sowen.com/media/posts/80/2017-04-06-21.08.01-1-300x253.jpg" alt="" width="300" height="253"  sizes="(max-width: 768px) 100vw, 768px" srcset="https://sowen.com/media/posts/80/responsive/2017-04-06-21.08.01-1-300x253-xs.jpg 300w ,https://sowen.com/media/posts/80/responsive/2017-04-06-21.08.01-1-300x253-sm.jpg 480w ,https://sowen.com/media/posts/80/responsive/2017-04-06-21.08.01-1-300x253-md.jpg 768w"></figure></a>

It turns out to work great, and in no time at all I was able to type in Z80 assembly code, list it out, and execute just that bit of code!  This is just a tiny fraction of what this machine is capable of though, and the amount of options for break points, tracing, history and register manipulation is probably beyond what I will ever need or understand, but I can already see a lot of instances where this will save me burning many many many ROMs!

However, I had already violated my initial rule - Don't plug things in until after you've taken them apart.  So, time to hit it with screwdrivers to check the innards are visually ok

<a href="http://www.sowen.com/1048/retro-challenge-20174-ice-ice-maybe/2017-04-07-00-15-35/"   rel="attachment wp-att-1054"><figure class="alignnone size-medium wp-image-1054"><img  src="https://sowen.com/media/posts/80/2017-04-07-00.15.35-169x300.jpg" alt="" width="169" height="300"  sizes="(max-width: 768px) 100vw, 768px" srcset="https://sowen.com/media/posts/80/responsive/2017-04-07-00.15.35-169x300-xs.jpg 300w ,https://sowen.com/media/posts/80/responsive/2017-04-07-00.15.35-169x300-sm.jpg 480w ,https://sowen.com/media/posts/80/responsive/2017-04-07-00.15.35-169x300-md.jpg 768w"></figure></a> <a href="http://www.sowen.com/1048/retro-challenge-20174-ice-ice-maybe/2017-04-07-00-17-28/"   rel="attachment wp-att-1055"><figure class="alignnone size-medium wp-image-1055"><img loading="lazy"  src="https://sowen.com/media/posts/80/2017-04-07-00.17.28-300x169.jpg" alt="" width="300" height="169"  sizes="(max-width: 768px) 100vw, 768px" srcset="https://sowen.com/media/posts/80/responsive/2017-04-07-00.17.28-300x169-xs.jpg 300w ,https://sowen.com/media/posts/80/responsive/2017-04-07-00.17.28-300x169-sm.jpg 480w ,https://sowen.com/media/posts/80/responsive/2017-04-07-00.17.28-300x169-md.jpg 768w"></figure></a>

Apart from a bit of dust and grime, it all looked pretty good inside.  It's nowhere nearly as complex as the ICE Engine BXs are, but there's still a lot packed inside.  However, I'm happy that this will be a regular tool in my arsenal against Z80 programming.

As for the ICE Engine BXs - I honestly believe that they both work, but I either don't have the right cables, or just don't know what I am doing.  (Probably both actually).  It might even be as easy as leaving them plugged in long enough to recharge the internal battery.  I don't know.  Yet.  I will revisit them again in the future, but for RC2017/4, I have ticked them off of the list for now.
            ]]>
        </content>
    </entry>
    <entry>
        <title>Retro Challenge 2017/4 - Getting The Excuses In Early</title>
        <author>
            <name>Spencer</name>
        </author>
        <link href="https://sowen.com/retro-challenge-20174-getting-the-excuses-in-early.html"/>
        <id>https://sowen.com/retro-challenge-20174-getting-the-excuses-in-early.html</id>

        <updated>2017-04-04T14:39:52+01:00</updated>
            <summary type="html">
                <![CDATA[
                    So, once again <a href="http://www.retrochallenge.org/">Retro Challenge</a> is upon us, and, yes, the timing is offset , but an April challenge should mean that more people are able to participate.

To try and stay ahead of the curve this time, I thought I'd get in early and give my excuses for why I failed to complete the challenge this time around.  I know most people leave this part until the very end, so hopefully I can impress the judges with my efficiency!

The very first weekend in April was the <a href="http://www.makerfaireuk.com/">UK Maker Faire</a> in Newcastle (which was awesome, thank you for asking), so that took 3 days out of April for me. Then at Easter the <a href="http://edinburgh.makerfaire.com/">Edinburgh Mini Maker Faire</a> will also be robbing me of 3 days.  And, finally, <a href="http://www.vcfe.org/E/">Vintage Computer Festival Europe</a> is on from 29th April to 1st May.  So, with travel and prep for these events, I feel like I'll be left with about 4.5 days in which to complete the challenge.  Lets see how that works out...

<a href="http://www.sowen.com/1029/retro-challenge-20174-getting-the-excuses-in-early/retro-challenge-2017/" rel="attachment wp-att-1043"><figure class="alignnone size-medium wp-image-1043"><img loading="lazy"  src="https://sowen.com/media/posts/79/Retro-Challenge-2017-300x169.jpg" alt="" width="300" height="169"  sizes="(max-width: 768px) 100vw, 768px" srcset="https://sowen.com/media/posts/79/responsive/Retro-Challenge-2017-300x169-xs.jpg 300w ,https://sowen.com/media/posts/79/responsive/Retro-Challenge-2017-300x169-sm.jpg 480w ,https://sowen.com/media/posts/79/responsive/Retro-Challenge-2017-300x169-md.jpg 768w"></figure></a>


                ]]>
            </summary>
        <content type="html">
            <![CDATA[
                So, once again <a href="http://www.retrochallenge.org/"  class="extlink extlink-icon-1"  >Retro Challenge</a> is upon us, and, yes, the timing is offset , but an April challenge should mean that more people are able to participate.

To try and stay ahead of the curve this time, I thought I'd get in early and give my excuses for why I failed to complete the challenge this time around.  I know most people leave this part until the very end, so hopefully I can impress the judges with my efficiency!

The very first weekend in April was the <a href="http://www.makerfaireuk.com/"  class="extlink extlink-icon-1"  >UK Maker Faire</a> in Newcastle (which was awesome, thank you for asking), so that took 3 days out of April for me. Then at Easter the <a href="http://edinburgh.makerfaire.com/"  class="extlink extlink-icon-1"  >Edinburgh Mini Maker Faire</a> will also be robbing me of 3 days.  And, finally, <a href="http://www.vcfe.org/E/"  class="extlink extlink-icon-1"  >Vintage Computer Festival Europe</a> is on from 29th April to 1st May.  So, with travel and prep for these events, I feel like I'll be left with about 4.5 days in which to complete the challenge.  Lets see how that works out...

<a href="http://www.sowen.com/1029/retro-challenge-20174-getting-the-excuses-in-early/retro-challenge-2017/"   rel="attachment wp-att-1043"><figure class="alignnone size-medium wp-image-1043"><img loading="lazy"  src="https://sowen.com/media/posts/79/Retro-Challenge-2017-300x169.jpg" alt="" width="300" height="169"  sizes="(max-width: 768px) 100vw, 768px" srcset="https://sowen.com/media/posts/79/responsive/Retro-Challenge-2017-300x169-xs.jpg 300w ,https://sowen.com/media/posts/79/responsive/Retro-Challenge-2017-300x169-sm.jpg 480w ,https://sowen.com/media/posts/79/responsive/Retro-Challenge-2017-300x169-md.jpg 768w"></figure></a>

So, before I get in to the Retro Challenge I've set myself, here's a bit of history to bring you all up to date.  A few weeks ago I got an email from Tom de Havas saying that there was a bunch of Z80 based stuff going spare at a company that no longer needs it, and would I be interested?  There really is only one answer to that, which resulted in a 350 mile road trip and a van full of old kit.  Then came the more difficult question that I asked myself; what the hell is all of this stuff and what am I going to do with it?  With the realization that Retro Challenge was approaching I knew that I had a challenge on my hands!

The primary goal I've set myself is to identify and catalog just what I've got here.  Some of it is vaguely obvious, but I'd like to get in to details about exactly what it is/was/does.  A lot of it is new old stock, so it probably will work, but I'd like to know for sure.  Other items are certainly used, but, again, I'd like to know if it still works.  To test things, I'm really going to have to know what they are, right down to the pin out of some of the connectors, so that will all need documenting too.  And then there's the documentation, which 5 minutes on Google makes me think these manuals aren't online anywhere, so there's a scanning/archiving challenge here too.

Yesterday I took a very rough inventory, which is the first step towards knowing what I'll be doing for the rest of the month.  Here's some photos and my first guesses about what I've got;

<a href="http://www.sowen.com/1029/retro-challenge-20174-getting-the-excuses-in-early/retrochallenge2017-2/"   rel="attachment wp-att-1033"><figure class="alignnone size-medium wp-image-1033"><img loading="lazy"  src="https://sowen.com/media/posts/79/RetroChallenge2017-2-300x169.jpg" alt="" width="300" height="169"  sizes="(max-width: 768px) 100vw, 768px" srcset="https://sowen.com/media/posts/79/responsive/RetroChallenge2017-2-300x169-xs.jpg 300w ,https://sowen.com/media/posts/79/responsive/RetroChallenge2017-2-300x169-sm.jpg 480w ,https://sowen.com/media/posts/79/responsive/RetroChallenge2017-2-300x169-md.jpg 768w"></figure></a>

There are 3 Z80 In Circuit Emulators.  Two from Adtek and one from Zax, all with manuals.  It looks like they will either run from a CP/M machine (although no software is included) or from a dumb terminal.

<a href="http://www.sowen.com/1029/retro-challenge-20174-getting-the-excuses-in-early/retrochallenge2017-1/"   rel="attachment wp-att-1032"><figure class="alignnone size-medium wp-image-1032"><img loading="lazy"  src="https://sowen.com/media/posts/79/RetroChallenge2017-1-300x169.jpg" alt="" width="300" height="169"  sizes="(max-width: 768px) 100vw, 768px" srcset="https://sowen.com/media/posts/79/responsive/RetroChallenge2017-1-300x169-xs.jpg 300w ,https://sowen.com/media/posts/79/responsive/RetroChallenge2017-1-300x169-sm.jpg 480w ,https://sowen.com/media/posts/79/responsive/RetroChallenge2017-1-300x169-md.jpg 768w"></figure></a>

There is a whole load of Euro Cards.  Some of these are Z80 single board computers, some are communication cards and some are I/O cards.  I believe they are propriety, but hopefully they'll have standard bus pinouts so I stand a chance of working out what they do.

<a href="http://www.sowen.com/1029/retro-challenge-20174-getting-the-excuses-in-early/retrochallenge2017-12/"   rel="attachment wp-att-1041"><figure class="alignnone size-medium wp-image-1041"><img loading="lazy"  src="https://sowen.com/media/posts/79/RetroChallenge2017-12-300x169.jpg" alt="" width="300" height="169"  sizes="(max-width: 768px) 100vw, 768px" srcset="https://sowen.com/media/posts/79/responsive/RetroChallenge2017-12-300x169-xs.jpg 300w ,https://sowen.com/media/posts/79/responsive/RetroChallenge2017-12-300x169-sm.jpg 480w ,https://sowen.com/media/posts/79/responsive/RetroChallenge2017-12-300x169-md.jpg 768w"></figure></a>

Along with the cards is a lot of backplanes.  Mainly passive 2, 10 or 12 slot boards, but also some active (?) 2 slot boards and a coupld of rack power supplies.

<a href="http://www.sowen.com/1029/retro-challenge-20174-getting-the-excuses-in-early/retrochallenge2017-3/"   rel="attachment wp-att-1034"><figure class="alignnone size-medium wp-image-1034"><img loading="lazy"  src="https://sowen.com/media/posts/79/RetroChallenge2017-3-300x169.jpg" alt="" width="300" height="169"  sizes="(max-width: 768px) 100vw, 768px" srcset="https://sowen.com/media/posts/79/responsive/RetroChallenge2017-3-300x169-xs.jpg 300w ,https://sowen.com/media/posts/79/responsive/RetroChallenge2017-3-300x169-sm.jpg 480w ,https://sowen.com/media/posts/79/responsive/RetroChallenge2017-3-300x169-md.jpg 768w"></figure></a>

This is a CP/M machine, with a few cards and a couple of 5 1/4" drives with discs (one is labelled CP/M).  It looks pretty complete, although very dirty. Certainly needs a thorough inspection before powering it up.  25 pin D socket labelled video might prove challenging to get anything out of it.

<a href="http://www.sowen.com/1029/retro-challenge-20174-getting-the-excuses-in-early/retrochallenge2017-4/"   rel="attachment wp-att-1035"><figure class="alignnone size-medium wp-image-1035"><img loading="lazy"  src="https://sowen.com/media/posts/79/RetroChallenge2017-4-300x169.jpg" alt="" width="300" height="169"  sizes="(max-width: 768px) 100vw, 768px" srcset="https://sowen.com/media/posts/79/responsive/RetroChallenge2017-4-300x169-xs.jpg 300w ,https://sowen.com/media/posts/79/responsive/RetroChallenge2017-4-300x169-sm.jpg 480w ,https://sowen.com/media/posts/79/responsive/RetroChallenge2017-4-300x169-md.jpg 768w"></figure></a>

Large rack with 3 backplanes and a lot of power supply stuff at the back.  The backplanes look prototype-ish, but it might be a good case to use the new backplanes as shown above.

<a href="http://www.sowen.com/1029/retro-challenge-20174-getting-the-excuses-in-early/retrochallenge2017-5/"   rel="attachment wp-att-1036"><figure class="alignnone size-medium wp-image-1036"><img loading="lazy"  src="https://sowen.com/media/posts/79/RetroChallenge2017-5-300x169.jpg" alt="" width="300" height="169"  sizes="(max-width: 768px) 100vw, 768px" srcset="https://sowen.com/media/posts/79/responsive/RetroChallenge2017-5-300x169-xs.jpg 300w ,https://sowen.com/media/posts/79/responsive/RetroChallenge2017-5-300x169-sm.jpg 480w ,https://sowen.com/media/posts/79/responsive/RetroChallenge2017-5-300x169-md.jpg 768w"></figure></a>

4 parallel keyboards.  Very very dusty. A couple with hex input number pads.  At least one of these should work with the CP/M machine shown above.

<a href="http://www.sowen.com/1029/retro-challenge-20174-getting-the-excuses-in-early/retrochallenge2017-8/"   rel="attachment wp-att-1037"><figure class="alignnone size-medium wp-image-1037"><img loading="lazy"  src="https://sowen.com/media/posts/79/RetroChallenge2017-8-300x169.jpg" alt="" width="300" height="169"  sizes="(max-width: 768px) 100vw, 768px" srcset="https://sowen.com/media/posts/79/responsive/RetroChallenge2017-8-300x169-xs.jpg 300w ,https://sowen.com/media/posts/79/responsive/RetroChallenge2017-8-300x169-sm.jpg 480w ,https://sowen.com/media/posts/79/responsive/RetroChallenge2017-8-300x169-md.jpg 768w"></figure></a>

Lots of power supplies and power regulators, including a PSU kit from Farnell.  All new.

<a href="http://www.sowen.com/1029/retro-challenge-20174-getting-the-excuses-in-early/retrochallenge2017-9/"   rel="attachment wp-att-1038"><figure class="alignnone size-medium wp-image-1038"><img loading="lazy"  src="https://sowen.com/media/posts/79/RetroChallenge2017-9-300x169.jpg" alt="" width="300" height="169"  sizes="(max-width: 768px) 100vw, 768px" srcset="https://sowen.com/media/posts/79/responsive/RetroChallenge2017-9-300x169-xs.jpg 300w ,https://sowen.com/media/posts/79/responsive/RetroChallenge2017-9-300x169-sm.jpg 480w ,https://sowen.com/media/posts/79/responsive/RetroChallenge2017-9-300x169-md.jpg 768w"></figure></a>

More power supplies and enclosures.  Also new.  Looks really high quality (expensive)

<a href="http://www.sowen.com/1029/retro-challenge-20174-getting-the-excuses-in-early/retrochallenge2017-10/"   rel="attachment wp-att-1039"><figure class="alignnone size-medium wp-image-1039"><img loading="lazy"  src="https://sowen.com/media/posts/79/RetroChallenge2017-10-300x169.jpg" alt="" width="300" height="169"  sizes="(max-width: 768px) 100vw, 768px" srcset="https://sowen.com/media/posts/79/responsive/RetroChallenge2017-10-300x169-xs.jpg 300w ,https://sowen.com/media/posts/79/responsive/RetroChallenge2017-10-300x169-sm.jpg 480w ,https://sowen.com/media/posts/79/responsive/RetroChallenge2017-10-300x169-md.jpg 768w"></figure></a>

Parallel port EPROM programmer.

<a href="http://www.sowen.com/1029/retro-challenge-20174-getting-the-excuses-in-early/retrochallenge2017-14/"   rel="attachment wp-att-1031"><figure class="alignnone size-medium wp-image-1031"><img loading="lazy"  src="https://sowen.com/media/posts/79/RetroChallenge2017-14-300x169.jpg" alt="" width="300" height="169"  sizes="(max-width: 768px) 100vw, 768px" srcset="https://sowen.com/media/posts/79/responsive/RetroChallenge2017-14-300x169-xs.jpg 300w ,https://sowen.com/media/posts/79/responsive/RetroChallenge2017-14-300x169-sm.jpg 480w ,https://sowen.com/media/posts/79/responsive/RetroChallenge2017-14-300x169-md.jpg 768w"></figure></a>

PIC development board and a couple of newish looking communication boards?  One has Tx on the EPROM, the other has RX.

<a href="http://www.sowen.com/1029/retro-challenge-20174-getting-the-excuses-in-early/retrochallenge2017-11/"   rel="attachment wp-att-1040"><figure class="alignnone size-medium wp-image-1040"><img loading="lazy"  src="https://sowen.com/media/posts/79/RetroChallenge2017-11-169x300.jpg" alt="" width="169" height="300"  sizes="(max-width: 768px) 100vw, 768px" srcset="https://sowen.com/media/posts/79/responsive/RetroChallenge2017-11-169x300-xs.jpg 300w ,https://sowen.com/media/posts/79/responsive/RetroChallenge2017-11-169x300-sm.jpg 480w ,https://sowen.com/media/posts/79/responsive/RetroChallenge2017-11-169x300-md.jpg 768w"></figure></a>

A couple of new 240 x 64 LCD displays

&nbsp;
            ]]>
        </content>
    </entry>
</feed>